Showing posts with label Gracielle Design. Show all posts

Friday, June 19, 2020

Gracie's new set: Words of Hope...

Hello there inky friends!  Today I'm joining my fellow Graciellie Design teamies as we share Gracie's newest digi set:  "Words of Hope".  This gorgeous floral set includes several beautiful orchid images as well as five inspirational sentiments perfect for those cards that inspire hope and courage.  

I decided to use the single orchid image to create a potted plant.  My sister can grow orchids so well and I wish I could too, but they just don't thrive in my care.  I don't know what it is.  I follow the directions, care for them with white gloves and they just bloom once and dwindle away.  BOO!  SOOOO... This digi set gives me the opportunity to create a plant I would love to have!  I love the creamy white orchids with just a hint of lemon yellow and green so I created my plant to feature these beauties.  
 I doodled the stalks (compete with the sticks that help them stand tall) and included some pretty leaves at the base.  I also added a short squatty pot for them to grow from. 
I just love the RUMI sentiment and it works perfectly with such a calm floral arrangement.  :)  

Thanks for hopping over.  I hope you're inspired by this set too!  See you next time!!!

Friday, May 22, 2020

Spring/Summer Coffee Lovers Hop Begins NOW!


Hello there coffee loving crafters!  I'm so excited to begin the Spring/Summer Coffee Lovers HOP today with everyone!  I've been gathering stamps and creating fun projects to share throughout the week and I can't wait to share them with everyone.  I can't wait to see what YOU have to share too!  

I want to say thank you to all 73 of our Super Sponsors joining in on the fun and want to say THANK YOU FOR YOUR GENEROSITY and SUPPORT!  This "little" hop is always a RAY of Sunshine for many of us stampers and creators and this season, it brings some much needed LOVE and LIGHT to  us all!  Thank you to all the hoppers too!  Without YOU, we'd be just STUCK!
For my first project, I decided to work with Super Sponsor Graciellie Design's brand new COFFEE SET.  You can check it out HERE.  
I started out by creating a RAINBOW COLLECTION of ATC cards to add to some white cardfronts. I think they turned out so HAPPY and encouraging.  The whole collection of cards will make someone smile!  


 Look at that line-up!  There's just something so happy about a rainbow!  Take a closer peek and you'll notice I added some coordinating "flicks" to each ATC and each card base so that the ATC blends seamlessly....yet makes that ATC the STAR!  Don'tcha just love it!?
 YUM!...
 Rainbows of fun!

And here you have it all wrapped up in a rainbow of Hemptique twine.  WAHOO!

Thanks for hopping over and I'll see you along the hop!  :).

Friday, May 8, 2020

Hope And Strength...Gracie's New Digi Set

Hello there inky friends!  Hope you're hanging in there!  I just hanging around, teaching online and then making a mess of my house!  HA HA.  It's amazing how much of a mess I can make spending ALL DAY for MONTHS at home!

I decided to work on making a card with this new gorgeous digi set called Hope and Strength just released by Graciellie Designs.  This set includes two beautiful dragonfly images and seven perfectly perfect sentiments.  I love the mix of fonts too!  

In thinking about how I would feature this set, I envisioned the drafting images that are out there of all kinds of things.  Since I can't do that, I thought I'd just make due and mimic some of those elements.  I started out by creating a box to contain the image and the sentiment and then added some horizontal lines here and there as well as adding some little square "dots" here and there.  I like how the final design turned out so I clicked save and printed it.  


After cutting out and coloring the dragonfly with Copics, I mounted the design on some green cardstock and then offset some pink cardstock before mounting directly onto a white card base.  I added some microfine glitter to the wings with glaze and glitter.  That gave the wings a dimensional effect after it dried. 
Thanks so much for stopping by today.  I hope my card inspires you to create something beautiful today! 

Saturday, February 22, 2020

Hey Beautiful! Gracie's new set...

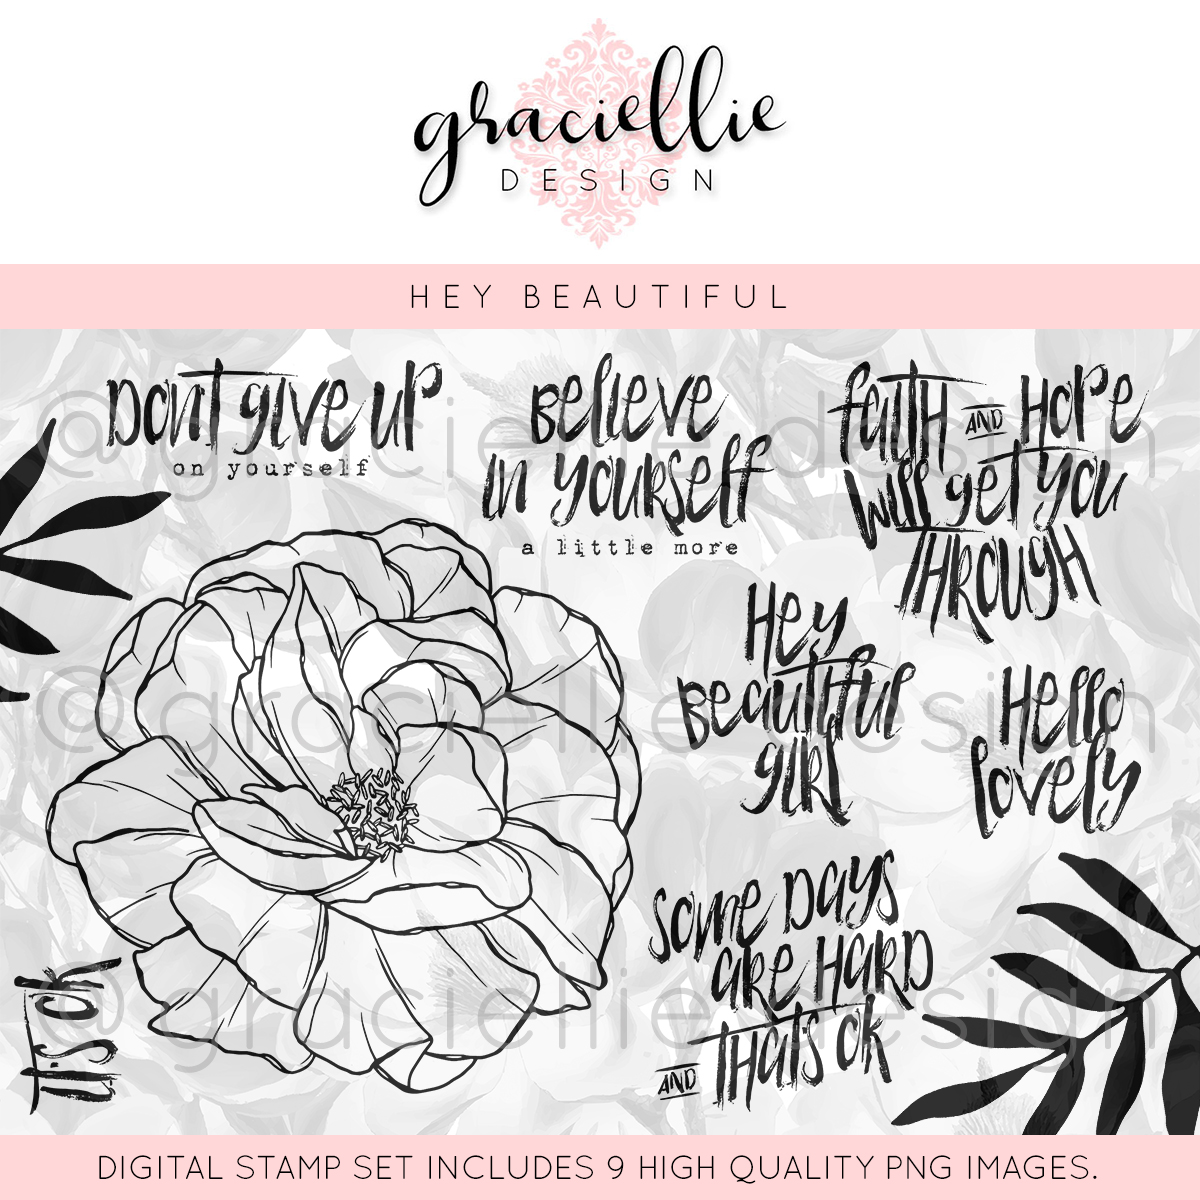
Hello there inky friends!  Today I'm sharing a sweet card featuring one of the newest digital sets by Graciellie Designs.  This set is called "Hey Beautiful" (it's on sale now!) and it features a gorgeous old fashioned rose, some fronds and of course, some amazing sentiments.  My card design was inspired by the sentiment "Faith and Hope will get you Through".  I thought the sentiment was beautiful and I could see a heart in the shape of the sentiment so I decided to take the rose image and repeat it in a heart shaped layout to frame the lovely sentiment.  
Hey Beautiful Mega Digital Stamp Set
To create the digital design, I lightened up the roses so that I could give a hint of age.  I then layered them digitally and then printed the design.  I also printed a few of the fronds so that I could use them on my design.  
After coloring the image with Copics (and Staedtler Microfine black pen, I fussy cut the image and mounted it onto a tag created with some of the same color in the design.  I highlighted the edge of the striped paper to coordinate with the design. 
Next, I tied some coral ribbon (from Stamps of Life) around the tag and added some twine.  I mounted it onto a sweet diecut panel (Scalloped Rectangles die from La La Land Crafts).  To finish things off, I added three little pearls.  

Thanks for hopping over to check out my card.  I'll be back soon with another project featuring a brand new Graciellie Design Digi set!  Come back soon!


Saturday, February 8, 2020

Gracie's Poppies...A Snapshot

Hello there inky friends!  Today I'm trying to spend the day catching up and getting crafty.  I've been a bit overwhelmed with school lately and have just wanted to come home and veggggg out.  This has left a big empty space in my crafty production and has made for a big old mess to remain on my crafty workspace.  I just don't feel like cleaning it up and it is just taking over...I hope this weekend I can get all "Clean Freaky" and get the job done.  UGHH...If not, it's going to take over.  LOL

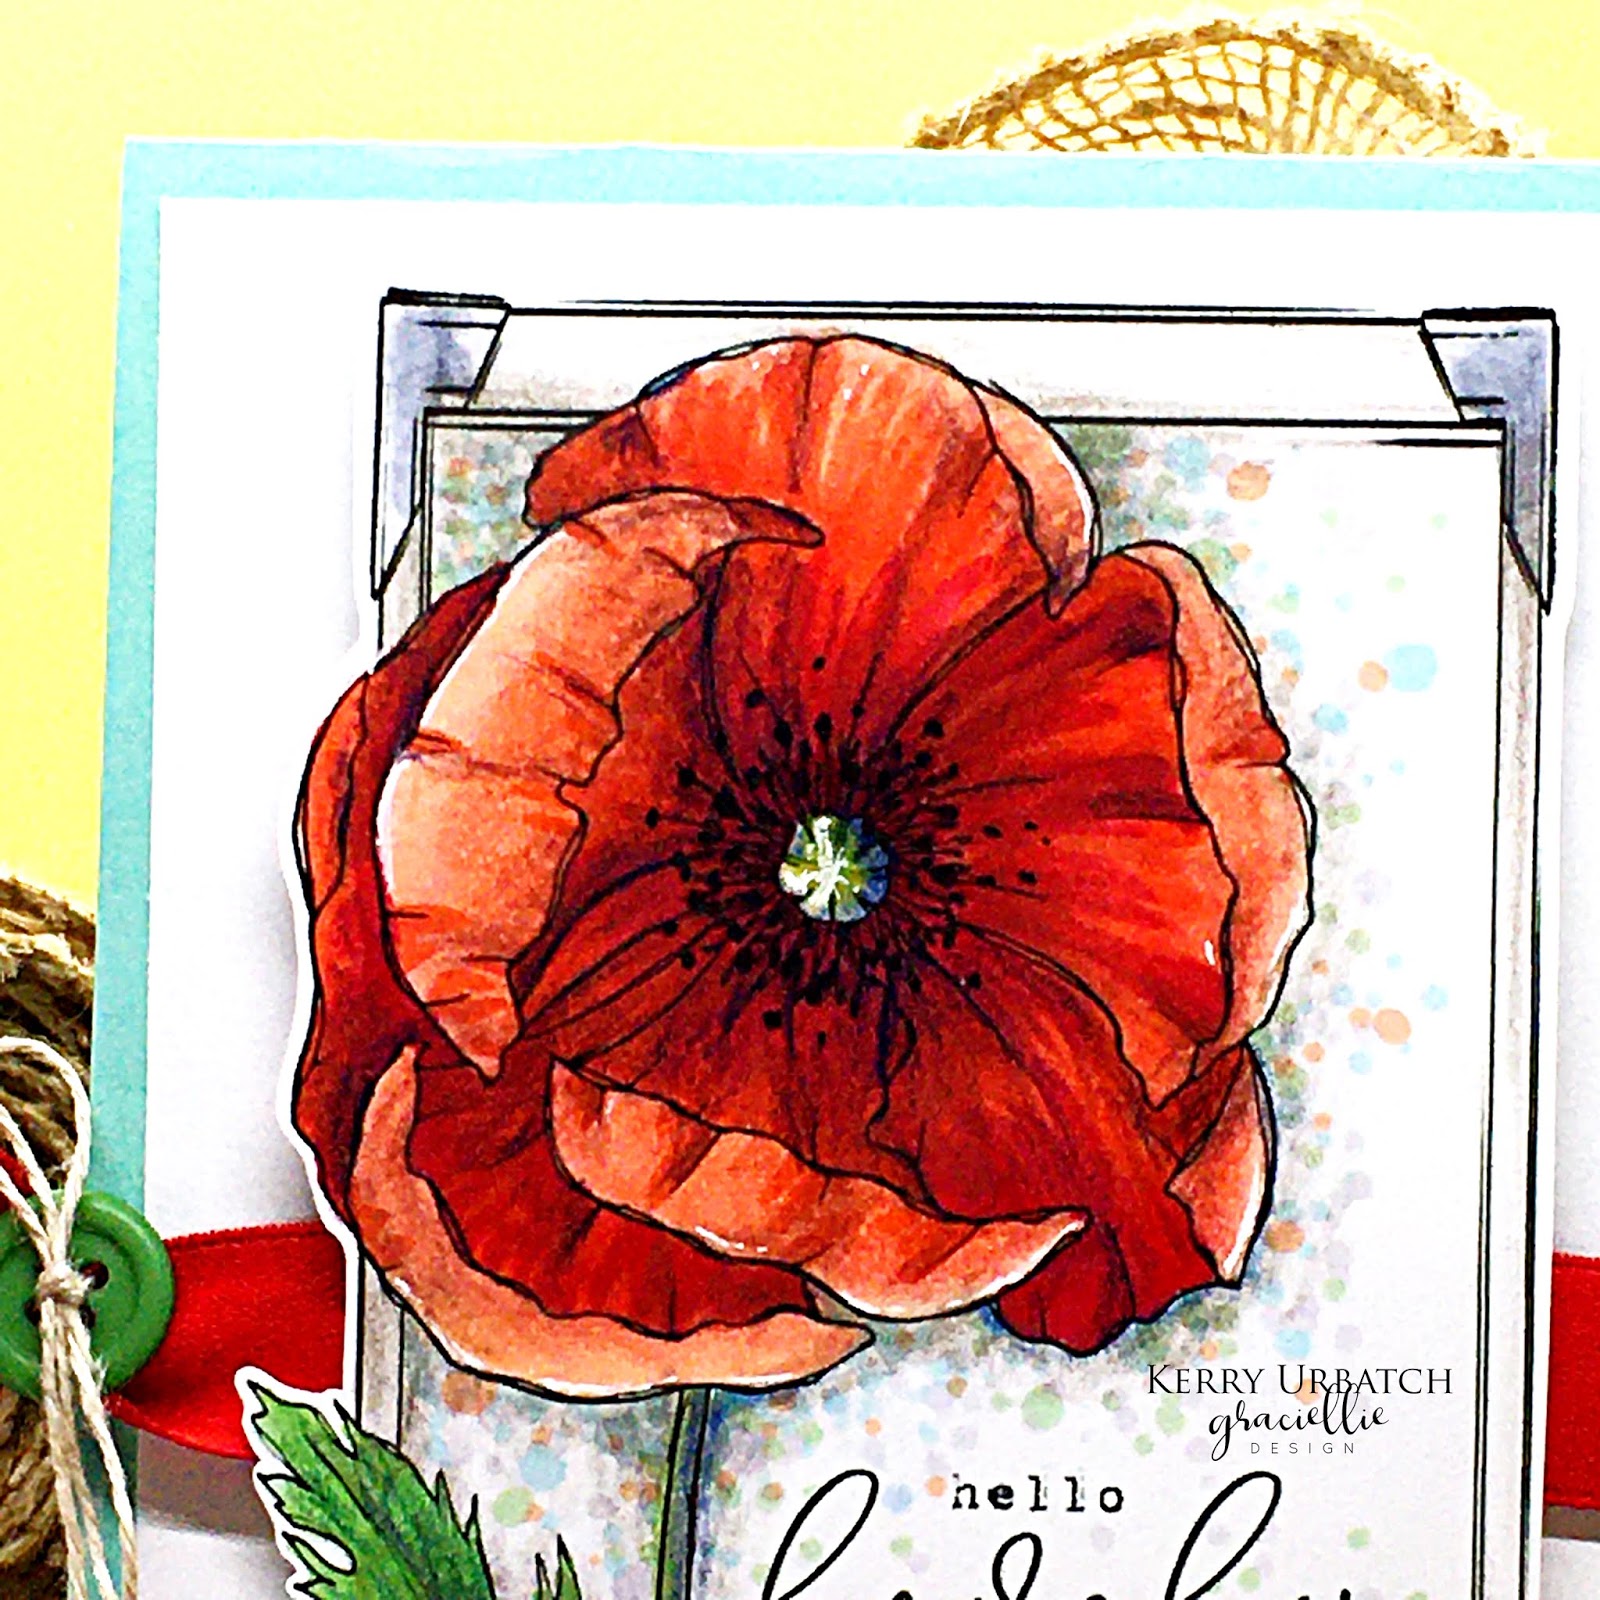
Anyway, I worked on computer this week and fiddled around with a few brand spankin new digi sets from Graciellie Design and I printed some "good looks" for this weekend.  SOOOO.... I spent a few evenenings coloring this image and finally this morning, it was complete.  I don't usually color an image over several days, but I just couldn't get out of the funk this week.  I'm glad I took the time with it because I love how it turned out.  Had I not, it would have most likely been a disaster and would have ended up in the trash-ola!

So to create this card, I combined two images from two different sets that were released in January.  I love the themes and they combine so beautifully. 
Sweet Memories Mega Bundle

Beautiful Day
After overlaying the poppy (and the sentiment) onto the frame image, I printed it out and started coloring.  I used a combination of Copics, Colored pencils and Microfine pens to finish the image.  Since I don't pull or plan my color beforehand, I just grab as I go and finish when I feel it looks done.  This strategy inevitably ends up in about 30 markers used and several different darker colored pencils.  That's why I usually don't share the colors #'s I use...I don't really plan it and it would definitely be a longshot to duplicate. 


When I was working on the inside of the flower, I first started out by coloring it gray...and then I thought it probably wasn't gray but yellow...but I didn't want to research it on the internet.  Sooo...I just added some light yellow on it and then went to town on adding some fun black dots.  I've seen those black poppy seed like dots on those flowers...I thought.  HA HA.  That's how I roll. 
 After coloring the flower, I wanted to tie the flower into the background photo frame so I did a bit of stippling with Copics and then used colored pencils to add details, shadows and a little white pen for some highlights. 
After I was done coloring, I took on the chore of selecting the perfect background card base.  I pulled a lot of colors:  mustard, this foamy green, a more leafy green, a pink, a lavender and a peachy red.  Since I wanted to add a red ribbon to the piece, i selected this foamy green to be the backdrop.  It looked the best paired with the image and really pulled out the faint teal stipples in the image. 

So there you have it!  One project down this week, several more to go.  WOO WEE!

PS...  Hop over to Gracie's digi shop this weekend!  She's got a fabulous sale going on and you can pick up so many of her sets for a steal! 

Saturday, January 4, 2020

Love is In the Air: Graciellie Designs January 2020

Hello there inky friends.  Today I'm sharing a sweet little Lovie-dovie card I created with the new Graciellie Designs January 2020 release digi set called "Love is in the Air".  It's a beautiful set that contains some woodgrain elements and some frilly, curly sweet sentiments.  Check it out!  You can also purchase the complete January Digi bundle HERE.
To create my card, I started out by creating a background using an edited version of the I HEART YOU heart.  I shrunk the image and changed the color as well as turned it into a shadow image.  Then I layered this image repeatedly onto the page to create a heart paper background.  After that, I colored the same heart (resized) using Copic markers before fussy cutting it.  
Next, I machine stitched the background so that I could add a little more texture in the corners and then I brushed the edges with some Catherine Pooler Sand Castle ink.  The final step was distressing the edges with my fingernail and assembling the pretty spray collage.  I added some fun elements like a button from a friend, some feathers from my embellishment stash and a few flat back pearls.  So pretty.  I also added a little strip of sparkly gold cardstock from my scrap bin.  I mounted this panel onto a burgundy panel and a little bit of rosy cardstock to create a stacked layer.  then attached it to a Kraft card base.  FINISHED!
Pretty, pretty.  Now ready to send to someone special!  Thanks for hopping over to check out my card.  I hope you were inspired.  :)

Sunday, December 15, 2019

International Tea Day 2019...

Hello there inky friends!  I'm joining my fellow Coffee Loving Cardmaker designers as we share a little inspiration for International Tea Day 2019!  Many know that I LOVE Matcha tea almost as much as Coffee but I also love just regular Twinings English Breakfast Blend loose leaf tea.  It's such a delicious start to my early weekends!  I decided to make my card color scheme match the tin that I have my loose tea in.  I used the gorgeous Tea-Lightful Digi set from Graciellie Design and colored it with Copic markers.
I also paired it up with some old My Minds Eye Christmas paper from my stash.  I love that the lines in the paper mimic the lines in the cup and help give that almighty glow.  

To finish off my card, I tied a bit of twine around the card front and that was it!  Easy, peasy!

I hope our tea-licious cards inspire you to plug in that teapot and brew a cup today!  Happy Tea day! Hop over to Coffee Loving Cardmakers to learn more about Tea Day!

Hop Roll:
You are invited to the Inlinkz link party!
Click here to enter

Sunday, November 17, 2019

Sunday Sip: Graciellie Designs Farmhouse Christmas!

Hello there inky friends!  It's Sunday Sip day at Coffee Loving Cardmakers blog and I'm sharing a pretty card I created using some of the newest digital stamp sets from Graciellie Design.

To create my pretty "Farmhouse Christmas" Spice Cocoa card, I combined two of Gracie's new sets:  Festive Wreath Mini Bundle and Cheery Cocoa Mini Bundle.  I just LOVE the images and the mix of fun sentiment fonts!  It's PERFECTLY PERFECT for the Christmas season!!!
To create my card, I colored the images with my Copic markers and then added some Glossy Accents to the pinecones and the center of each flower.  I also added a bit of shine to the cinnamon stick.
After coloring, I set the images aside and started working on the base layer.  I mounted a piece of kraft cardstock onto a white card base (topfold) and then flicked some black acrylic paint onto a kraft card panel and then attached some of my favorite burlap ribbon to the Farmhouse sentiment.  I then started layering all the pieces together and voila!  This beauty was complete!
Thanks so much for stopping over to check out my card today!  Hope you have a fabulous week!  See you again soon!

Saturday, March 16, 2019

Be Authentic...A fab new Graciellie Digi Bundle!

Hello there inky friends!  I'm back today with a few cards I created to add to my encouragement stash.  Graciellie's sentiments and images are always the perfect go-to for my encouragement cards!  Today I'm featuring the Graciellie Design digi set called Authentic.  It's a beautiful and inspirational set, don't you think?  Purchase any stamp bundle at 40% off!  Use Code NEWFORYOU at checkout to get your discount!  

Authentic Digital Stamp Set $5.99
 I created this card using MS Word.  I started out by laying down some florals in a cluster then lightened them up to create a watermarked image.  After that, I laid out the larger flower and inserted the leaves too.  These leaves were placed behind the larger flower.  After creating the design, I printed it and cut it out to fit an A2 card layout.
After cutting out the panel, I colored the images using Copic markers.  As I wanted to help keep the background florals very light and "watermark-like", I chose the lightest peach I could find in my Copic stash.   
To finish up the card, I glued a golden piece of cardstock along the right edge of the colored panel, attached some vibrant orange satin ribbon to the kraft card base and popped the stamped panel over that.  I added five flat-backed pearls to the card and called it DONE!  

I was able to create two additional cards using digital images I had included in my original MS Word document.  I love that I can create multiple cards using just one sheet of white cardstock!  For my second and third card, I created a leafy background by laying out the leaf cluster image onto my word document.  I then included one loose leaf and a smaller single floral image.  I also included two sentiments.  

To create the first leafy background card, I cut the leaf panel so that it would fit nicely on an A2 card base with a double mount of lavenders.  I then colored the images with Copic markers.  Next, I cut out the floral and the separate leaf cluster then attached that to my sentiment banner.  
As with most of my cards, I include ribbon, twine and other embellishments.  I just can't get enough of  ribbon!
 A closer look at the flower will give you a hint of the sparkly bits on my pretty flower!
 Leaves, leaves, leaves!  Love 'em!

For my third and final card, I incorporated the use of the remaining portion of my leafy background.  I tied in the sentiment and a fun diecut border frame.
 I added a bit of black splatter to tie in the black on the images.
 Of course, adding a pretty bow with the remaining ribbon was necessary.

...a reason to smile...That makes me think of YELLOW!  Sooo...I tied in the "smile with a yummy yellow button and a milky yellow card base.  HAPPY, HAPPY, HAPPY!

Thanks so much for hopping over to check out these cards.  Remember, you can get a steal of a deal on this (and other) digi sets by including the secret code upon checkout.  What are you waiting for?  Hop over to Gracie's shop and go shopping!