Showing posts with label Valentines Day. Show all posts

Saturday, January 4, 2020

Love is In the Air: Graciellie Designs January 2020

Hello there inky friends.  Today I'm sharing a sweet little Lovie-dovie card I created with the new Graciellie Designs January 2020 release digi set called "Love is in the Air".  It's a beautiful set that contains some woodgrain elements and some frilly, curly sweet sentiments.  Check it out!  You can also purchase the complete January Digi bundle HERE.
To create my card, I started out by creating a background using an edited version of the I HEART YOU heart.  I shrunk the image and changed the color as well as turned it into a shadow image.  Then I layered this image repeatedly onto the page to create a heart paper background.  After that, I colored the same heart (resized) using Copic markers before fussy cutting it.  
Next, I machine stitched the background so that I could add a little more texture in the corners and then I brushed the edges with some Catherine Pooler Sand Castle ink.  The final step was distressing the edges with my fingernail and assembling the pretty spray collage.  I added some fun elements like a button from a friend, some feathers from my embellishment stash and a few flat back pearls.  So pretty.  I also added a little strip of sparkly gold cardstock from my scrap bin.  I mounted this panel onto a burgundy panel and a little bit of rosy cardstock to create a stacked layer.  then attached it to a Kraft card base.  FINISHED!
Pretty, pretty.  Now ready to send to someone special!  Thanks for hopping over to check out my card.  I hope you were inspired.  :)

Monday, November 25, 2019

TCP Sneaky Peek Week Day 6: I'm NOT Fat!

 
Hello there inky friends!  I'm back...Yes, I was away for a few days awaiting the delivery of my new nephew.  He arrived Saturday!  He is just a beautiful baby!  Now that I'm home, I am getting back into my projects and posting schedule.

Today is DAY 6 of The Cat's Pajamas Sneaky Peek Week and we're sharing inspiration featuring this adorable panda set called "I'm NOT Fat".  Hee hee...
I pulled a few images from the set and stamped/colored them and then decided I needed a little bit more LOVE!  I took a peek at the "STUCK ON YOU" set and noticed there was a perfect little heart die that I could use for my background design.  I diecut the hearts in the background from that stamp/die set and then stamped the little hearts (from the I'm not Fat" set) using some pink ink.
Isn't he just the cutest little panda?  I love each one in this set.  I can't wait to create a cute birthday card with the one featured in the sneak image.  

After stamping the hearts, I splattered some black acrylic paint onto the card and then used some pink/peach ink to distress around the hearts.  I then mounted the panel onto some red cardstock and then the stamped panel onto a white card base.  I tied the ribbon onto the edge of the sentiment and then colored one of the white diecut hearts red.  
Thanks for hopping over to check out my project.  I hope I inspired you to create something LOVE-LY with this set.  It's so cute !

Please hop over to my fellow teamie's blogs to check out their projects too!  And remember, comment on each blog for a chance to win a fabulous TCP prize!
ME!

Thursday, November 21, 2019

TCP Sneaky Peek Day 3: Hugs Needed!

Hello there inky friends!  I'm back with DAY 3 of the TCP Sneaky Peek reveals for November.  Today, we're sneaking a peek of the AHHHDORABLE lovey-dovey set called "Hugs Needed".  This set is a sweet set that includes some cute characters:  a  boy, a girl and a big old bear.  It also includes some scenery.  I think this set calls for a few more coordinating sets like background builders and vignettes don't you?!  I added a few doodles here and there to blend the two character images into one and added some ribbon embellishments and doodly hearts/dots.    

To check out all the inspiring cards with this set, hop over to the TCP Blog HERE!


After stamping and coloring the images with Copic markers,  I added a few doodles here and there and mounted my design to a blue card panel and then to a red card base using foam squares.  I then tied some red sparkly ribbon around the panel to finish it off.  I really thought these two characters didn't need much to make them shine, so I kept my card design simple and clean.  
Thanks for hopping over to check out my card.  Please make sure to check out my fellow Cat Pack designers as they share more inspiration with this adorable set!  Make sure to leave a comment for your chance at the daily sneaky peek prize!  Oh...and remember, this set is available TODAY so make sure to pick it up!  

Today's Sneaky Peek Designers

Tuesday, January 22, 2019

Sneaky Peek...The Cat's Pajamas...Don't be Koi


Hello there inky friends!  Today I'm joining The Cat's Pajamas in a little sneaky peek using the most adorable new set called "Don't Be Koi".  I'm also sneaking another peek of a die set that'll release this month too...Watch for it soon.  


This little guy is fishin' for LUUUUVVVVVE!  I love how he's all prepped and ready to head out and hook the big one!  

I created a cute little gatefold card and paired the sweet images up with paper from the Echo Park Coffee 6x6 pad.  The images were colored with just a few Copic Colors.  A little taupe seam binding and a coordinating button and voila.  DONE!  

Thanks for popping over today to take a sneaky peek.  I'll be back again soon with another fun peek!  

Monday, January 7, 2019

Bears, Hearts and LOVE...Part 2 RGStudio360 reveals today's bundle!


Hey there, I'm back with another sweet share featuring the most adorable bears ever!  If you had a chance to check out my project on my previous post, you'll know I'm swooning over these bears.  This Mama bear with her baby just warmed my heart and I knew they needed to take the spotlight on this card!  

I colored the bears from the Sweet Love set with the same Copic markers that I used in the previous card.  I also incorporated some individually cut hearts from the Many Hearts background set.  I have a collection of deelish hearts now! Hop over and check that one out HERE if you are interested in the deets.  

Most times, I don't like to fussy cut around a sentiment and this was the case with this card.  SOOO....I snagged the sentiment on the PDF and placed it on a white panel using Microsoft Word.  I then Cut the whole panel out so that the sentiment was in the perfect position on the card.  
Adding just a tad bit of plaid printed paper, some twine, some wooden buttons finished this sweet card off.  

Alrighty...Card #2 is done!  I'm really in the groove...hee hee...  I'll be back with another sweet twist on this bear collection.  If you've been following me on social media...you've seen some peeks already!  See you soon!

Sunday, February 12, 2017

Sunday Sip and Share...Share the Love!

Hello there coffee-loving crafters!  I was reminded that it's almost Valentine's Day when I went to Starbucks earlier this week.  It's not one of my favorite holidays, but I do love celebrating "Friendship Day" with my young students at school.  I love to prepare tasty little treats and gifts for them too. 

I was kind-of thrilled to get the sweet coffee sleeves on my morning coffee so I collected them every day this week.  Yes, I had plans to create some coffee-loving cards for the baristas who prepare my morning coffee every weekday.
Take a peek at how I repurposed/reimagined the coffee sleeves and how I created these two tasty cards! For the first card, I used a faith-based Bible Journaling clear stamp sentiment set from Bossy Joscie. I used the "Come and fill me" sentiment and the yummy hearts.  I stamped the sentiment repeatedly in a heart formation on kraft cardstock using Memento Tuxedo Black ink.  I applied the coffee sleeve to the design and added a bit of sparkle to the hearts.  
I love that the sleeve has several different elements that are perfect for cardmakers.  It gives me the opportunity to really mix my designs and make multiple cards that are completely different-with one sleeve!  
Of course, none of my cards are complete without a little ribbon or twine so I selected some bakers twine tied at the top.  I elected to keep the "tails" long.  

I also created this card using the extra parts from the sleeve.  I love how the washi creates the perfect little golden accents to coordinate with the ribbon.  
The Starbucks name was perfectly suited right along the edge of this card panel!  
Just look at those adorable cups!  I just had to cut them out and place them on the card!  It's a perfect pair, don't you think?! 
Since I created two cards using the coffee sleeves, I selected the second card as my layout of choice for this week's challenge.  Hope you find some time to play along with it!  Remember, if you decide to play along, please add your link to the inlinkz below.  At the end of the month, I will select one winner to receive a coffee-loving treat!  

Wednesday, January 25, 2012

Heartfelt Wednesdays...

Hey stamping friends,

I have a few NEW projects that I worked on for Heartfelt Creations this weekend and I wanted to share them today.  Make sure you head over to the Heartfelt Creations Blog to check out the fabulous creations my fellow Design team sisters have posted this week.  I know you'll find at least one FAVORITE!  

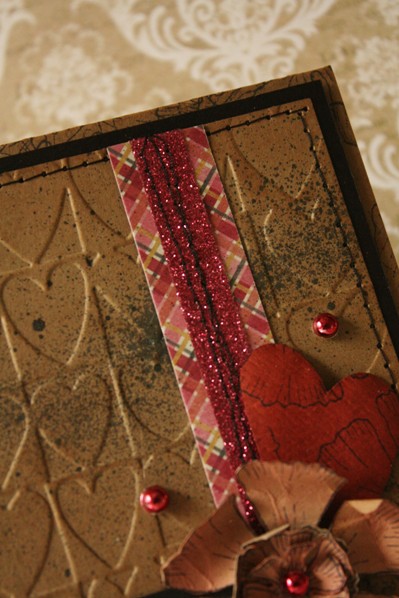
Here's my first card for the week.  I think it has to be one of my most favorite cards in a long time.  I love the "artsy" look and the spritzing, for sure.  I'm kinda on a Kraft kick lately...Not much patterned paper...Yes, I have TONS and I guess I'm hoarding that too, but I like my plain cardstock that I can stamp all over!  LOL...
Isn't it pretty?  I love how it just all came together.  I'm glad I still have that heart Cuttlebug folder...It works perfectly with this design.  
I think the little black tag looks kinda like a tag on some clothes, what do you think???
Here are the DEETS:

"Love"


Other
Cuttlebug Hearts Embossing Folder
Kraft, Black, Currant Cardstock
My Minds Eye Patterned Paper (A Happy Heart 6x6 pad)
Sparkly ribbon from Michaels
Silver flatback bling (colored with Dark red Copic)
Tsukeniko Fireworks glittery spray:  Black
Black India Ink
Ranger Distress Ink:  Worn Lipstick, Pink, Vintage Photo
Gold Glitter Embossing Powder (Stampendous
Black Machine thread
Pop Dots

Now for my second card:

I love it when I have dreams about certain projects and this is one of the projects I dreamed of making the other day!  I stamped the carnations onto kraft cardstock then colored with watercolor pencils, then after that, I used some Heartfelt Creations sticky tape and added microfine glitter all over the image.  It's a pretty simple card, and before it was glitzed up, it was quite bold with the coloring...I love how the glitter tones down the colors and just makes them peek through.  
I've been saving those little metal flower brads FOREVER.  I don't know why I buy stuff and let it just sit forever without using it...I guess, I just LOVE the stuff TOO much and can't let go of it.  This time, I tried using the brads and the flowers broke off two of them before I got one brad to work.  I guess the soldiering isn't the greatest, and they just pop off!  Ugghhh...
Here's a closer peek at the coloring.  I used yellows, pinks, and oranges on some of the carnations and greens and blues on others. I also tied some new pink/white twine I got from the Twinery!  Nope, that was a new purchase, and WAS Used right away...so proud of myself!
Here are the DEETS:

"Pretty Carnations"

Other: 
India Ink
Staedtler Watercolor Pencils, watercolor brush
White Ribbed Cardstock base
Kraft Cardstock, colored cardstock
Pink Ribbon (Michaels)
Pink/white twine:  The Twinery
Floral Stamens:  Wilton
Pink Flower Brad:  Making Memories
Glue Dots

Monday, January 24, 2011

A little Love Album...

This week's challenge on the Woodware USA blog is ANYTHING GOES!!!  I created a couple things for this challenge, but I'm only sharing ONE of them with you...The others will have to wait!! TEASE!!!

I'm loving (pun intended) the load of hearts available in the set called LOTS OF HEARTS.  They are so useful when making CAS cards but they are also great for making cards and projects with repeated designs.  I love the linear structure of many of the images and that the set has some great sentiments too. 

I decided to go with a repeated "quilted" style pattern and make a cute little photo album.  I have several of these dollar albums that I picked up at Michael's many moons ago and thought they should finally get some use.  I just removed the original (fern pattern) design on the cover, flipped it over and stamped directly on that.  I then went to coloring with my Copics and added the embellishments.  I added the Jolee's puffy felt heart that I recently purchased at Michael's (they're on sale this week three for two deal) at the end (on the top of the plastic) when the layout was inside. 
Now that it's made, I have to take some pictures to put inside!!!  CHALLENGE!!!