Showing posts with label Tags. Show all posts

Tuesday, November 3, 2020

TCP Tuesday #374: TAG It!

Hello there it's the start of a new TCP Tuesday challenge and we're getting all excited about the TAGS!  Here's your chance to get crackin' on those gift tags...or possibly create some tags that you can tuck goodies and gift cards inside!  That's what I'm sharing today!  

Make sure to join the fun and play along with our fun Tag challenge.  Just create a tag- any tag, and post your creation on our blog post here.  We'll select a lucky crafter to win a special TCP Prize...That's it.. It's that EASY!  


My tag is a fun little envelope tag that you can tuck a little gift card or perhaps a little moolah inside!  To make this type of tag card, all you have to do is fold an envelope and decorate the front side.  Trim the edges to make the card into a tag shape, punch a hole and thread some ribbon, twine or seam binding through the hole.  

I stamped the cute "Roll With It" set and colored with Copic markers then diecut the fun Farm Duo die using brown cardstock and using some polkadot paper from my stash.  I then assembled everthing to the top of the folded kraft envelope then trimmed the corners to make a tag shape.  I tied some  black seam binding on the envelope to secure the card/tag closed and then mounted the elements onto the card.
So fun, so simple and so handy!  Now I have a sweet little tag to send to a loved one with a special gift card tucked inside.  

Thanks for hopping over!  I hope my project inspires you to create something fun and useful!  


Saturday, February 22, 2020

Hey Beautiful! Gracie's new set...

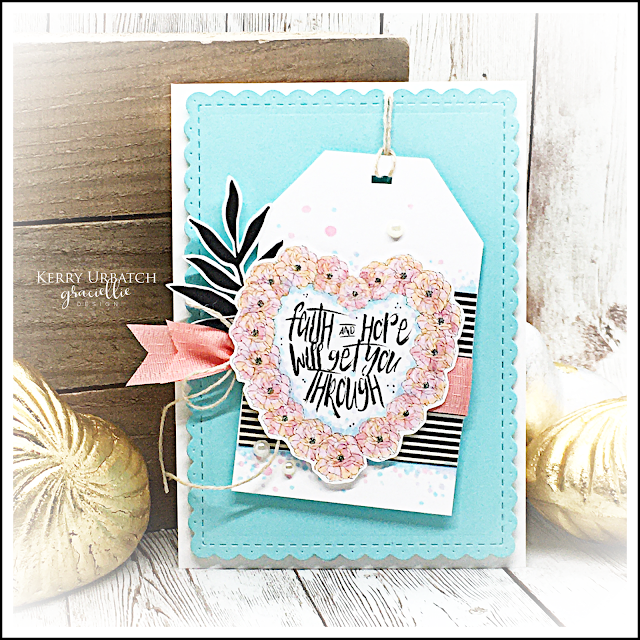
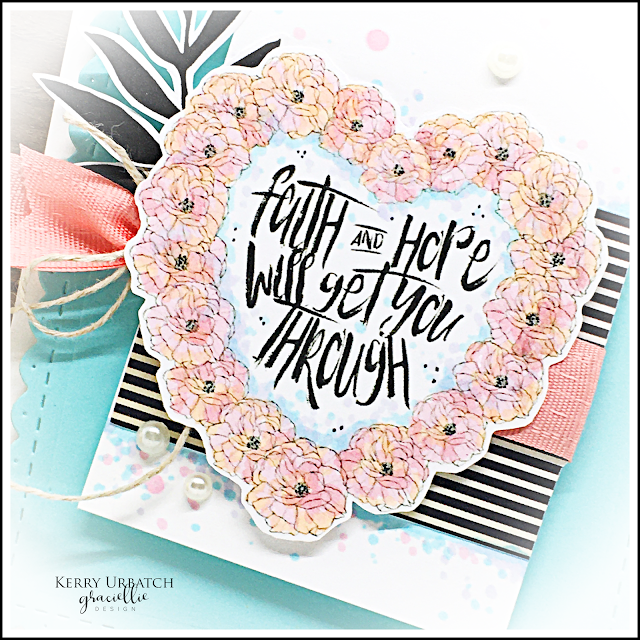
Hello there inky friends!  Today I'm sharing a sweet card featuring one of the newest digital sets by Graciellie Designs.  This set is called "Hey Beautiful" (it's on sale now!) and it features a gorgeous old fashioned rose, some fronds and of course, some amazing sentiments.  My card design was inspired by the sentiment "Faith and Hope will get you Through".  I thought the sentiment was beautiful and I could see a heart in the shape of the sentiment so I decided to take the rose image and repeat it in a heart shaped layout to frame the lovely sentiment.  
Hey Beautiful Mega Digital Stamp Set
To create the digital design, I lightened up the roses so that I could give a hint of age.  I then layered them digitally and then printed the design.  I also printed a few of the fronds so that I could use them on my design.  
After coloring the image with Copics (and Staedtler Microfine black pen, I fussy cut the image and mounted it onto a tag created with some of the same color in the design.  I highlighted the edge of the striped paper to coordinate with the design. 
Next, I tied some coral ribbon (from Stamps of Life) around the tag and added some twine.  I mounted it onto a sweet diecut panel (Scalloped Rectangles die from La La Land Crafts).  To finish things off, I added three little pearls.  

Thanks for hopping over to check out my card.  I'll be back soon with another project featuring a brand new Graciellie Design Digi set!  Come back soon!


Sunday, September 29, 2019

National Coffee Day: Super Sponsor Pink and Main!

Hello there coffee-loving crafters!  WOO HOO!  Today's the day!  National Coffee Day is here and I've got several projects to share with you.  I like to keep manufacturers separate (just one of my quirks) so check out my other posts today to get your coffee fix!  

For this post, I'm featuring some fun new crafty goodies I purchased from Pink and Main.  They have several inky coffee sets and of course I had to jump on the "PUMPKIN SPICE" set.  I paired it up with the fun "FOUR POINT STAR" stencil.  
I started out by using my blending brush to create a fun lime green background.  I then used my Misti to stamp the images with black ink and then fussy cut/colored them.  I used the following Copic colors to make the images come to life:  YR16, YR18, YR24, YR61, Y23, YG 25, V04, V12, E50
To finish off my card, added the sentiment and then tied some orange satin ribbon around the card.  Finally, I attached a green button with some Hemptique twine.

I also created a cute little matching tag with some of the additional pumpkin spice images in this set.  NOM NOM NOM!
 A closer peek will show the colors and the yummy detail of these fun images!
Thanks for hopping over to my blog!  I hope you're hopping along with all the Super Sponsors!  Make sure to leave comments on the CLC Blog, and all the super sponsor blogs that are participating in today's hop!  You'll have until Sunday, Oct. 6th @11:59 Pacific time to leave comments for a chance to win a coffee-crafty prize!  

Thursday, July 18, 2019

RG Avenue New Release...Pucker UP!


Hello there inky friends.  Today I'm sharing a fun little gifty bottle to beat the summer heat!  I created this digital tag for a yummy little treat bottle full of some tart homemade vodka.  Have it straight up (better pucker up!) or add it to some sweet fizzy soda like Sprite or 7-up.  DEELISH!
Lovely Lemonade Stamps and digi files
I found the little clasp lid bottle at Hobby Lobby and grabbed some fun ribbons to tie onto it while i was there.  

To create the tag, I arranged the images in the Lovely Lemonade (digi version) set onto a Word Document and then changed the color to fit the theme.  Next, I used the tag shape on MS Word to outline the images in a tag shape.  To allow for a white border, I added a hollow tag with a white outline around the edge.  I printed it out, cut it and poof, it was done.  EASY PEASY. 

Before attaching the tag and ribbons, I filled the bottle up with some Ketel One Botanical Grapefruit and Rose Vodka.  This is my favorite vodka to drink on its own because it has a very slight natural sweetness.  After filling the bottle with vodka, I added two packets of Lemonade Kool-Aid.  Yes, the powdered packets with NO SUGAR.  I shook it up and gave it a taste. TALK ABOUT PUCKER POWER!  WOOEEE!  I knew it would be an amazing mixer for some Sprite.  

After closing up the cap, I attached the ribbons and attached the tag with a yellow button and some black twine.  It's ready for the weekend!  HEE HEE! 

To make this a non-alcoholic gift, You can fill your bottle with homemade (or purchased) instant lemonade powder...or add some cute little lemon candies inside! 

Thanks for hopping over to check out my tasty project today.  I'll be back again to share another project created with the final stamp set in the Designer Kit bundle.  See you then!!!

Monday, January 21, 2019

RG Studio 360 Beep Bots and the Bee Mine Bundle Event!

Hey there inky friends!  Today I'm sharing some ADORABLE projects featuring the new Beep Bots stamp/digi sets by RGStudio360.  These images were such fun to create with and I'm having a ball making some adorable valentines for my class.  SO CUTE!  

RG is offering a fabulous and fun incentive bundle with this stamp bundle!  Check it out:  
With the purchase of the stamp sets:  Beep Bot, Cyberspace and Beep Notes, you'll also receive the digital sets for free and will receive kitted projects for a fun and festive Live Online class.  
You'll make eight Valentine treats, one greeting card and One Love Notes Journal for $99!  Hop over to the class page and sign up HERE today!  There are a limited number of kits available so make sure to join soon.  

To create my project, I worked exclusively with the digital version of the sets.  I started out by creating the thinking bubble by pairing it with a fun sentiment.  I then selected this adorable robot (blew him up to a larger size), and scaled the Cyberspace background image to a reasonable tag size.  I also snagged one of the little hearts and enlarged that a bit so I could incorporate it into my design.  I quickly on my printer, cut the images out and got to work coloring the cute robot.  
Copics are so fun to use when coloring this little dude.  I selected some teals, yellow and grays to get him all spiffed up.  After coloring the robot, I moved on to the hearts with a rich red.  Adding some sparkle on the heart and on part of the background helped him leap out into the stratosphere!
These thought bubbles are just the perfect way to add a fun sentiment!  I love cutting around these bubbles! To make my little robot tag a bit more interactive and fun, I attached the robot to the tag so that his arms could be outstretched to hold the sweet heart...Just as though he's giving you all his love.  <3 .="" fun="" nbsp="" oo="" p="">
I'll be back again in a few with another fun project featuring this adorable bundle!  See you soon!  

Thursday, January 10, 2013

Blessings to You!

This is another Christmas creation I sent out to family and friends this year.  I wanted to use the scraps I had left over from the other cards I created so this card is an original- one and only.  I usually make 10 to 12 of each design and make one extra -original with the leftover scraps...
 I just love the teal and the red together!  One of my favorite color combos this year!!!
Gotta add a litte ribbon, twine and Stickles too!!! ")

I'll be back again tomorrow to close out my 2012 Christmas Card Collection Review!  Hope you stop back and take a peek!

Kerry

Tuesday, January 8, 2013

Christmas wishes...

Here's one of the card designs I created to send out to family and friends this year.  I was reminiscing this year and pulled out lots of older stamp sets that have been sitting on the shelves.  So sad when I think of all the older sets that are pushed aside to make way for newer designs...
 The stamps used for this card originally came from TAC.  When TAC closed and sold most/all products to Red Rubber Designs, I hoped this set would resurface there.  I can't find them there yet, but I'm sure eventually, they'll hit their store shelves.  If you like these sets, keep your eyes peeled!
Blessings!

I'll be back tomorrow to share another Christmas card creation made for family and friends.

Saturday, December 3, 2011

A little late...

Boy, school is kickin' my but.  Late nights and even later workdays, leave this stamper wishing for SUMMER vacation!  My poor pooch.  I've gotta get out of the classroom before 9 each night! 

I'm spending this weekend catching up.  Yep, I didn't have any time to post my Wednesday post, even had SIRI remind me to do it but work took over.  I love that I can give myself reminders on my new Iphone, but when I can't access my blog at work, I'm in BIG trouble! 

SOOO...Here I sit this Saturday trying to MADLY post, post, post.  I think I'm ahead....until I get behind again! 
This little easel frame was made using a few supplies, some YUMMY patterned paper and a handy-dandy cut out I made to match the paper in the frame...Hope you like it! 

Acrylic Easel Frame and Tag Gift Set
 HCPC 3432 Magnificent Spruce Trees
HCPC 3309 Faith Heb. 11:1 Precut Set
472182 Spellbinders Fleur De Lis Doily Accents
Zip Dry Glue
Grand Calibur
Other:
Wheat Bazzill Cardstock
Darling Dear Patterned Paper My Minds Eye
Memento Tuxedo Black, Potter's Clay
Black Zig Marker
Burgundy Ribbon, Velvet scalloped ribbon-May Arts
Martha Stewart Brown bakers twine
Basic Grey Button
Staple
Acrylic frame: Michaels

Directions: This frame measures 6 1/2 x 4 inches. The coordinating gift tag measures approximately 2 1/2 x 3 1/2 inches.

Cut cardstock base to size. Cut white cardstock 1/4 inch smaller. Attach to base layer. Cut deer patterned paper approximately 3 1/2 inches and attach to panel. Stamp trees with black ink and cut out. Cut border and attach to deer layer. Arrange trees and stamped sentiment (matted onto wheat cardstock) onto card layer. Attach velvet scalloped ribbon directly to outside of frame with Zip Dry Glue. Tie ribbon around frame.

For Tag: Use coordinating paper to draw deer freehand. Cut out and apply to white cardstock and layer to wheat tag. Attach ribbon, button, bow and add doodling border, and eye (with White pearl Liquid Pearls and a Sharpie marker). Attach ribbon to edge of tag with staple and the project is complete!

Wednesday, August 24, 2011

Heartfelt Wednesday...

Hey friends!  Here today to share another fun creation made with my Heartfelt Creations stamps.  This time, It's a cute little tag album that someone can add some of their precious b&w photos in.  Take a peek:
I wanted to use some of my new 6x6 My Minds Eye paper packs with this project and I felt the pink tags and stamp images I selected would work really well with the Everyday Flair set.  I Love the papers and with a little aging ink it looks even better! 

Supplies Used: 


HCPC 3392 Bella Rose House Precut Set
Zip Dry Glue
Pink Tags
Patterned Paper: My Minds Eye 6x6 stack Everyday Flair
Tombow Mono Adhesive
Assorted ribbons and trimmings
Flat back pearls
Memento Tuxedo Black
Memento Desert Sand
Kraft Cardstock

Directions: Stamp birdhouse onto four tags using desert sand ink. Stamp bees on one tag and butterflies on the final tag using desert sand ink. Distress edges with desert sand ink. Cut 1 inch strips of patterned paper and attach to edges of tags. Use trim and ribbons to embellish edges of patterned paper. Distress patterned paper with desert sand ink. Cut kraft cardstock into 2 1/2 inch squares and 2 1/2 x 1 1/2 inch rectangles to place on front and back of tags. These will become mats for the photos you include in the album. Tie tags together using decorative ribbon. Attach flat back pearls with zip dry glue to permanently adhere to project.

Saturday, October 23, 2010

Magic Potion anyone?

Hey!
A few days ago, while shopping for Halloween candy in Target, I happened upon some WINE in the candy section! Huh? Wine with candy??? Well, I guess it had a BLACK label, so does that make it Halloween-ie??? I picked some up and wandered more through the store...How can I make this Halloween-ie? I kept asking myself. Then it dawned on me while down the glass vase aisle! The TALL bud vase just spoke to me! Yes, I guess it was those mysterious spirits (pun intended) but I just had to pick one up. I'll fill some of that wine up into one of those bud vases, add a straw and a tag and it'll be PERFECT!!! BLOOD RED WINE IN A TALL TALL GLASS!!! YES!!!
So I came home all bouncy with excitement and headed to my lab-o-ra-tor-y...you know, The one with all those pots and pans? Oh, yeah, I don't use the kitchen that much but for now, it's my LAB!
I carefully opened my bottle '0 booze and poured it into my bud (no, not beer) vase. I tasted it...YUCK! Too bitter...I like dessert wine. The kind that's sweet and tasty, not anything like chewing on a lemon peel. So I went to the big fridge 'cuz that's where all scientists keep their perishable ingredients you know. Pulled out some special concoction called Lingonberry concentrate (I get it at Ikea) and some bubbly French stuff called Perrier...Mix it all up and VOILA! I have my Mystical brew...DEEELISH...

Kerry's Magic Potion

1 shot Red Wine
1 shot Lingonberry Concentrate
Perrier or seltzer water to taste
Give it a try! Don't have too many...Or you'll end up just like that dragon...draggin' or snoozin'!
Here's the cute concoction ready and waiting for you. Come on over!!! I'll have one waiting with your name on it!
Tag: Stamps by Woodware USA Wizardry