Showing posts with label Christmas In July. Show all posts

Thursday, July 23, 2020

TCP Sneak Peek Week Day 3: Dies, Dies, Dies!


Hello there cardmakers!  It's sneaky peek week day 3 and it's all about those holiday dies!  We're sneaking peeks of three new stand alone die sets that will allow you to make some GORGEOUS cards!  

My first card features the Cardinal Duo die.  Its a two part die that will help you create a fun cardinal scene as well as create pierced circle cut-outs in your cards!  

 I started out by creating the nighttime sky using some Caran d'Ache watercolor crayons in an ombre blend of oranges and yellows.  After that, I diecut the cardinal die using some white cardstock.  I removed the pierced circle so that I could create the cut "schierenschnitte" style design.  I mounted this panel onto the watercolored panel and then splattered some black acrylic ink over that.
Since I didn't have a pine needle die set (hint hint TCP), I decided to glue a faux pine sprig from my mantle arrangement.  I attached it with Beacon Adhesive 3 in 1 glue.  To help it stay in place while drying, I placed a box of colored pencils over it to add some pressure.  Once Dry, I attached the little gingham ribbon bow.  

Up next is the fun little Gnome!  I paired it up with the fun Birch Forest stencil and the Birch Snowglobe die.  

I started out by blending the yummy Wendy Vecchi Make Art inks below to create the beautiful blue birch tree sky scene on white cardstock.  
 I then flicked some diluted white acrylic paint onto the stencil to create the illusion of snow falling.

I then diecut the birch tree globe using white cardstock and then started diecutting the parts of the gnome.  After cutting the nose, hands and feet, I colored them with Copics.  I then glued everything together to create the cute gnome and mounted it onto the birch globe.  
To finish everything off, I mounted the birch stenciled panel onto red cardstock trimmed to size and machine stitched the edge before attaching this panel to a white card base.  Next, I mounted the Gnome and birch globe combo, then attached some coordinating twine with some fun brass jingle bells.  SO FUN!  

Isn't he just the cutest???

Alrighty, for the last card today, I'm featuring the fun scripty sentiment die "Hello Winter".  
 I started out by coloring a white piece of cardstock using Copic markers.  I blended the inks with Copic various refill and then added some shimmery metallic ink splatters before drying with a heat gun.  After it was dry, I diecut the sentiment and set it aside.
 Next, I scribbled a tree scene on a piece of cardstock and then added some blue watercolor.  I then added some white splatter and mounted it onto a blue scrap of cardstock.  I then attached some fun sequins (holeless sequins from TCP) and attached the sentiment.
For the ribbon treatment, I added some black twine and some fuzzy floral centers and some sequins.  I curled the edges of the twine to mimic the scribbles in the background.  :)


Hop on over and check out all the other inspiration for these fun dies!  

Me


Wednesday, July 22, 2020

TCP Sneak Peek Week: Day 2 Oh Christmas Tree!

Hello there inky friends!  It's DAY 2 of the TCP Sneaky Peek Week and I'm joining my fellow Cat Packers as we share inspirational peeks of the fun new set "Oh Christmas Tree" and the coordinating dies HERE!  It's also available in a STAMP/DIE BUNDLE HERE.  This set is so pretty and has a fun collection of florals and leafy elements to make collages great!

 To create my card (I made a collection of SIX perfectly using my Misti) I started out by stamping all of the floral elements using Wendy Vecchi blendable inks.  I also colored the berry stem with markers so that I could get the two toned look.  Next, I diecut the fun leaves in a few different greens, diecut the berry stem and the yellow floral bursts. I tied some black checkered grossgrain ribbon around the pane before attaching it to a piece of golden yellow cardstock and then mounting onto rich red card panel.  To finish things off, I fussy cut a scalloped strip of red cardstock and tucked it under the bottom edge of the ribbon.  I then added some Glossy Accents to give the finished card some texture and shine.
Hop over and check out my fellow DT members projects below.  


Me


Tuesday, July 21, 2020

Sneak Peek Week Day 1: Beary Christmas!!!


Hello there inky friends!  It's the first day of SNEAKY PEEK WEEK at The Cat's Pajamas and we're celebrating this month with CHRISTMAS IN JULY!  The full July release is stocked full of fun and whimsical images that will help you get a head start on your Christmas cards this year.  I'm so excited about this fun collection and can't wait to share all my fun little projects with you!  


**Remember, during Sneaky Peek Week, you can purchase each stamp set/die (or bundle) for the set featured each day and the whole collection will be available for purchase when the New Release Hop goes live on July 28.  Sooo...whether you decided to buy just your favorites on the days they release or wait to purchase the whole collection on the 28, I know this collection will be a SUPER HIT! 

***Make sure to comment on each of the sneaky peek blogs for a chance to win a Sneaky Peek $10 Gift Certificate to shop.  A prize will be awarded each day of sneak peek week! 

I started off by stamping and clear embossing the images and sentiment from the Beary Christmas set with Versafine Onyx ink and clear embossing powder.  I colored the images with Copics and then fussy cut them.  I attached foam squares to the back of each image and set them aside.  

To create my card, I used an upcoming die (to be sneaked tomorrow) to create a hole in my white cardstock.  I then used a Scotch laminating pouch to help my sequins float like snowflakes before laminating the page.  Next, I attached foam tape around the hole on the backside of the paper and dropped some little "snowball" Minnie Pearl prills onto the page and the colored sign with foam squares before attaching another piece of white cardstock to contain the snow and turn it into a shaker.  
After mounting the laminated shaker panel onto the light blue card base, I attached the image and tied the sentiment (no foam squares-but with a small hole to attach ribbon) to the top of the page with some red/white bakers twine.  SO FUN!  


I just love bears and have collected them for years.  My childhood nickname is Kerbear so everytime I see a bear stamp set, IT'S MINE!  I'm so thrilled that this set is available!!!

Thanks for hopping over to check out my card.  I hope it inspires you to get an early start on this year's Christmas card stash!  Please hop over to my fellow Cat Packers for some additional holiday inspiration with this adorable set.  Make sure to leave a comment for a chance to win today's prize.  The winner will be announced tomorrow on the blog!!!


See you tomorrow for SNEAK PEEK #2!

Tuesday, July 7, 2020

TCP Tuesday #370: Christmas in July!

Hello there inky friends!  Today we're introducing a fun new TCP Tuesday challenge this month and it's all about "CHRISTMAS IN JULY"!  WOO HOO.  Join us by stocking up on our stash of 2020 Christmas greetings for loved ones!

Here are the details for the Challenge:
• Each month a new challenge will be posted on The Cat’s Pajamas blog and our Facebook page.
• If you want to play along you just upload your design to The Cat’s Pajamas blog page using the InLinkz button provided.
• You are not required to use a Cat’s Pajamas stamp or die but if you have them we would love to see them.
• On the day of the next challenge the winner will be chosen from the previous challenge and will receive a Cat Cash Voucher for $50.

For this card, I used the fun set called NORTH POLE OR BUST! It's a great set that is full of fun and whimsical images featuring Sprinkle the Kat, Poochie the Pooch and the fun penguins!!!
I also created a watercolored background and diecut it with the DOTS die set and added some fun snowflakes using the FIVE SNOWFLAKES die HERE .
 I colored the image with Copic markers.
Such a cute image set!!!  Make sure to play along with this monthly challenge for your chance to win a $50 TCP gift certificate.  Just add a link to your creation (you don't have to use TCP products) and sit back and wait for the winner to be selected!  Hope to see you play along!

Tuesday, July 2, 2019

TCP Tuesday: Christmas in July!

Hello there inky friends.  Today I'm joining my fellow Cat Packers as we introduce TCP Tuesday challenge #359.  It's all about CHRISTMAS IN JULY!  And there's nothing like a great SALE to get you revved up right?  The SUMMER SAVE SALE is going on NOW!  Get 25% off ALL products in the TCP shop NOW through July 8!  Take this opportunity to cross sets off your wish list and get a discount to boot!  


The TCP Challenge runs throughout the month of July.  To play along, please upload a CHRISTMAS themed entry to our blog post HERE.  
Here are the details for the Challenge:
  • Each month a new challenge will be posted on The Cat’s Pajamas blog and our Facebook page.
  • If you want to play along you just upload your design to The Cat’s Pajamas blog page using the InLinkz button provided.
  • You are not required to use a Cat’s Pajamas stamp or die but if you have them we would love to see them.
  • On the day of the next challenge one winner will be chosen from the previous challenge and will receive a Cat Cash Voucher for $50!
Now let me share a bit about my Christmas themed card!  

I created this fun and festive card using the adorable bunny set called "Your Gift".  I started out by using an awesome new blending brush (COMING SOON TO THE SHOP) to add some light blue on a white card panel.  I also stamped some of the tiny stars onto the background so that I could color them and add a bit of sparkly bling.  I then stamped the bunny tree onto a piece of white cardstock and fussy cut the image before coloring with Copic markers.  After it was colored, I applied some white gel pen to add dimension and give a bit more texture.  I then started arranging the card design.  
I thought a whisp of golden thread would add the fine ribbon treatment I needed for this card.  To finish things off, I added a few golden pearls and mounted this panel onto a piece of polkadotty paper (Pink and Main) and mounted this panel onto a green backing.  Next, I mounted the whole panel onto the card base and added the sweet sentiment.

Thanks for hopping over to check out my card.  I hope my teamies also inspire you to start filling your Christmas card stash box with some awesome new cards!

Wednesday, August 15, 2018

Christmas In July with Joy Clair...WINNER WINNER!

Thank you so much for joining me as I helped celebrate Christmas in July with Joy Clair!  I appreciate those who visited my blog posts and left a little comment.  While blogging seems to be becoming a thing of the past, it is a great place for me to document my journey as a stamper, creator and designer.  I appreciate those who take the time out of their busy day to stop over, read and make a comment.  

To share my appreciation for your visits and sweet comments, I offered a prize- a prize I purchased myself, with no sponsorship or endorsement from Joy Clair. Although Joy Clair offered a prize for one lucky fan too, my prize is specific to my creations...The three cards I created for this event.  

If you missed out on the event, I've provided links back to my blog posts (just click on the card you wish to learn more about) that feature the cards and stamps used.  Please visit these posts if your interested in further details.  


Thank you so much to the following people who visited each blog post and left some sweet comments.  I cannot thank you enough for your visit.  

Cindy Holmes
Dana M.
Sue D.
Andre M. 
Denise Bryant

The winner of my Christmas in July prize is:  

Cindy Holmes!

Congratulations Cindy!  I hope you enjoy your prize and I look forward to seeing your creations pop up on the Joy Clair FB page or somewhere around the web!  I will be in contact to get your shipping information.  

If you would like to follow my inky journey, you can find me at the following social media locations:  

Stampinbug on Instagram
 StampinbugKerry on Pinterest
Kerbear on Splitcoaststampers

Wednesday, July 25, 2018

Christmas in July with Joy Clair: Glory to the Highest!

Hello there Joy Clair Friends!  Today I'm sharing three cards I created for the Joy Clair Christmas in July celebration!  I'm thrilled to add this card to my Christmas card stash and I'm happy to say I am now three cards closer to my yearly goal!  WOO HOO!  Joy Clair is offering a great prize at the end of this event, so make sure to check out the Design Team posts all week!  

This card features the stamp set:  Born is the King.  Just so you know, I lost my static cling powder bag and you can see all the gross extra gold powder flakes on my sentiment.  WAHHHH!!!  Oh well, I tried to work with it and distressed the whole card to "make it work".  HA HA!  
The first thing I did was blended some watercolor onto the background of the white cardstock using my Gel Press.  I wanted some brayered color swooshes and the Gel Press worked perfectly.  I stamped some green leaves over this panel and then brushed some white acrylic paint over that to add some layers.  After that, I stamped the sentiment with clear ink and heat embossed some gold powder.  After that, I splattered with a bit of watercolor and gold onto the panel.  I then stitched the edge with my sewing machine. 


I hope this project inspires you to get inky and helps you get one step closer to your Christmas Card goals!  

If you're interested in learning how I created a specific card pictured below, make sure to click on the link to direct you there. 


Christmas in July with Joy Clair: Joy to the World!

Hello there Joy Clair Friends!  Today I'm sharing three cards I created for the Joy Clair Christmas in July celebration!  I'm thrilled to add this card to my Christmas card stash and I'm happy to say I am now three cards closer to my yearly goal!  WOO HOO!  Joy Clair is offering a great prize at the end of this event, so make sure to check out the Design Team posts all week!  
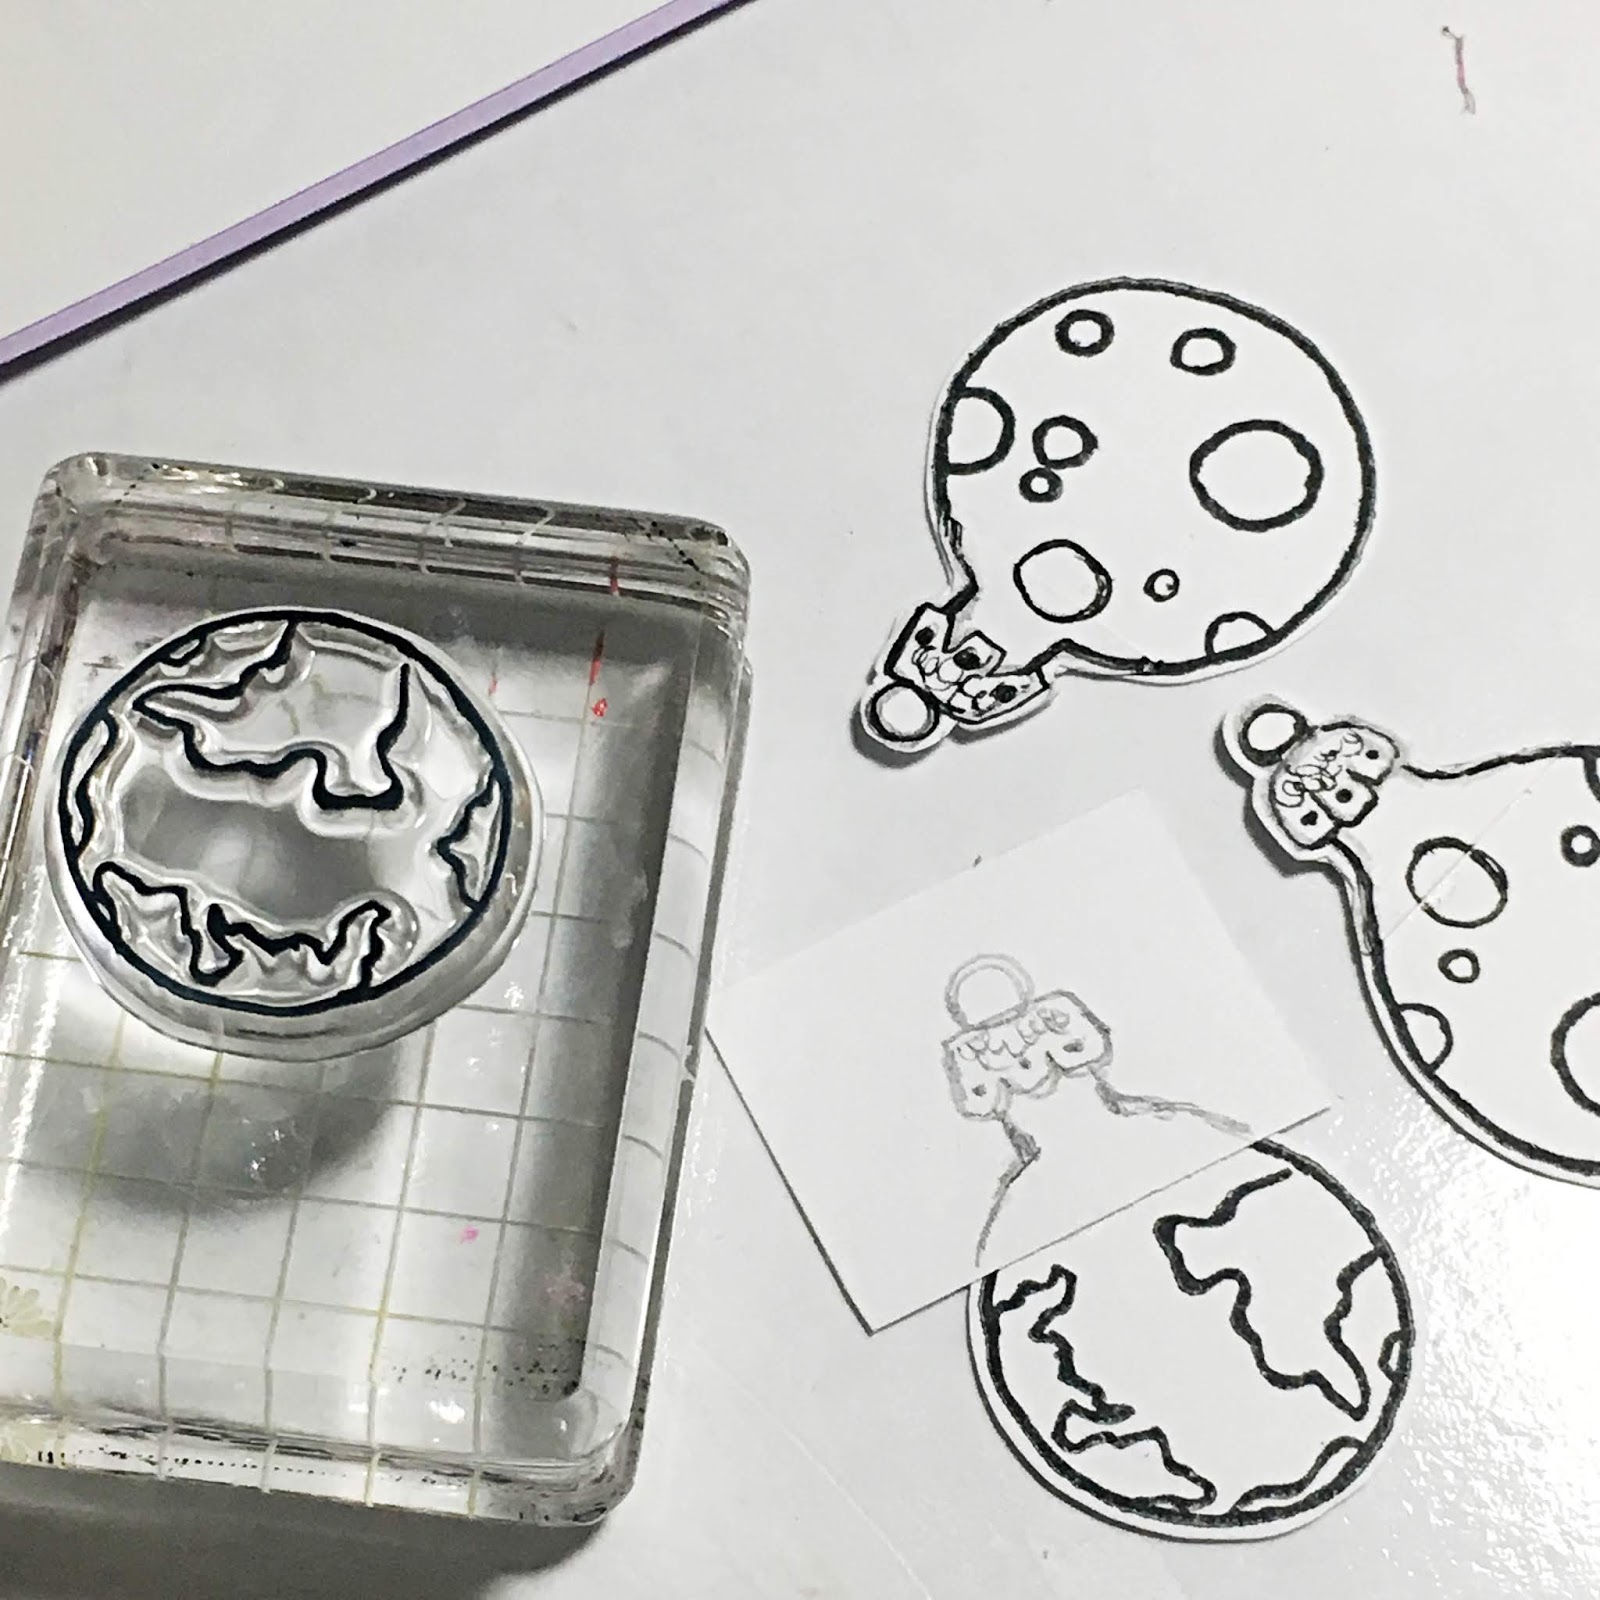
This card features the Out of this World stamp set.  I enjoy using non-traditional stamp sets to create my Christmas Cards and after thinking about the phrase "Joy to the World", I imagined how I could represent this on a card.  I shuffled through my Joy Clair stamp collection and found the Out of this World stamp set and thought those planets would make some cool hanging ornaments!  Well, that set the ball rolling and I stamped the images onto white cardstock and then worked to create the ornament tops for them.  I placed a little piece of white cardstock over the top of the planets and then used a pencil to sketch a little top that would fit. When I was pleased with the results, I traced over the designs with a Staedtler permanent pen and attached it to the planet with glue.  I cut around the top so that they would blend in with the stamped image.  There is a slight line, but if you squint hard enough, you can't see it.  LOL
After cutting out the "ornaments", I colored them using Leisure Arts Watercolor Pencils.  Once done, I applied some clear glaze and microfine glitter to make them sparkly.  
After they dried, I punched a hole in each ornament and threaded them onto some black twine.  I moved on to the card base next!  
To create the card base, I diecut the Reverse Confetti Cuts Stitched Squares out of a white card base and used the cut out to create a frame.  I watercolored the frame with the watercolor pencils and then mounted some gold cardstock behind the cut out on the card base.  I doodled a design around the oval and then I mounted the "frame" wonky style onto the front of the card and attached the ornaments.  To finish the card off, I applied some silver pearls for added shine!  
I hope this project inspires you to get inky and helps you get one step closer to your Christmas Card goals!  

If you're interested in learning how I created a specific card pictured below, make sure to click on the link to direct you there.
