Showing posts with label Leisure Arts. Show all posts

Tuesday, July 31, 2018

Joy Clair, Bread of Life...

Hello there cardmakers!  I'm back with a colorful creation for the Joy Clair blog.  I created this card using the new Manna from Heaven stamp set and the Leisure Arts Premium Colored Pencils.  I love how the images and colored pencils work so well together!  Hav eyou tried them yet?  If not, you should!  
To begin making my card, I started out by doodling a frame onto a white card base (with a topfold).  I added a little doodly bow on the corner to close the frame.  After that was done, I stamped the sentiment using the Many Names stamp set.  Then, I colored my doodled frame with colored pencils.  I love that they blend so well and are just the right softness to color softly on the paper (No scratch marks!).  After coloring the frame, I stamped the grains onto the panel and colored those too.  

Next up was the bread and the porridge bowl.  I used the same sweet colors for these images.  After finishing the coloring, I applied some glaze to the grains, bread and porridge bowl to make them dimensional, thick and glossy.  After the gloss dried completely, I arranged the images onto the card and attached them with foam squares. 
I think this card can be used for a variety of reasons and with a special note inside.  I'm looking forward to finding the perfect person to send it to. 

Wednesday, July 25, 2018

Christmas in July with Joy Clair: Glory to the Highest!

Hello there Joy Clair Friends!  Today I'm sharing three cards I created for the Joy Clair Christmas in July celebration!  I'm thrilled to add this card to my Christmas card stash and I'm happy to say I am now three cards closer to my yearly goal!  WOO HOO!  Joy Clair is offering a great prize at the end of this event, so make sure to check out the Design Team posts all week!  

This card features the stamp set:  Born is the King.  Just so you know, I lost my static cling powder bag and you can see all the gross extra gold powder flakes on my sentiment.  WAHHHH!!!  Oh well, I tried to work with it and distressed the whole card to "make it work".  HA HA!  
The first thing I did was blended some watercolor onto the background of the white cardstock using my Gel Press.  I wanted some brayered color swooshes and the Gel Press worked perfectly.  I stamped some green leaves over this panel and then brushed some white acrylic paint over that to add some layers.  After that, I stamped the sentiment with clear ink and heat embossed some gold powder.  After that, I splattered with a bit of watercolor and gold onto the panel.  I then stitched the edge with my sewing machine. 


I hope this project inspires you to get inky and helps you get one step closer to your Christmas Card goals!  

If you're interested in learning how I created a specific card pictured below, make sure to click on the link to direct you there. 


Christmas in July with Joy Clair: Joy to the World!

Hello there Joy Clair Friends!  Today I'm sharing three cards I created for the Joy Clair Christmas in July celebration!  I'm thrilled to add this card to my Christmas card stash and I'm happy to say I am now three cards closer to my yearly goal!  WOO HOO!  Joy Clair is offering a great prize at the end of this event, so make sure to check out the Design Team posts all week!  
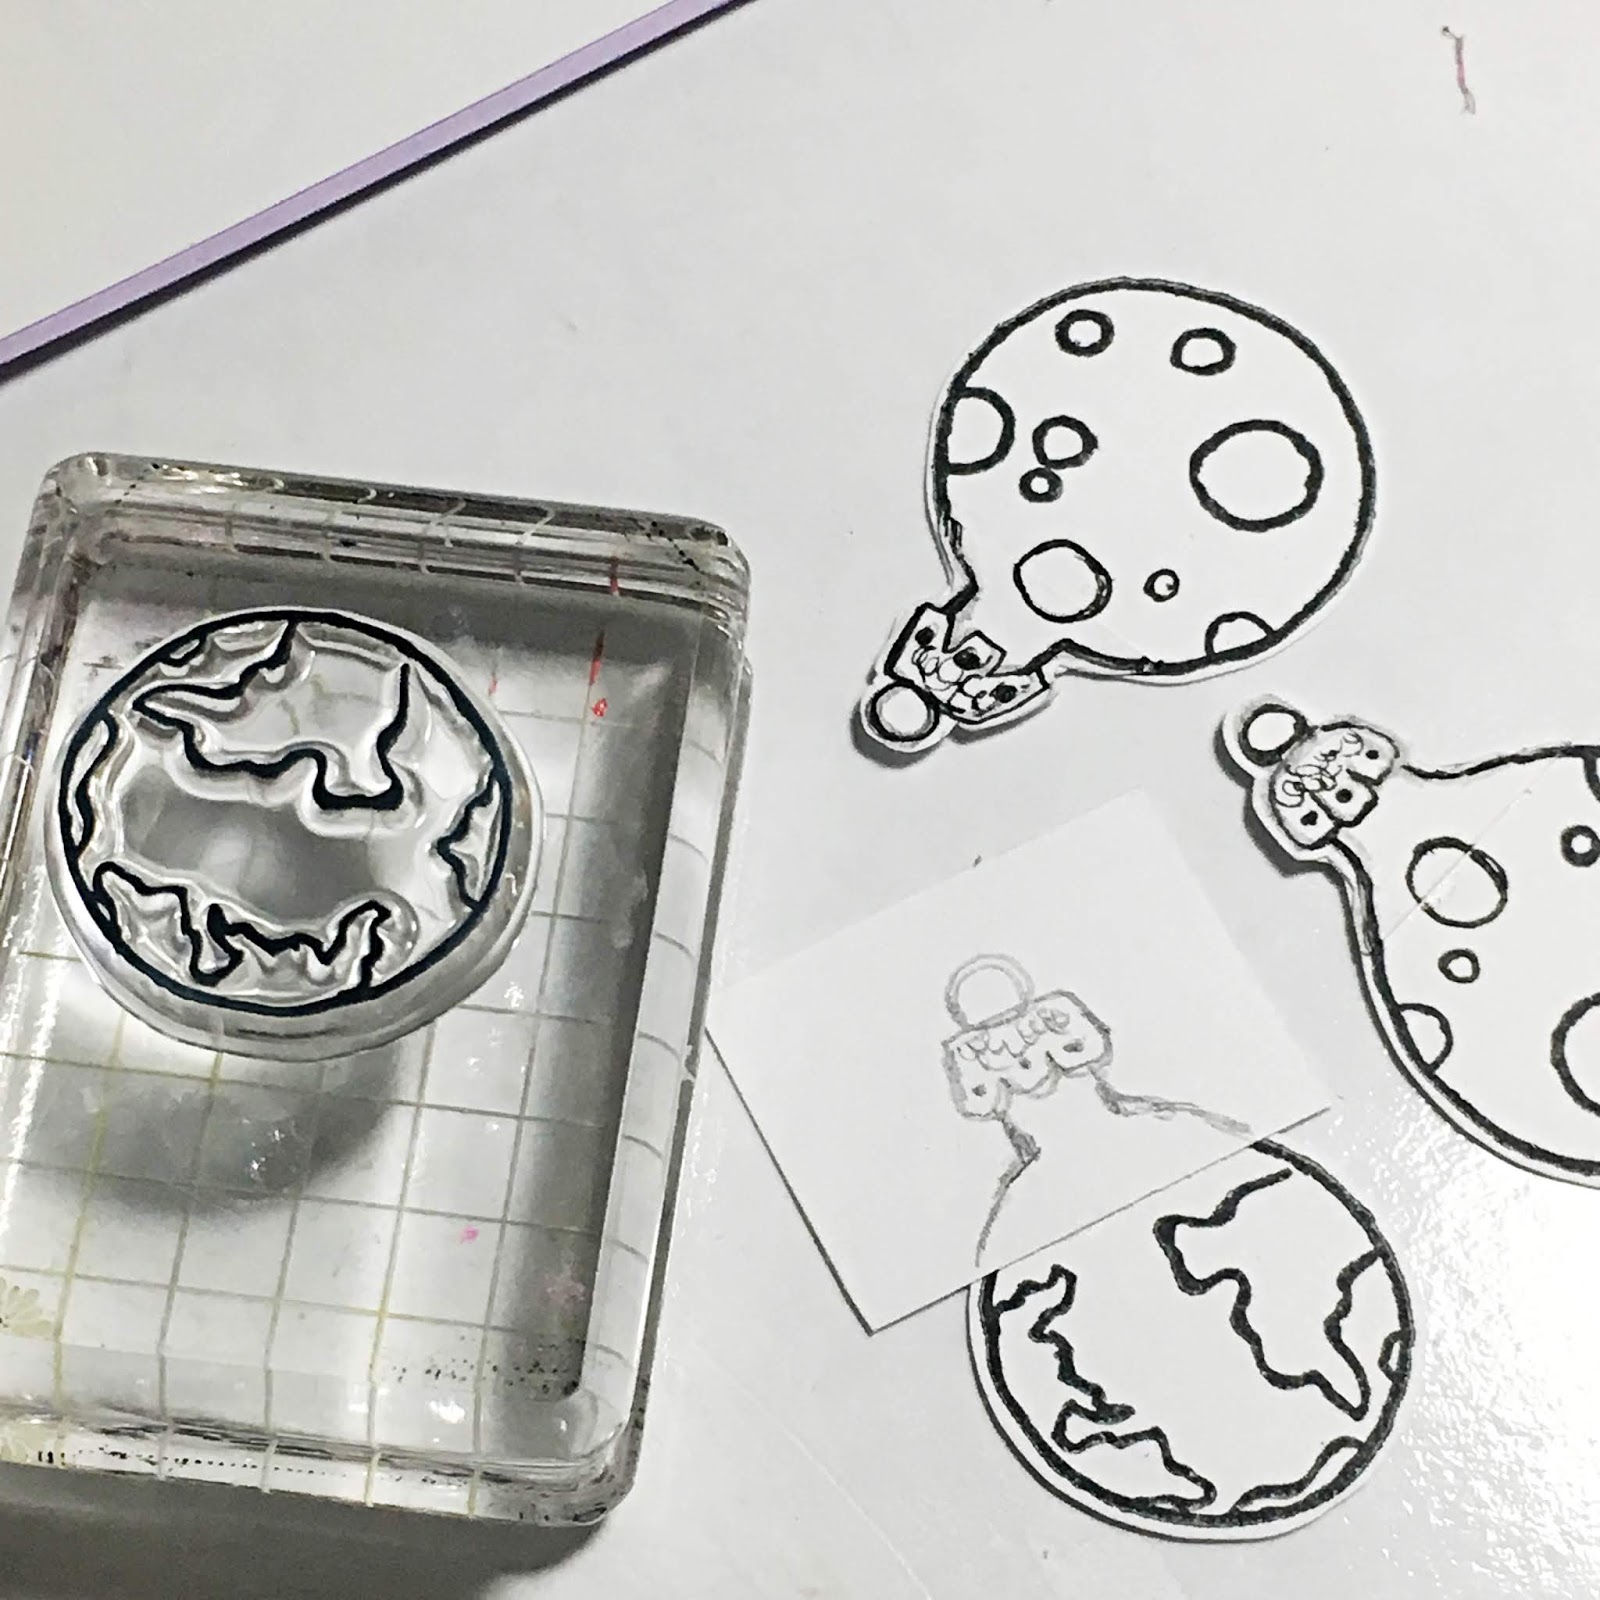
This card features the Out of this World stamp set.  I enjoy using non-traditional stamp sets to create my Christmas Cards and after thinking about the phrase "Joy to the World", I imagined how I could represent this on a card.  I shuffled through my Joy Clair stamp collection and found the Out of this World stamp set and thought those planets would make some cool hanging ornaments!  Well, that set the ball rolling and I stamped the images onto white cardstock and then worked to create the ornament tops for them.  I placed a little piece of white cardstock over the top of the planets and then used a pencil to sketch a little top that would fit. When I was pleased with the results, I traced over the designs with a Staedtler permanent pen and attached it to the planet with glue.  I cut around the top so that they would blend in with the stamped image.  There is a slight line, but if you squint hard enough, you can't see it.  LOL
After cutting out the "ornaments", I colored them using Leisure Arts Watercolor Pencils.  Once done, I applied some clear glaze and microfine glitter to make them sparkly.  
After they dried, I punched a hole in each ornament and threaded them onto some black twine.  I moved on to the card base next!  
To create the card base, I diecut the Reverse Confetti Cuts Stitched Squares out of a white card base and used the cut out to create a frame.  I watercolored the frame with the watercolor pencils and then mounted some gold cardstock behind the cut out on the card base.  I doodled a design around the oval and then I mounted the "frame" wonky style onto the front of the card and attached the ornaments.  To finish the card off, I applied some silver pearls for added shine!  
I hope this project inspires you to get inky and helps you get one step closer to your Christmas Card goals!  

If you're interested in learning how I created a specific card pictured below, make sure to click on the link to direct you there. 

Tuesday, July 10, 2018

Joy Clair...Sail Away...

Hello there Joy Clair friends! It's Kerry here and today I'm sharing a card I created using a few of the newest stamp sets in the Joy Clair collection:  Light House and Inspirational Arrows.  I chose to pair these two sets together because they are both inspiring and hopeful to me. I think the sentiment on the arrow really helps encourage others to travel storms, seek adventure and take risks...even when it may be a wavy passage. I think the lighthouse and the sailboat encourage one to carry on...for there is always someone or something guiding your way!  
 To create this card, I started out by using a light blue watercolor from Leisure Arts Premium Watercolor pencils to color the diecut frame I cut out of Watercolor paper.  After that, I stamped the lighthouse onto a a piece of white cardstock using black ink.  I chose NOT to color this image as I wanted the focus to be on everything in the foreground.  After stamping this image, I attached it to the framed watercolor and then stamped the blue background paper so that I could mount them onto a card base.  

After assembling most of the card, I stamped the sailboat onto watercolor paper using some black ink and then watercolored the image with the colored pencils.  I used a superfine paintbrush to apply my color so that I could control the amount of ink in each location.  
Thanks so much for stopping by today.  I hope you have enjoyed this project!  See you next time!  :)

Sunday, July 1, 2018

Sunday Sip: Six Pack

Hello there coffee loving crafters!  It's Kerry here and I'm back with another Sunday Sip for the Coffee Loving Cardmakers blog!  This week, I'm jumping for joy as I share a CAS card with you!!!  WOOP!!!  I did it!  I made a CAS card!  My fellow CAS challenged cardmakers can attest that this is quite a feat and one not to go unnoticed!  WOOP!  A little pat on the back and a Yee Haw is in order! 
To create my card, I cut the little square die from the Reverse Confetti Stitched Squares Confetti Cuts die and then stamped the itty bitty coffee tumbler (from the Planner ATS stamp set from Fun Stampers Journey called "Calendar Essentials") six times being careful to line them up as perfectly as I could.  I colored the cups with Leisure Arts Watercolored pencils and then stamped the strip of light blue cardstock with "Oh Happy Day" sentiment using two different blue colors.  After that, I attached it to the base of my card and attached a strip of torn vellum above that.  
I tied some Hemptique yellow twine to the card and then thought it looked a little bare (and the white cardstock had a dent in it too)...ha ha ha...so...I flicked some watercolor pencil splatters onto a piece of white cardstock and laid that over the top of the white portion of the card base to cover the imperfections.  

These colors are some of my most favorite colors during the summer months so I am extra excited about how it turned out.  I know EXACTLY who to send this card to!  WOOP!  

Do you like this card/sketch?  How about playing along with the sketch challenge this week?  I've included a linky below so you can add your link!  Join the fun!  


Friday, June 1, 2018

Spring/Summer Hop: Power Poppy Cup of Columbine!

Hello there coffee loving cardmakers!  I hope you've been enjoying the hop!  I know I have.  I've got a lot of commenting left to do this weekend so I'm kind-of happy it'll be a rainy weekend so I can get it all completed.  End of the year things at school have taken up my free time.  SHEESH!  

For my final post in the hop, I'm sharing a project created using the newest Power Poppy digi stamps called "Cup of Columbine".  I love this collection of images (with and without the bird) so I decided to color my first image with a combination of Copic Markers and to finish off the coloring, I used my Leisure Arts Colored Pencils.  I love these colored pencils because they apply to the paper so creamy and cleanly!  LOVE!  
I find coloring so relaxing!  I spent the evening coloring this beautiful image up and just had a ball.  Since the image is digi, I was able to print it in the perfect size to fit my card.  This image needed no additional embellishments so I simply finished the card off by adding a little gingham ribbon.  I liked the contrast of the pretty florals and the black and white check.  
A closer look at the coloring helps you see a bit of my favorite background coloring techniques with Copics.  I love to add stippled dots here and there...I also applied some colored pencil in targeted areas of the background to give more dimension and depth.  
 I love this color combo.  I did a little google search and found a collection of Columbines in this color scheme so that was my jumping off point. 
OK...Hurry up now.  The hop is just about over!  You can do it!  Hop, Hop, Hop!  Good Luck!
Thanks for stopping by!  Check out the hop deets below.  


Hop Deets:  

When:  Friday, May 25-June 1
Theme:  Spring and Summer
Use:  Coffee/Tea/Cocoa images

Prizes Galore!
 SUPER GENEROUS SUPER SPONSORS 
Check out the lead blog post from Coffee Loving Cardmakers HERE
Direct link to the Hop post is here:  POST YOUR PROJECTS HERE 

Wednesday, May 2, 2018

Hopping with Joy Clair...The Potter

Let's start the fun with creativity and great projects!  Remember, as with every new release, we have a special prize for one lucky visitor who comments on each blog post in the hop!


Leave your comments and tell us which is your favorite stamp set!
Scroll to the bottom of my post to see the complete blogroll!  
So now let's get to MY Creation!  

I'm excited to be joining the Joy Clair Design Team as we present the newest collection of stamps to Joy Clair.  There are so many fabulous new sets to share and each one of us has selected ONE set to feature and share with you today.  I selected the set called "The Potter".  

I LOVE LOVE LOVE this set because of the sentiment and the images.  As a wanna-be potter and collector, these images just drew me in.  The scripture was quite a reminder too.  I need to remember them.  
I spent some time reflecting on the sentiments and deciding what to do to create something beautiful and heartfelt.  I decided to stamp the pots on some kraft cardstock with Sand Memento ink.  I decided to make these images my focus on the front and the scripture on the inside.  
I started out by stamping (I did not mask the images however the "overlap" was wiped off before stamping so that I could achieve the same effect) the pots on a strip of Kraft cardstock.  I stamped in a light color so that I could create most of the color/using my Leisure Arts Colored Pencils.  I added a few highlights with the yellow and the white colored pencil and used two browns and the black color to make my pots come to life.  I chose not to focus on the "native" pattern on the pots, just made them a little cracked and pocked with age. 
After coloring, I used the ric-rac die from Right At Home to create a zig zag border then applied some white cardstock.  I added a bit of kraft paper for some texture.  
To finish the card off, I added some black twine on the card.  I hope you are inspired by this project.  Thanks for stopping by.  Please enjoy the rest of the hop!  

PS...If you're interested in finding out more about the Chance Taylor pottery featured in my photo (I love including my pottery collection in my card photo vignettes, you can see more of this potter's work on Instagram @chancetaylorceramics and on Etsy.  

Blogroll:  


Have fun and get inspired!!!

Sunday, April 29, 2018

Sunday Sip...Little Treasures

Hello there coffee-loving crafters!  It’s Kerry here and I’m back with another fun Sunday Sip!  Today I’m featuring one of the most adorable finds from my adventures in Washington, DC this past weekend.  I attended the Smithsonian Craft Show on Friday and Saturday and came home with many new treasures.  This show was absolutely fabulous and there was a wide variety of artisans from all around the USA (and elsewhere).  I purchased several pieces of pottery, and some beautiful mixed media art.
On Saturday, I happened upon this tea-loving crafter named Mimi Kirchner.  She crafts whimsical stuffed toys and trinket wares from felt (and teacups she finds at thrift stores).  Her “Tiny Worlds” were too irresistible to pass up, so I selected this adorable pincushion in a teacup because you know how much I love pottery and crafty fun!!
I was inspired by the fall colors of this particular piece and really loved the cup.  If you’re inspired by her adorable creations too, she has the pattern for this little pincushion available in her Etsy shop HERE.

Check out the other “Tiny World” teacup pincushions she had available at the show:


Which one strikes your fancy?  Do they have your wheels turning?  They do for me!  I decided to alter a teacup stamped image (doodled) and make my own little “Tiny World” inspired card.  I think I’ll send it to her as a thank you!

To create my card, I used the coffee cup from the Joy Clair “Christmas Coffee” set and doodled some freeform florals and the “Tiny World” using a Staedtler .01 black pigment pen.  I colored my doodles with my Leisure Arts Watercolor Pencils.  I then added more color using Leisure Arts Premium Colored Pencils. After that, I fussy cut the image and popped it up onto the card with foam squares.  The sentiment comes from the ever popular “Hello Sentiments” Set.
Isn’t it the sweetest?  Adding some Nuvo Crystal Drops in Ivory Seashell and Bubblegum Blush, Nuvo Aqua Crystal Shimmer (Pen) and some pretty pastel ribbon finished the card off.  The Plaid printed paper comes from the Lawn Fawn Perfectly Plaid 6×6 pad.
I loved chatting with Ms. Kirchner about her craft and she graciously agreed to be featured here on my blog post today.  I hope you join me in hopping over to her blog/Etsy shop and show appreciation for her work.  

Since I’m featuring this fabulous artist Instead of offering a sketch challenge today, I thought it would be fun to SHARE something a bit different.   I’ll be gifting one “Tiny World” pattern from Mrs. Kirchner’s Etsy Shop…All you have to do is comment on this post and share which “Tiny World” you love most from the photos above.  I’ll announce a winner next Sunday!  Good Luck!