Showing posts with label CLCSip and Share. Show all posts

Sunday, July 21, 2019

Dual Purpose Cards...Sunday Sip!

Inlky friends!  Welcome back to another fun Sunday Sip and Share!  I'm up on the Coffee Loving Cardmakers Blog every Sunday giving a little coffee-loving inky inspiration!  Make sure you stop by the blog and check out all the coffee/tea/cocoa loving inspiration each and every day!   

This week I thought I would share a tasty little giftie treat I created for a crafty friend.  This card is not just your average card…It’s actually dual purpose.  You see those images?  Well, they will have a completely different purpose for the recipient!  I’ll share how later on in the post.  

I started out by printing some digital images of this fun RG Avenue set called “Birthday Girl”on Avery sticker paper.  This set is available in both digi and photopolymer stamp set but while waiting for my stamp set to arrive, I thought I’d take advantage of having the digi set and playing with some stickers for my planner…Oh yeah, the sheet was originally made for my planner sticker stash.  I love that when I print out these images, I can cut them out and color them with my Copic Markers without worry of bleed or disaster.   


After cutting out my images (I prefer fussy cutting over using my machines), I colored the images and created a little collection to use throughout my planning week.  Then it dawned on me that I could share these images with a friend….And there came the “Dual Purpose” Card!  You see, the images on this card (the birthday girl and the sentiment) and the collection of frappes scattered about, are all peel-and-stick!  Yes, you got that right, the recipient will be able to peel the birthday girl and sentiment right off the backing (I popped the images up on pop dots) so that they can be used in her planner.  I’m also including all those fun little frappes in a little gift bag on the inside of the card.  Some are colored (and glossed and glittered) by me, and some are left black and white so she can color them!

For the card base-and layers, I used some scraps from previous projects.  Since I knew this card would be decomposed by the reciient, I knew I didn't want to go all out using materials that would just get thrown in the trash, so I grabbed goodies from the little scrap stash cup I have on my table.  They come in so handy.  

How fun is that?  Perhaps you'll want to give this a try!  It's easy peasy and makes for a fun little surprise for your recipient!  

Thanks for hopping over to check out my project today.  I hope it inspires you to get crafty with your stamps or digi images.  See you again soon!

Sunday, May 12, 2019

Sunday Sip...Thank You...WINNER WINNER!

Yes! You read that right!  I've selected the winners for last weeks giveaway of some awesome steel straws.  You can see the winner at the bottom of this post and can hop over to my other Social Media Locations to see the winners there!  

This week, I am sharing a card I created featuring the awesome stamps and dies from the Spring/Summer Coffee Lovers Hop Super Sponsor Honey Bee Stamps. I selected the TEA TIME HONEY CUTS dies and the Perfect Blend Sentiments set to create this card.  

This card is a nod to all those tea lovers out there!  

This Friday, my Kindergartners hosted a fabulous Tea Party for their moms. We spent two weeks preparing for the event.  We taste tested cookies (based on a brainstorm list of "Mom favorites") to narrow down our top five for the party, taste tested approximately 15 teas and narrowed it down to our top five for the party, Designed place mats with thoughts of mom, designed artwork, practiced a MOM song, practiced etiquette and wrapped gifts.  This event is such a precious event every year and I love seeing my kiddos loving up on their moms!  Next up...Picnic with Pops!  
To create my card, I diecut the cup, lemons, tea label and string.  I gave everything a soft and sweet coloring touch with the Copics pictured below.  I then used the larger cup image as a stencil to create a background image on a white panel.  Next up was to assemble the layers.  Finally, I attached some floss and applied a few embellishing "dots" with the Copics and a White Gelly Roll Pen. 

Thanks for visiting!  I hope you enjoyed the Spring/Summer Coffee Lovers hop and I want to thank ALL the sponsors and all those who participated in the hop!  Congrats on another fabulous hop Amy!  

WINNER:  The winner of one of my Steel Straw sets is:  Sue D!   I'll tag you in the CLC FB group to claim your prize!  

Head over to my IG to see who the winner is there!
Head over to my Coffee Lovers Blog post to see who the winner is there!  

Sunday, May 5, 2019

Day 3: Spring Summer Coffee Lovers Hop...Sunday Sip and Miss Ink...and a giveaway!

Have you hopped over here from the Coffee Lovers Blog?  It's Day 3 of the Spring/Summer Coffee Lovers Blog hop and Sunday so that means it's my day on the CLC Blog!  I'm sharing this card featuring Super Sponsor Miss Ink!  
For today's Sunday Sip post, I am sharing a fun card featuring Super Sponsor Miss Ink!  The Brewtiful Stamp Set is a real beauty!  I love the coffee beans, the flowers and the cute cups so I colored mine up in springy colors and used the Jitters Stencil with some lime green ink to create a fun background panel.  
I added a bit of gloss to the dots on the cups and the beans to give my image more dimension and texture to the touch.  Yes, I love my cards to be touchy feely cards.  ;)
So that's it for today!  I hope you've been inspired by this creation and hope to see your creations pop up in the hop!  


SKREEEECHHHHHH...Hold your stamps!  If you've read this far, I'm hosting a give-away right here (for USA peeps due to shipping constraints)...on the Coffee Lovers Blog Post and on my IG...Just leave a comment on each platform (I will pick winners based on the comments) for a chance to win one of THREE fun stainless steel straw sets like this set right here:  
VEHHE Aluminum TOP QUALITY Straws

This set is perfect for those iced tea, iced coffee, coffee flavored shakes, bubble tea and Cinco de Mayo Margaritas...and they're REUSABLE and work in your big water bottles!!  I purchased several of these sets after testing them out myself and finding they were the best quality reusable straws EVER...sooo... I thought I'd share!

Sunday, March 17, 2019

A New Stamp Company Is In Town...Welcome Miss Ink Stamps!

Hey there inky friends!  I have the great privilege as a Coffee Loving Cardmakers designer to play with some new stamps!  Today I get to welcome the newest stamp company to our family!  Welcome to Miss Ink Stamps!  I'm thrilled to be able to share some projects featuring your two new coffee themed sets:  Java Joe's and Brewtiful!   These sets were so fun to design with and I hope you enjoy what I've created for you.  

My first card features the Java Joe's set.  I love the whimsy and playfulness of this set so I tried to create something to make any coffee lover smile!  Happy was the word...and when I read Happy, I immediately thought of YELLOW!  SOOOO...I created a card with some green and a POP of yellow!  The coffee shop was stamped on green cardstock and colored with Copic Markers and colored pencils.  I also used a white Gelly Roll pen to create some highlights and added pop. 
After coloring the images, I set them aside and started working on my background panel.  I cut out a polka-dotty stencil using my Silhouette Cameo and then painted some polka dots onto the paper with ivory acrylic paint.  After that (it was almost immediately dry), I machine stitched the border and tied a green ribbon around this panel.  After that, I assembled the the images onto the card panel and tied a little button to the bow.  I mounted this panel onto an A2 white card base (side fold) and this card was done!

Next up was the springy card featuring the Brewtiful set.  I selected the colors for this project based on the printed paper I wanted to use.  This printed paper comes from an old collection of 6x6 printed paper from Fun Stampers Journey.  It's about time I use that paper I've been hoarding!  LOL...

After mounting the printed panel onto the yellow panel, I machine stitched the top and bottom for added texture and interest.  Then I attached some orange ribbon.  I just love ORANGE in the springtime!  

After assembling the card panel, I attached the stamped/colored images and added some gloss to make them shine.  I also pulled in a little of the white Gelly Roll pen.  


My third card is the fancy-schmancy one!  It also features the Brewtiful stamp set.  I researched the colors of the leaves, berries and flowers of the coffee plant and tried to match the colors I found using Copic Markers.  
After coloring the images, I mounted them onot a rose colored cardstock and then mounted this panel onto a cream cardstock base.  I wanted the image to be my main focus so I kept a lot of white space around it!

Isn't the image just gorgeous?  I just love this set so much!!!  

Thanks so much for stopping by today!  I hope you were inspired by my projects today and I hope you'll hop over to Miss Ink Stamps and check 'em out!  I know you'll find something that would love to hop right into your cart!  

Thank you to Miss Ink Stamps for allowing me the opportunity to guest design for you.  I had a ball playing with these coffee images and I learned something new too!  Now I'm on a quest to find some dried coffee flowers so I can taste some homemade "tisane".  

Sunday, September 16, 2018

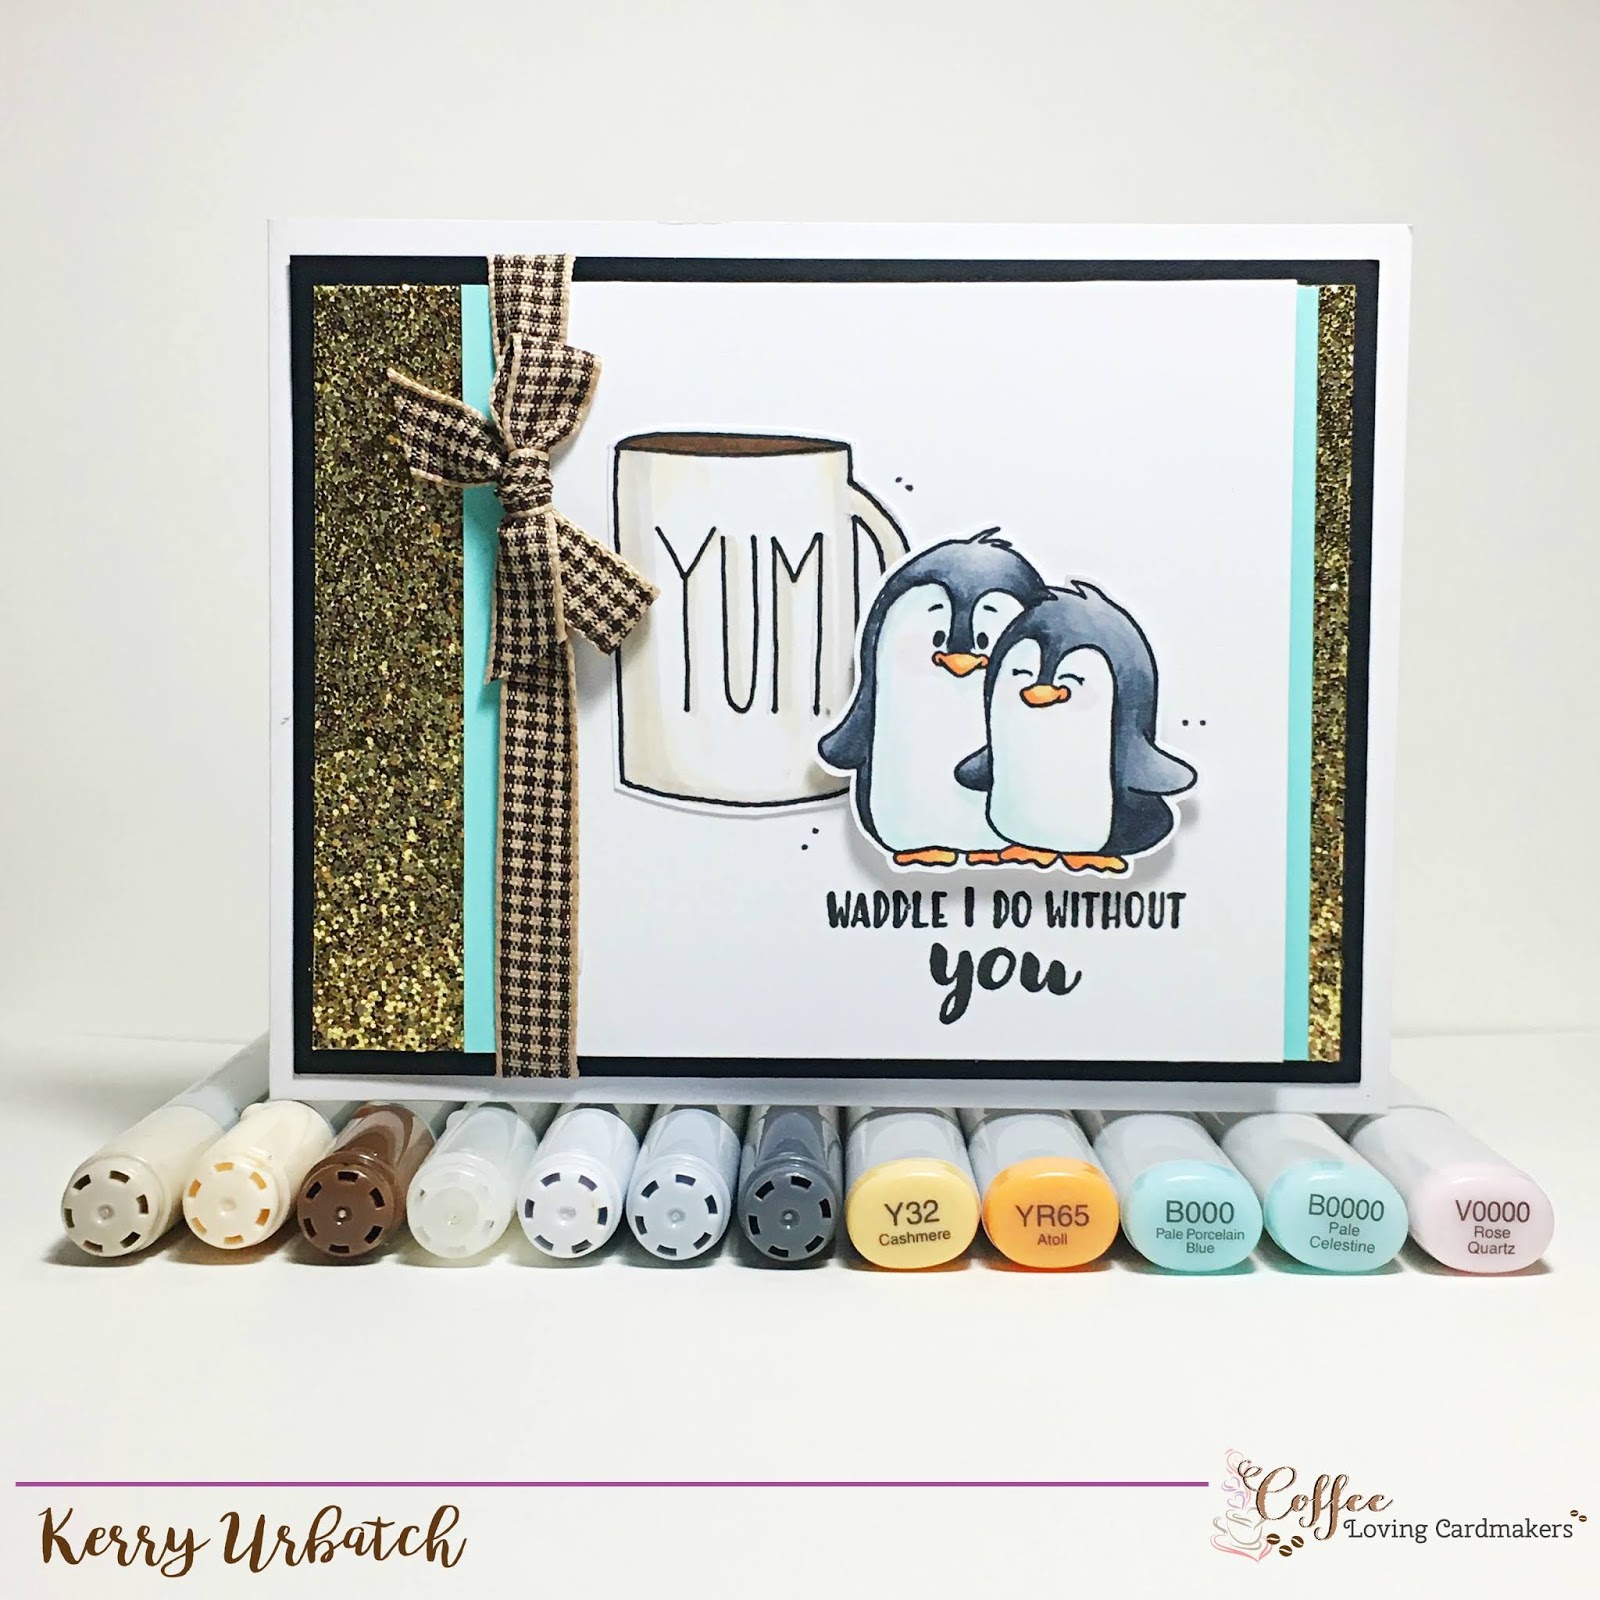
Sunday Sip...Waddle, Waddle, Sip!


Hey there coffee loving crafty friends!  It's my day on the Coffee Loving Cardmakers blog for another fun Sunday Sip Challenge!  This week, I'm OVER the heat and in the mood for some colder weather!  I decided to use a stamp set I've had since around February (and haven't used) for this post.  I brought out this adorable penguin set from Gerda Steiner Designs called "Valentine Penguins".  While the set theme is Valentine's Day, I can find many other uses for this set...It's so much more than a LOVEBIRDS set!  I paired the cute little penguins up with a hand-drawn image of one of those uber famous mugs popping up all over.  You know who I'm referring to, right ? 

I colored the images up with some Copic Markers (Penguin:  C1, C3, C7, 0, V0000, B0000, B000, YR65, Y32; Mug:  W1, E50, E5).
Adding a little sparkle leftover from my parent's 50th anniversary party and some brown check ribbon to tone down the formality and voila...It's done.  I LOVE IT!
Like my card?  Why not play along with our sketch challenge this week?  I created a sketch that matches this card design and I hope you find some time to play along with it.  We'd love to see what you create with it!  Just add your link to our inlinkz below.


Sunday, August 12, 2018

Sunday Sip...Tealightful...

Hey there coffee/tea/cocoa loving crafters!  It’s Kerry here and I’m back with another Sunday Sip!  This week I was on a RED kick.  Have you ever experienced a “Color Kick” before?  Well, mine usually lasts about a couple weeks and it’s difficult for my brain to grab colors outside of the “Kick zone”.  SOOO…Here ya go.  Two cards on the RED team.  RAH RAH!
I started out inspired by the little poppy-like flowers in the Pinkfresh Studio BIRD WITH FLOWERS set.  Since they were poppies in my mind, I had to color them red.  So, I stamp, stamp, stamped them onto a piece of white cardstock and then colored them (the peeks of white were purposeful) with Copic R14.  After that, I stamped a few cute leaves and colored them with Copic YG06.  I added some shadowing with C-1 and then moved on to stamping the teacup from the Pinkfresh Studio TEALIGHTFUL DAY set (minus the little pattern on the cup) and stamped a few flowers on the teacup.  I also colored them and doodled a bit of a border and some stripes/dots.


I think my mug was inspired by a new mug I recently received in the mail.  It’s a gorgeous HUGE bowl-like mug purchased from Colleen McCall Ceramics (on Instagram HERE) and has a strawberry pattern on the inside.  It’s gorgeous!  I’ll be sharing it on Monday on my Instagram if you care to take a peek!   
To add a bit more whimsy to the card, I stamped the leafy stem on the edge of a green piece of cardstock and then cut it to create a whimsical edge.  I stamped the sentiment from the Tealightful Day Set.
Since I had so much fun and was on a roll, I decided to make another card.  A CAS card and the card that inspires this week’s sketch.  I used the same color theme- but also incorporated some light gray ink for the teacup.   
Since I don’t really have restraint to make a CAS card, I had to add some ribbon and some blingy sequins before attaching the panel to the card base.
I think this is probably a favorite card made this month.  Although it’s simple, I can say that it is perfect for a person who listened to me do a bit of “It’s not fair” whining this weekend.  I thank her for listening and yep, I’ve just gotta suck-it-up Buttercup!  (Hey, wait…Maybe I can make a card for that!) 
I hope you find this sketch inspiring and I encourage you to play along with it!  If you do, just add a link to your card in our inlinkz below! 

Sunday, July 1, 2018

Sunday Sip: Six Pack

Hello there coffee loving crafters!  It's Kerry here and I'm back with another Sunday Sip for the Coffee Loving Cardmakers blog!  This week, I'm jumping for joy as I share a CAS card with you!!!  WOOP!!!  I did it!  I made a CAS card!  My fellow CAS challenged cardmakers can attest that this is quite a feat and one not to go unnoticed!  WOOP!  A little pat on the back and a Yee Haw is in order! 
To create my card, I cut the little square die from the Reverse Confetti Stitched Squares Confetti Cuts die and then stamped the itty bitty coffee tumbler (from the Planner ATS stamp set from Fun Stampers Journey called "Calendar Essentials") six times being careful to line them up as perfectly as I could.  I colored the cups with Leisure Arts Watercolored pencils and then stamped the strip of light blue cardstock with "Oh Happy Day" sentiment using two different blue colors.  After that, I attached it to the base of my card and attached a strip of torn vellum above that.  
I tied some Hemptique yellow twine to the card and then thought it looked a little bare (and the white cardstock had a dent in it too)...ha ha ha...so...I flicked some watercolor pencil splatters onto a piece of white cardstock and laid that over the top of the white portion of the card base to cover the imperfections.  

These colors are some of my most favorite colors during the summer months so I am extra excited about how it turned out.  I know EXACTLY who to send this card to!  WOOP!  

Do you like this card/sketch?  How about playing along with the sketch challenge this week?  I've included a linky below so you can add your link!  Join the fun!  


Sunday, December 24, 2017

One last giftie...

Hello there Coffee/Tea and Cocoa loving papercrafters!  It's Christmas Eve and I've been baking up a storm finishing up the last of my responsibilities for my family Christmas tomorrow.  You see, my family requested that I create the cookie/dessert tray and of course I said sure will!  I have five different types of yummy cookies that I'll be presenting on the table and the yummy cookies above are included!  I had some extra cookies and decided I would pack them up in a little clear box and give them to my neighbor.
These little cookies are so tasty!  They are sugar cookies flavored with nutmeg and iced with Matcha Royal Icing!  YEP!  Matcha!  If you've never tried matcha in your royal icing, you MUST!  it is deeelish!  This little winter caps are perfect and simple and oh so festive!  To package up these cookies, I used a clear box from Gina K Designs.  I love these little card boxes and they're perfect for not only sending cards, but also for sending cookie treats!
This little treat package wouldn't be complete without a cute little coordinating card so I created this card using the stamp set I won from the Winter Hop!  I selected the clear stamp set called Coffee Therapy.  I love the sentiments and the mix of cups!  I used my Misti and Memento to ink them up.  Since these cookies are MATCHA and not COFFEE, I printed up the Matcha sentiment on my computer and then just stamped the rest of the sentiment under it.  PERFECT!  While I was shopping at Gina K, I picked up some Apple Green Nuvo Drops and they work perfectly with this card!  LOVE IT!
A closer look at the card and you'll notice I added some fun stitching.  I love the added dimension it adds to my cards so I am kinda addicted to adding it lately.  A few little pearls finish the card off.
Such a simple way to decorate these cookies!  Just pipe the matcha flavored icing on half of the cookie, add some sprinkles and white for the fluff and the puff ball on top and you're done!
Of course, I did create a coordinating sketch.  If you want to play along with me, please create a card (coffee, tea, cocoa themed) and add it to our inlinkz below.  :)
Thanks for stopping by and MERRY CHRISTMAS!


Sunday, January 29, 2017

Sunday Sip and Share...Coffee and YOU!

Hello there my coffee loving stamping friends.  I'm back with another Sunday Sip and Share post over at the Coffee Loving Cardmakers Blog and this week, I'm using my Simon Says Stamp January Kit of the Month!  I fell in love with the little WAFER THIN DIE and couldn't resist the coffee theme!  
Everything (except my kraft cardstock, thread, Stickles and ribbon) used to create this card was pulled from the kit box.  I embellished the hands/heart/nose/eyes with my Copic markers too.  Easy peasy, right?!
I added some Stickles sparkle to the coffee mug's heart and also to the candy dots.  Gotta add my sparkly touches!  
Did you have a chance to knab this kit before it sold out?  If not, you can purchase some of the items in the kit by following the links below.  Hurry- things are selling out fast!  


Now let's move on to the card sketch for the week.  I hope you find some time this week to join the fun and play along.  There's only ONE WEEK LEFT until I select a winner who will receive a coffee loving treat from me.  Sooo...Post your coffee-loving card using any of this month's sketches for inspiration!