Showing posts with label Birthday. Show all posts

Wednesday, July 1, 2020

Birthday Wishes...

Hello there inky friends!  Today I'm sharing a little card for a special little lady who had her heart broken this week.  You see, I am a Kindergarten teacher and this pandemic brought our classroom learning and engagement to a screeching halt in March and we worked so hard learning and navigating school life online until the middle of June.  Our classroom community is a close one, and we enjoyed not only the opportunity to learn together via live (synchronous) online lessons and just simply being together to socialize, stay connected and maintain our community.  Since school has ended for the year, I find that my students (unlike any other of my 23 years of teaching) have worked hard to maintain some connection with me and we enjoy visits every now and then just to say hello. 

Two weeks ago, one of my students asked if she could invite her classmates to her virtual birthday party.  She asked me to send a link to her friends so that they could come celebrate with her. She also invited me, and the instructional assistant as well as another support teacher to her party.  I was excited to help her gather her friends together so I sent the link to all of her classmates.
On the day of her "party", I clicked on the link to her party.  I visited with her for several minutes until the IA arrived to join the fun.  Little Miss was dressed in an adorable birthday shirt, had a birthday crown on, fixed her curly locks just so perfectly and had a giant balloon attached to her chair.  She waved her birthday wand back and forth with the biggest smile on her face. 
We chatted and she shared that she was going to be visiting her grandma and grandpa and that her family was going to do a "drive by" for her and that she was so happy to be 6 years old.   Then she asked..."Where is everybody?". 
After 20 minutes of chatting and waiting, she asked again..."Where is everybody?".  I was beginning to feel so crushed for her.  Can you imagine getting all excited for a "virtual" get together and none of your friends show up?  We tried to keep her smiling and happy but she kept asking..."Where is everybody?".  
After about 45 minutes of waiting and waiting, her teachers singing her the birthday song and waiting some more, I struggled to let her go.  I struggled to say goodbye and leave her "party" because we were the only ones there.  Finally after about an hour, her mom took to the screen and shared some of the activity that was going to happen with the family and I think she was trying to ease the goodbyes.  I knew we had to go sometime, but it was just hurting my heart so much that NONE of her friends/classmates came to her party. 

I have never sent a student a birthday present by mail but this situation called for something special.  I can't imagine as a six year old sweet child to have nobody show up for my birthday party.  How crushing it would be.  What are the thoughts going through her little mind?  SOOO...I donned my mask and headed to Target to get her a special present.  I wrapped it up nice and pretty (her favorite color is pink) and saved a piece of wrapping paper for her card. 

This card was created especially for Little Miss.  I hope it makes her smile and I hope it helps her know that she is so special.  The little fox is similar to the little fox family toy set that I got for her. I thought the sentiment was perfect and encouraging for this sweet little girl. 

Card Details: 

Stamp Set:  For Fox Sake
Ink:  Richard Garay Designs Black Taffy
Markers:  Copics:  E13, E18, E30, E93, E95,YR14, BG000, RV42
Cardstock/paper:  Neenah Solar White, Pink, Yellow, wrapping paper
Clear Glaze
Microfine Gitter


Saturday, April 4, 2020

Sneaky Peek Day 5: It's Magic!


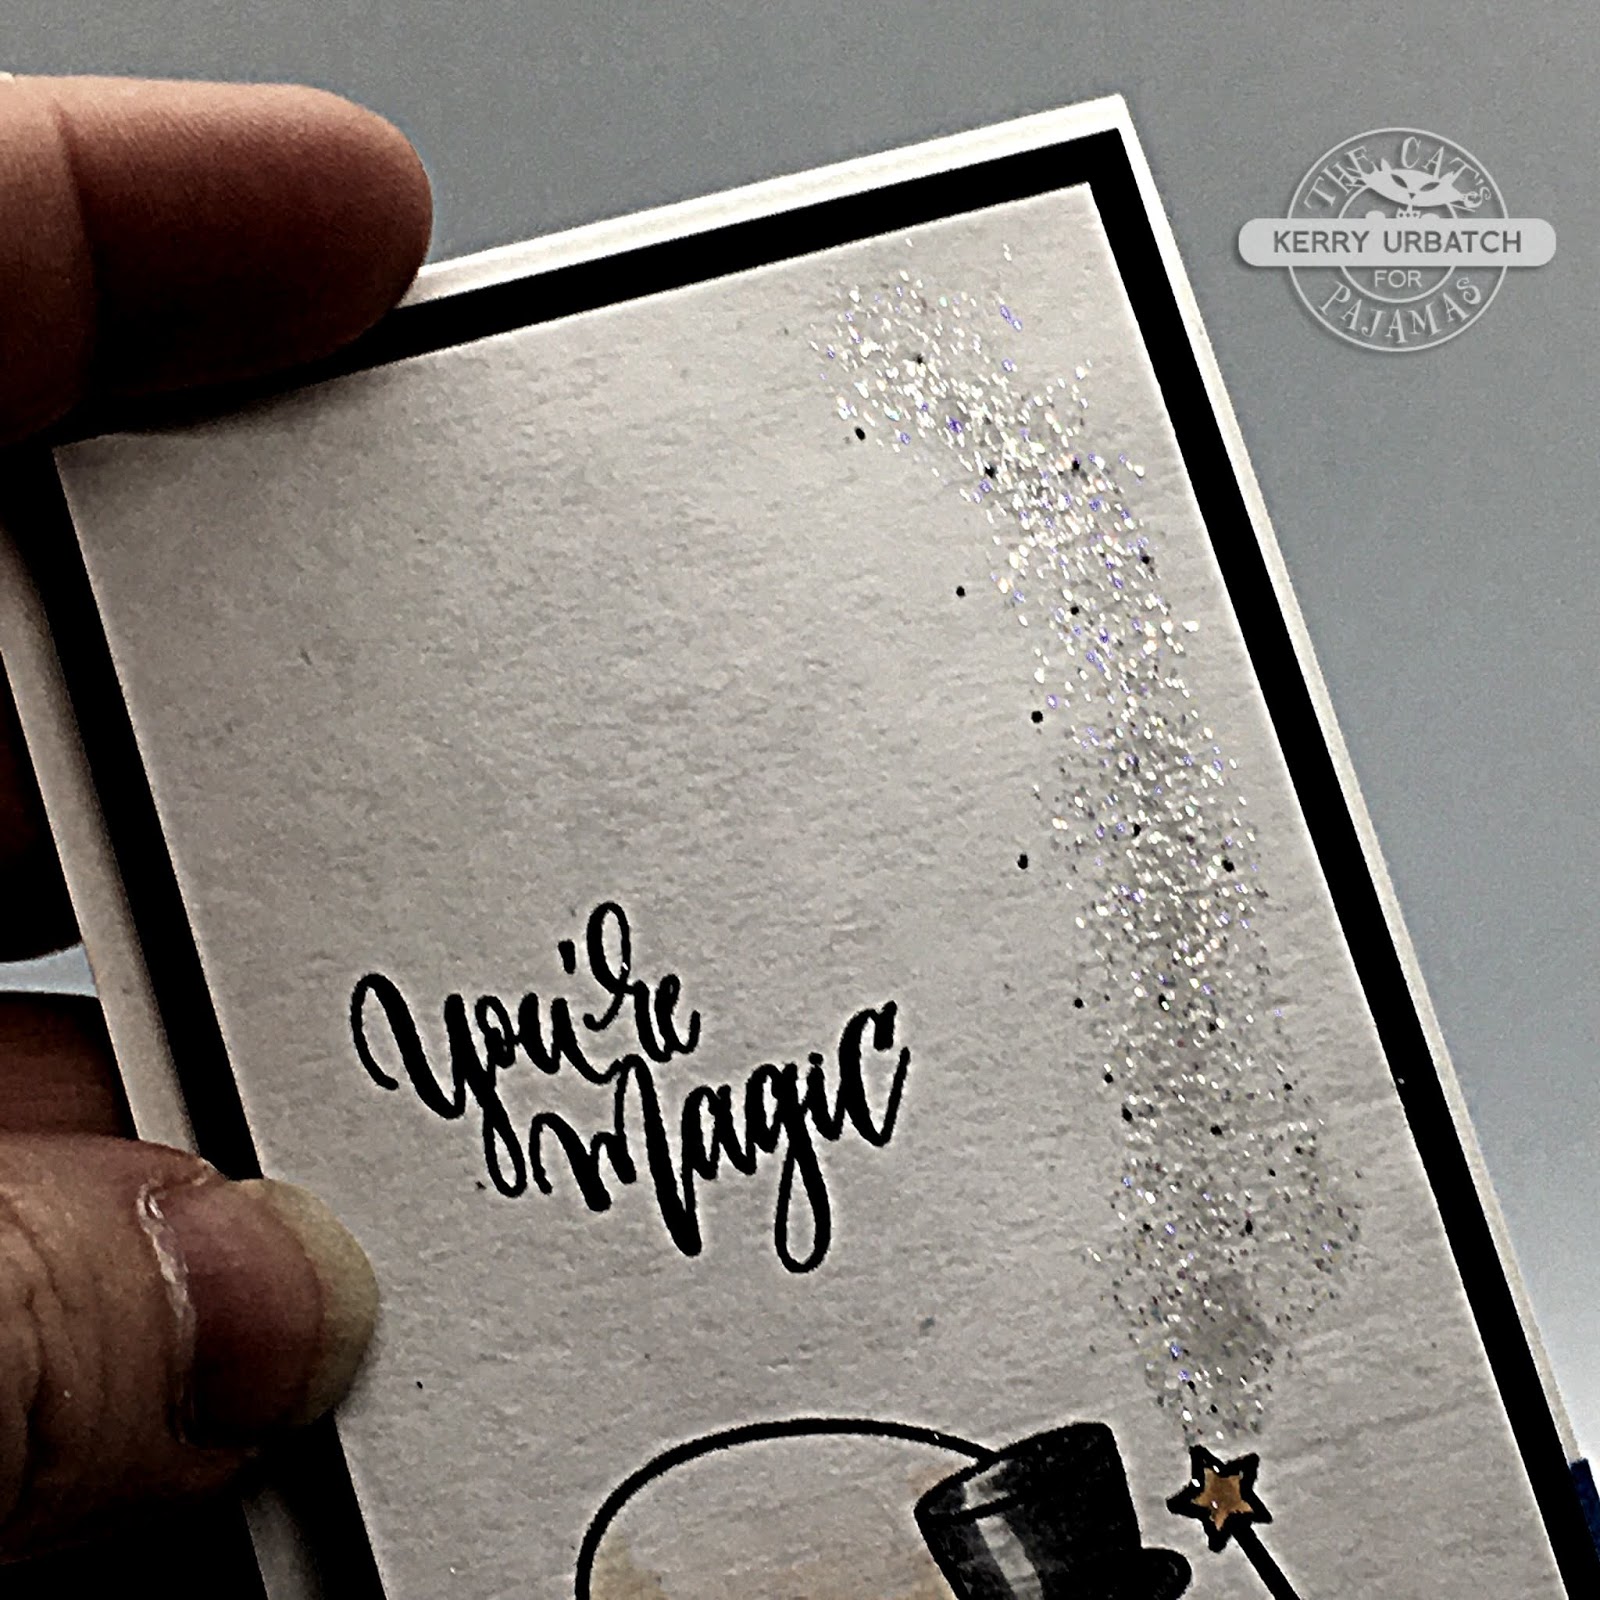
Hello there inky friends!  I'm back with another SNEAKY PEEK!  Today The Cat's Pajamas is sneakin' a peek at the adorable new addition to the bunny club!  This set is called "Get Your Sparkle On" and its such a fun and playful set.  I decided to keep it simple- and skinny...and added a bit of sparkle too! 

All of the new sets/dies/etc will be available for purchase on April 6.  Are you making your list?  


To create my card, I just stamped the bunny and the sentiment on a skinny half panel of white cardstock.  i then colored the image and added some embossing ink onto the paper in a nice sparkly trail from the magic wand.  I used microfine iridescent clear glitter and clear embossing powder to make the sparkly effect.  

Now for the final image, I wanted to make this sparkle embossing powder show up and the only way I could do it was to make the lighting really funky!  I guess the magic will happen for the recipient!  They'll get to tip and twirl this card to make the sparkles just sparkle!  

It's quite magical, I'd say! 
Please hop. on over to the TCP Blog to check out the other fab magical creations.  Make sure to leave a little comment here and there as you'll have a chance to win the $10 gift from TCP!  See you tomorrow for sneaky peek #6!


Wednesday, April 1, 2020

Sneaky Peek Week Day 2: Let There Be Cake!


Hello there inky friends and welcome back to SNEAKY PEEK WEEK day #2!  Today we're featuring the cute little cake set called LET THERE BE CAKE!  And WOOP WOOP!  It's my birthday!  Yep, really, it IS!  I think it's kinda fun that I can celebrate it with my virtual crafty peeps while I sit here at home in isolation.  
I've got a few things to do today.  I'm reading the Happy Birthday book (Dr. Seuss) to my students virtually as I am now an online teacher.  Never would I have thought that I would be teaching and spending time online/on the phone, through letters and through telepathy (ha ha) with my kindergarteners!  It's been quite an adventure, that's for sure.  

To create my personal birthday card, I stamped the colorful strips using VersaColor inks.  I love these inks for crisp and vibrant impressions every time.  After stamping the cake layers I cut them out and set them aside, I stamped the cake plate and the candles with VersaColor Nocturne ink.  YUM!  Next, I splattered some acrylic paint onto the panel (I used watered down neon colors).  
After layering all the cake layers with foam squares, I mounted the stamped panel onto a teal layer and then onto a pink polka-dot layer of patterned paper from my stash (I think it's Dear Lizzy).  SO fun!  


To finish things off, I added some bling because it sparkles!  HA HA!  Thanks for hopping over and now I'm off to party like it's 1999!  WAHOO!

Wednesday, January 1, 2020

Happy New Year! Let's UNI-BRATE!


Hello there inky friends!  Happy New Year!  I hope you've made a fabulously easy transition to 2020 and I pray that your 2020 is just as amazing as you hope it to be!  I'm looking forward to a happy and healthy 2020 with lots of opportunities to travel, visit, play and CREATE! 

Today I'm sharing this fun new ALL DIGITAL bundle that is sooo adorable!  This bundle aptly named "Magical Decade Bundle" is available at RG Avenue until July 31 so you'll want to scoop it up before it goes away forever.  Click on the photo to go directly to the digi sale!  I hope the little unies will make an appearance again in future sets...and especially in some stamp set versions!  Crossing fingers!!!

I created this fun little card to ring in the new year with a magical touch!  I selected two of the little unicorns that I felt would be very versatile even AFTER the new year.  I think I'll be able to create some fun birthday cards and Fourth of July projects with it too! 

When you purchase this digital collection, you'll not only receive the designs for three sets featured above, you'll also receive the digital cut files and a variety of formats so that you can design with them as you wish.  I elected to use the PDF version and cut/pasted the image into an MS Word file so that I could enlarge them, print them and color them with Copics.  

After coloring the unicorns, I fussy cut them (it's relaxing) and added some foam squares.  I added a little bit of cloud action in the background by tearing a piece of cardstock and using it as a mask, then blending some ink onto the card base.  
To finish off the design, I added some glitter to the stars and popped them onto the card with glue.  It is a CAS delight! 
Such cuties 'eh?  Don't you agree that these little unies need to make another appearance in a new stamp design?  How about a Uni collection???  I say YEAH!  

Thanks for hopping over to check out my card!  Hope you have a fabulous day!  

Friday, August 30, 2019

Happy 5th Birthday, Joy Clair!...Hop, hop, hop!


Hello there Joy Clair friends!  Today I'm joining my fellow Joy Clair designers (old and new) as we celebrate Joy Clair's 5th Birthday!  Hop along to take a walk down memory lane and see some favorite stamp sets as well as get inspired with the brand new designs launching today!  If you've arrived here from Shanna Slater's blog, you're on the right track.  If not, you can check out the complete blogroll at the bottom of my post.  

**Joy Clair is giving away ONE gift card of $25 dollars to TWO lucky winners. The be considered, just leave a comment in ALL participant blogs.  You have from August 30 at 9:00 AM until the Monday, September 02, 2019 at 11:59 pm. ET.   Each winner will receive a $25 gift card to be used on Joy Clair Store.

Today, I'm featuring two NEW stamp sets and an older set that is one of my well loved favorites!  Hope you enjoy!  

My first card features the new stamp set called Fall Family Football.  It's a fun set perfect for the football season!  I paired the images up to create a fun little collage and stamped the goal post onto some "turf" colored cardstock.  To finish off the fun "gridiron" look, I splattered the page with some black acrylic paint and then added some dirty prints with my cloth wrapped finger dipped in black ink.   

I snipped the Go Team! Sentiment into two pieces so I could add the GO to the pennant and the TEAM to the play panel.  
 Deelish prints.  I love the scruffy look of this card!

My second card features the new HOPE stamp set.  I love the gloves and the fun designs on this set and can't wait to see all the inspiration with this set.  The recipient is surely going to smile!

I added a little black acrylic paint in varying consistencies with the splattering effect.  I also kept this card super simple and CAS so that the focus goes directly to the image/sentiment on the card.
My third card features a fun little twist on the planner/bible journaling set called Lightbulb Moment.  I love the doodly aspect of this set and found the possibilities for this set are endless!  I reached waayyy back and designed some framed "portraits" that are just as fabulous as my Kindergartener's work.  I arranged them on the "frames" so that they could really set this card off.  

I embellished the design using some of the smaller stamps in this set.  I also incorporated some child -like handwriting here and there.  
 Just look at that yummy cake.  Pretty fancy 'eh?!
Of course, I couldn't finish the design without adding a little arrows to draw the eye right on into that beautiful kiddie coloring!  
Thanks for hopping over to my blog.  Please head over to Rema's blog to continue the hop!


Blog Hop Line-up:  


You are invited to the Inlinkz link party!
Click here to enter

Thursday, August 15, 2019

Happy Birthday La-La Land Crafts!

Hello there inky friends!  Today I'm joining the fun and celebration of La-La Land Crafts 5th Birthday Bash!  Woweee...5 fabulous years!  I'm thrilled to share in the celebration and the birthday fun with all my crafty peeps and look forward to many, many more crafty celebrations to come!  

I am honored to have been asked to share in the 5th Birthday celebration by sharing some card-a-rific creations featuring the August Club Kit!  Check it out on the Subscription page HERE!  Take one peek at this fab kit and you'll know it's definitely fit for a partay!  This month's kit will also include a very special surprise giftie for YOU and I know you will just love it!!  

I'll share more about the fun Birthday Bash Giveaway on IG and FB groups at the end of my post so make sure to read to the end...It's AHHHMAAZING!  But for now, I'll share my cute projects! Hope you enjoy!!!
My first card was created featuring the adorable critters of La-La Land and the new set called "From All of Us".  They're all dolled up and ready to partay!  Of course I had to give each little critter a party hat to get into the spirit.  I used Copics to help them come to life!

I mean, who can resist this little hammie?  He's prepped and ready for the fun bash and those cheeks prove that his cupcake taste testing skills are on point!

My next card features the newest Marci set called "Birthday Present Marci". Have you seen a Marci with freckles?  Well, she's got 'em here!  hee hee hee...
I used the fun number balloons die set "Balloon Numbers" to create a mask for stenciling a fun background behind Marci.  To help add some sparkle and shine, I added golden washi tape to the top, bottom and middle of the background.  Marci also needed a fun BIG balloon to bring to the party so I popped a cheery yellow balloon from the die "Balloon" onto the card as well.  This die is fun because it includes the balloon and the little ribbon.  I cut the ribbon twice to allow for a central ribbon on the ballon.
I gave Marci a few darker strands of hair to give a little whispy look and to give her a bit more texture in her locks.  The sentiment worked perfectly for this card. 
My third card incorporates a little more of a twist on the dies.  I used the same stencil I created for the other card to add number balloons to the background.  I also used the scraps from the yellow balloon I diecut to create a little frame for the statement.  
Giving the background a quick brush of white acrylic paint gave the background paper a fun texture and also added to the funk of this card.  I splattered some white paint on the card too.  Adding that fun number balloon was an embellishing touch to finish things off!

Before attaching the card panel to the base, I used my sewing machine to stitch some lines on the paper.  SOOO fun and funky!  Love it!

And there you have it!  Three mighty fun and fabulous cards made with this mighty fun and fabulous Club kit!  You've gotta love it!  

Thanks so much to La-La Land Crafts for the opportunity to play with your products.  I appreciate the opportunity to join your 5 year celebration in such a special way!  

GIVEAWAY DEETS:  

To enter the Prize Giveaway of a $25 La-La Land shopping prize, comment on my blog post here.  For extra entries, follow the steps below. 

1. Follow me on IG @stampinbugKerry
2. Follow La-La Land Crafts on IG @lalalandcrafts
3. Join Club La-La Land Crafts Facebook Group (online party there NOW!)
4. Tag a friend (or more) in the giveaway post.  
5. Leave a comment on each post!

The deadline for new subscriptions to Club La-La Land (to get the August Birthday Kit) is August 29th.  

Sunday, July 21, 2019

Dual Purpose Cards...Sunday Sip!

Inlky friends!  Welcome back to another fun Sunday Sip and Share!  I'm up on the Coffee Loving Cardmakers Blog every Sunday giving a little coffee-loving inky inspiration!  Make sure you stop by the blog and check out all the coffee/tea/cocoa loving inspiration each and every day!   

This week I thought I would share a tasty little giftie treat I created for a crafty friend.  This card is not just your average card…It’s actually dual purpose.  You see those images?  Well, they will have a completely different purpose for the recipient!  I’ll share how later on in the post.  

I started out by printing some digital images of this fun RG Avenue set called “Birthday Girl”on Avery sticker paper.  This set is available in both digi and photopolymer stamp set but while waiting for my stamp set to arrive, I thought I’d take advantage of having the digi set and playing with some stickers for my planner…Oh yeah, the sheet was originally made for my planner sticker stash.  I love that when I print out these images, I can cut them out and color them with my Copic Markers without worry of bleed or disaster.   


After cutting out my images (I prefer fussy cutting over using my machines), I colored the images and created a little collection to use throughout my planning week.  Then it dawned on me that I could share these images with a friend….And there came the “Dual Purpose” Card!  You see, the images on this card (the birthday girl and the sentiment) and the collection of frappes scattered about, are all peel-and-stick!  Yes, you got that right, the recipient will be able to peel the birthday girl and sentiment right off the backing (I popped the images up on pop dots) so that they can be used in her planner.  I’m also including all those fun little frappes in a little gift bag on the inside of the card.  Some are colored (and glossed and glittered) by me, and some are left black and white so she can color them!

For the card base-and layers, I used some scraps from previous projects.  Since I knew this card would be decomposed by the reciient, I knew I didn't want to go all out using materials that would just get thrown in the trash, so I grabbed goodies from the little scrap stash cup I have on my table.  They come in so handy.  

How fun is that?  Perhaps you'll want to give this a try!  It's easy peasy and makes for a fun little surprise for your recipient!  

Thanks for hopping over to check out my project today.  I hope it inspires you to get crafty with your stamps or digi images.  See you again soon!

Monday, July 15, 2019

New Designer Kit is HERE!!!...RG Avenue Birthday Girl...

Hey there inky friends!  I'm back!!!  Today is the official release of the July RG Avenue Designer Kit Bundle!  WOO HOO!
I thought I'd share ALL week and feature some projects I created using this collection of stamps/digis.  Did you know that when you purchase any RG Avenue stamp sets you immediately receive the digital files for free?  Yes!  you get the digi files, cut files AND the stamp sets!  
Take a peek at the cards I created with this fun and chic set called "Birthday Girl"!  Each image was colored with Copic markers and a few bits of sparkle/gloss were added for dimension and texture.  
Birthday Girl

Notice the background?  I used the super awesome/popular Diamond Daze background stamp (and Black Taffy Sugar Cube ink) to create a fun background for my cards.  To push the background even farther into the background (and to allow the leggy lady to shine), I drybrushed white acrylic paint over the image.  I also splattered some RG Avenue reinkers directly onto this panel when it was dry.  To finish the background off, I punched a few tiny holes here and there and added pink Copic dots on the stamped image to match the Sour Guava cardstock.
Before mounting onto the Sweet Guava panel, I attached the background panel to some Sweet Banana cardstock and then wrapped some gingham ribbon around the bottom.  Next, I tied some cream floss into a bow and mounted this panel onto the Powdered Sugar card base.

After that, I added some splatters of white acrylic paint and attached some fun sequins accentuate the  party vibe.

My second card used some of the same techniques but I tried to CAS it a bit more because I wanted to use two colored images.  I'm not that good at the restraint that CAS design requires so this was as good as it got for me.  HA HA.
Of course, finding a coordinating sentiment was a fun adventure for me and I found it in the Make Magic sentiment set.  I think this has to be my most loved and versatile sentiment set in my collection!  After mounting the sentiment onto my RG Acrylic Round, it took one press onto the Sour Crush  ink pad to get a crisp, beautiful impression.
Just take a look at those glossy balloons!  I had fun adding gloss and glitter to these beauties and even added a few dabs of gloss to the frappe cups.  YUM!  
To finish the card panel off before attaching it to my card base, I mounted the background panel onto the same Banana cardstock then onto some Sour Crush cardstock.  Next, I tied some green Hemptique twine around the panel and attached a cute pink button before attaching to my Powdered Sugar base!  

And voila!  They're done.  Notice the coffee in this set?  I'm sure you'll see more of those cups in future card projects.  Yes, I've already got them colored, cut, glossed and ready for their spotlight!

Thanks so much for popping over to check out my projects.  I hope they inspire you to get crafty today!  I'll be back tomorrow with some more fun featuring another set in this new Designer Kit!!  See you then!