Showing posts with label Blog Hop. Show all posts

Friday, September 20, 2019

Coffee Loving Cardmakers and Divinity Designs...A Perfect Blend


Hello there coffee loving crafty friends!  Today I'm joining my teamies at Coffee Loving Cardmakers and the team at Divinity Designs on an awesome collaboration hop!  Divinity Designs has some fabulous coffee sets and WE GET TO SHARE in a fun BLOG HOP!!  WOOP!  
If you've arrived here from Lisa's blog, you're on the right track.  If not, it's ok.  You can head over to the Coffee Loving Cardmakers Blog OR the Divinity Designs Blog to check out the full line-up!  

I've created two deelish cards featuring the stamp/die combo set called Perk Up! Check 'em out!  My first card features the lowercase scripty coffee sentiment die and the sentiment I RUN ON.  

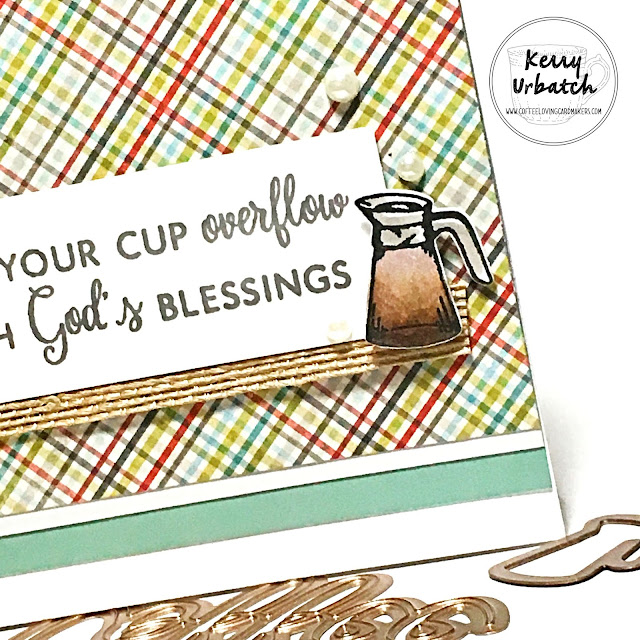
My second card features the fabulous faith-based sentiment "May your cup overflow with God's blessings" and the fun perkolator pot stamp and die.  Love love love!!!


I used the pretty plaid and patterned papers from the old/retired Vintage Christmas 6x6 pad from My Minds Eye.  I love the colors and the patterns and I think they work so perfectly with my coffee theme.
Thanks for hopping over and for leaving some comment love.  Remember to leave comments on all the blogs in the hop for a chance to win an amazing 25$ prize from Divinity Designs!  Commenting will be open from today until Friday Sept. 27 at 11:59 Pacific time. Winners are selected from across all blogs so the more you comment, the better your chances of winning!  Since I'm the tail end of the hop, I'll direct you back to Divinity Designs.  

Tuesday, July 30, 2019

The Cat's Pajamas New Release!

Hello there inky friends!  Today I'm joining my fellow Cat Packers as we share some of our favorite inspirational projects created from the NEW Release this month!  If you've hopped over here from Rebkaha's blog, you're on the right track.  If not, the complete blogroll is available at the bottom of my post!  Check out the full blog post for all the fab inspiration!  
How have you enjoyed the sneaks?  Do you have a favorite stamp set?  How about those awesome stencils?  And wow...That BIG BEAUTIFUL BLENDING BRUSH!  I'm in LOVE!  

Take a peek at my project featuring the new Gnome Peeking set.  It also has a free cut file HERE.  I paired it up with the adorable Mailbox die and the new Blizzard stencil.  Did you know that you can receive this fun Gnome Peeking set when you purchase items in the TCP store?  Yep!  Just have a purchase of  more than $65 and you'll get it FREE or you can purchase it by itself!  Deal?  Yep!
Gnome Peeking
Blizzard Stencil
Big Beautiful Blending Brush
Mailbox Die
I started out by using the Big Beautiful Blending Brush to blend some some light blue ink onto the top portion of my white card panel.  I then added s blend of some grey for grounding and then stamped and colored the gnomes.  I selected just a few colors to keep the theme "Postal".  After coloring the gnomes, I diecut the mailbox three times (in blue, two times in white) so that I could get the added elements to make the mailbox come to life.  
Next up was assembling the card panel.  I arranged the images so that they would appear to be having a little mail party.  I then attached this panel to a red panel and then onto a blue panel before placing into my stamp positioner and stamping the sentiment with black ink.  Finally, I attached this panel to my white card base.
And there you have it!  Finished and ready to mail this winter!  One more Christmas Card down, a million more to go!
Thanks for hopping over to check out my project! Please hop on over to my fellow Cat Packer Brenda's blog to check out her inspiring project!   I'll be back later in the week to share some more projects featuring sets in this new release!!!

Complete Blogroll Here!

Monday, April 1, 2019

Color By Faith...Easter best!

Hey there inky friends!  Happy Birthday to ME!  No joke!   Hee hee...

I'm joining my fellow Joy Clair design teamies as we celebrate one of our favorite stamp lines:  Color By Faith!  The Color By Faith line is a collection of stamps perfectly suited for stampers who desire to share their faith with others.  It's also a line that features scripture, faith based sentiments and coordinating images to help you spread love, hope and comfort.  If you've arrived here from Monica's blog, you're on the right track.  If not, scroll down to the bottom of my post and you can start hopping right away! 

Not only is the Color By Faith line perfect for Faith journaling, the stamps work beautifully for cardmakers and scrapbookers.  They even work well for your everyday creations or specialty projects.

Today I created a special project for Easter gift giving.  I was inspired to create a cute little dress featuring one of the newest sets in the Bible Journaling Color By Faith set called "Blossom".  I wanted to create a cute little Dress treat Box from The Cutting Cafe.  To create this project, I printed the dress template onto white cardstock using the PDF version of the files (they are available in SVG format as well) and then cut out the template.  I then stamped the little agave cactus plant onto the bottom of the dress (both sides) using two different green inks.
After stamping the cactus plants, I used a Copic marker and an Opaque White Gelly Roll Pen to create polka dots on the top portion of the card.  Next, I added some yellow ribbon.  
Once the dress was stamped, I assembled the box by following the score lines.  I filled it up with chocolate and now it's ready for gift giving!!!

Thanks for hopping over!  I hope you were inspired by my creation and I hope you enjoy the rest of the hop!  Remember, to celebrate the Color by Faith Blog Hop, Joy Clair Stamps is giving away a $25 Gift Card to One lucky winner! The winner will be chosen at random from the comments left on participating blogs, so make sure to visit each stop and leave a comment. Leave comments by 11:59 pm ET 04-05-2019 on all participating blogs. The winner will be announced on the Joy Clair Blog on April 30, 2019! Please hop on over to Donna's blog for more inspiration!

Blogroll:  

Tuesday, January 29, 2019

The Cat's Pajamas New Release! FREEBIE!

Hey there TCP Fans!  I'm joining my fellow Cats as we hop, hop, hop along and release a new bundle of stamps, dies and sparkly bits today!  Today IS the day and we hope you've enjoyed the week long sneaky-peek of all the newest stamps and dies officially released today!  

Did you know you can purchase the Poochie Pack or Kitty Kat Pack today for an additional 10% discount?  YEPPERS!  So get shopping!  PS...Did you know that there's a FREEBIE stamp in every release too?  Today, I'm sharing a project with the freebie set for this release:  Always Believe!  How do you earn a FREEBIE Set?  Well, just place your order of $65 or more (after discounts and shipping applied) and receive this set FREE!  Here's a direct link to all the goodies:  What's MEW!  No worries if you can't make a Freebie Set purchase this month.  You can always purchase THIS set if you wish!  

I'm the leadoff hopper today so if you're here, you're ready to hop! Let's jump right in to my project share:  
Need a little SUNSHINE....a little HAPPY? How about some SNOW?  Well, all you've gotta do is BELIEVE!  :)  I created this bright and happy card featuring Always Believe using some neon inks and distress oxides.  I stamped the sentiment in Versafine Onyx black and embossed with clear EP to give it some shine.  To create the background, I just brushed some neon yellow ink onto my non-stick mat and lifted the color onto my paper.  I then splattered some neon green and orange ink onto the paper and added some splats of Distress Oxide blue. 
 I loved the little crow on the top of the umbrella so I stamped that and colored his beak with a yellow Copic marker then cut it out and attached it to my card with some fun silver sparkly fibers too. To finish the card off, I added some stars from the Holiday Toppers Cut-Ups die set using that same neon yellow color.   To make the card just shine, I added some of TCP's newest sequins:  Holographic Holeless Pink Sequins and Silver Saucers Holeless Sequins

Pretty WILD right?  I LOVE it!  

Thanks for hopping over (and for leaving some love!) Please head on over to Julee's blog and check out her fabulous project.  It's always a joy to see what she creates! Take a peek at the full lineup for the hop right here:  
Kerry ME!

Thursday, January 17, 2019

Joy Clair Blog Hop Release Day 4!

Hello there Joy Clair friends!  It's Day 4 of the new release and we're releasing the following sets today:  Check 'em out! 
Reckless Love, Spring Stroll and Going Places

Here's the line-up for today's hop.  Make sure to visit each blog and leave a comment for your chance to win a Joy Clair prize!  

Saturday, September 29, 2018

National Coffee Day...Joy Clair and Coffee Loving Cardmakers...


BOO!  Hello there Joy Clair and Coffee Loving crafters!  If you've arrived here from Erin's blog, you're following the candy wrappers just fine!  If not, join the fun and make a full circle starting here!  I'm doing double duty in this post to share a fun "Halloweenie" Coffee card as well as share that CLC Super Sponsor Joy Clair is contributing a fabulous prize to one lucky commenter in this POST!!!!  As this hop is a bit different than previous hops, it's FULL of prizes from generous Super Sponsors!  Just make sure to check out as many posts as you can in this hop because we have secretly hidden some prizes!  I'm thinking of it as a little TRICK-OR-TREAT adventure.  HEE HEE...

So... Just make sure to hop along with us.  Lots of Super Sponsors will be sharing NEW and SHINY stamp sets, prizes and goodies along the way.
To create my "Halloweenie" card, I started out by stamping the Joy Clair Coffee Talk mug onto some fun and bright magenta cardstock, then went to town coloring it with Copic markers and colored pencils.  After it was colored up nice and pretty, I cut it out and set it aside.  I then started working on the background.  I just added some coordinating colors from my colored pencil stash and then spritzed the paper with some Tsukineko Sheer Shimmer FROST Spray.  After that, I machine stitched some "steam" lines and added some embellishing touches.
I mounted this panel onto a green card base that I had prepared with a few corner pieces of that magenta cardstock.  F.U.N.  Love how this card turned out and I'm excited to be featuring this fun set from Joy Clair.  Joy Clair has graciously offered a $25.00 Gift Card to their shop and I know that you'll find a few goodies to enjoy.  Good Luck!

Please hop on over to Melissa's (Brew Crew) blog to check out her inspiring project!

After hopping along with the CLC team, make sure to hop the other Super Sponsors' pages!  Here's a list to help you navigate:

CLCDT (and Brew Crew) Blogroll:  

Super Sponsors hopping along with us today:  

Wednesday, August 29, 2018

Joy Clair Birthday Bash! Anniversary Showcase

Hey there Joy Clair friends!  I hope you're enjoying the fun and fabulous creations we're featuring with this new Birthday set called Party Animals!  Joy Clair has been celebrating its 4th birthday all month long and we are excited to share this fun and exclusive set!  I got a little carried away with my project and had tons of fun!  Take a peek at my card creations here and make sure to also check out the fun creations from my fellow DT members at the Joy Clair Blog HERE!  


This set includes several wild party animals and quite a few awesome sets.  I pulled a few of my favorites to make my cards today.  

My first card incorporates the MOOOVALICIOUS bovine I call Clementine.  She's swinging in as a fun pinata and daring you to choose...Will it be a nice healthy apple or will ya take a crack at the treats that'll fall from inside her bodacious bod?  GO WILD!  
I started out by coloring "Clementine" and then doodled some confetti and a few candy treats onto a piece of cardstock.  I added some colored dots for the added confetti with a mix of bright Copics in my collection.  After doodling, I used a ruler and my Staedtler .03 Pigment pen to make a string for her to swing on.  After that, I popped her up on the page and added the sentiment. 
 Clementine has some gorgeous glossy red lips, perfectly manicured toenails and flirty blue eyeshadow.  I also added a little earring loop for good measure.
After mounting the stamped/decorated panel onto pink cardstock, I attached it to a white card base and added some gloss to the confetti, lips, toenails.  She's gorgeous...and ready for a whack or to...but be careful, don't clunk your head when diving for the treasure that falls!
My second card incorporates a little wild and crazy too!  My sister loves pigs (and has a pet pig) so this card will be heading her way in a few months.  I decided to add a little piggie pool for her to play in.  Yeah, splash, roll, blow bubbles...It's time to PARTAY!  
I stamped the pig onto the card panel and then doodled a little blow-up pool to the side.  I added some water and extended the grass lines to make it "flow".  
 I gave this mischevious little piggie some glossy eyes, teeth and tongue and colored him with a few peachie Copics.
Just a little green to make the grass come to life ! And to make this photo-op a little more tame for the younguns, I removed the booze in the background (no I didn't drink it all).  and added a tasty can of grapefruit sparkling water.  YUM!

Friday, August 3, 2018

Coffee Loving Cardmakers and Our Daily Bread Designs...Brewin' it up!


Hello there Coffee Loving crafty friends!  Today I'm joining my fellow Coffee Loving Cardmaking teamies and the Our Daily Bread Designs team as we collaborate on a fun Blog Hop featuring Our Daily Bread Designs products!  If you've arrived here from Amy's blog, you're on the right track, if not, you can navigate your way through the complete hop list at the bottom of my post.  
I selected the new stamp and die combo called Hug In A Mug and paired it up with the rich and lovely paper from the Latte Love paper pad.  
I love the pattern of this paper and the color is just so rich and delightful!  It works perfectly with this stamp set!  I added a bit of copic coloring E50 over the creamy parts of this paper to give them a hint of peach...Just to soften that color up a bit.
As with many of the ODBD stamp sets, they make sure to include some faith based sentiments...LOVE that!  
And guess what!  This card made the weekly favorites on Splitcoaststampers!

My second card (and treat) was created using the other travel to-go cup in the Hug in a Mug set.  I also used the fun paper in the Latte Love paper pad.  
Still playing with the rich colors of this paper collection, I chose to pull colors from the collection as a whole- minus the terra-cotta color.  I added a hint of purple/lavender instead using Copic V04 and V12 lavender colors on the cup as well as the G21, G0000 and BG93 for the cup itself.  I stamped the "Greatful Heart" sentiment on a tag diecut. After I diecut the cup, I added some foam squares and set it aside so I could assemble my cardfront, attach some pretty ribbon and mount this panel onto a piece of light lavender cardstock.  I attached the coffee tumbler and popped this completed panel onto a dark chocolate colored card base (with a topfold).  

I wanted to create a little pillow box to hold some coffee caramel candies so I used some of the yummy coffee bean printed paper in this fun paper pack.  I tied a bit of dark brown satin ribbon on the pillow box to coordinate the set.  
Adding some Chocolate twine and a pretty golden pearl finish the tag off!
As a special offer for this hop, Our Daily Bread Designs is offering a special discount of 20% off your purchase!  Just add the code coffee to your order and it'll discount it right away! I'm providing a link to their shop so you can fill your cart right away.  Just click on the photo below.  :)

Thanks for hopping over to my blog.  Please hop on to Helen's blog as I'm sure you'll be inspired!  

Blogroll:  

Kerry Urbatch (That's ME!) 

Thursday, August 2, 2018

Joy Clair August Release: Deer Friends

Hello Joy Clair friends!  Today I'm joining my fellow Joy Clair designers in sharing some fun inspiration featuring the newest stamp sets to the Joy Clair collection!  We're also featuring some cool products from Rinea Foil in our projects.  We hope you are inspired and enjoy our creations!  If you hopped here from Helen's blog, you're on the right track. If not, you can find the complete blogroll at the bottom of my post.  

PS...If you would like a chance at the $25.00 Gift Certificate to shop Joy Clair's store, make sure to comment on each post in the hop!  A winner will be announced at the end of the month and it just might be YOU!  


I selected to feature the adorable stamp set called Deer Friends.  It's a great little set that is perfect for coloring and includes three cute little critters, some leafy elements, some woodsy items and a mixture of words with fun fonts!  

I created this adorable little gift bag for a friend.  The glassine bag looks awesome against the metallic shine of the Rinea foil, don't you think?  Let me quickly share how I created my little giftie!  

I first rubbed the Ghost Ink over the edge of the Rinea foil.  I used the Teal/Gold foil from the Peacock Variety Pack.  I let it air dry for about a minute or so and then took a dry paper towel and rubbed the teal color off.  This ink works wonders and using it always reminds me of when I remove my fingernail polish with fingernail polish remover!  HA HA!  It has no scent- so that is a perk!  
So after I rubbed off the blue, I stamped the leafy vine onto the Ghost pad and stamped directly over the paper.  I wanted to create a layered effect.  After that, I stamped the same image over that with black ink.  
The next step was to score about a half inch space from the bottom of the foil and used my scissors to fringe the bottom.  I wanted my foil to have a fringed look to give added texture as well as help the gold color on the back peek through!  

I attached the foil panel to a piece of white cardstock for extra "sturdy" support and then attached it to the glassine bag.  
I stamped and colored the little fox using Memento Tuxedo Black ink and my Copic markers then cut it out.  I added a little heart to his chest because I though he needed it.  :)  Next, I tied some orange and teal Hemptique twine around the bag.  
Finally, I stamped the sentiment onto a piece of white cardstock cut into a pennant shape with Memento Black ink and VersaClair ink.  I popped the fox and the tag onto the bag with foam squares and filled up my gift bag with some crinkle paper and a new pad of Rinea Ghost Ink.  Now, I have a sweet treat to gift a friend!  Please head on over to Angie's blog to see her newest creation!  
Blogroll:  
Kerry (That's ME!)