Showing posts with label Winter cards. Show all posts

Saturday, December 26, 2020

All is calm...


Hello there inky friends. Today I'm sharing a card I created for one of my sisters and her family for Chirstmas. I wanted to give them a little piece of peace and calm and I felt this scene captured it perfectly.

To create this scene, I stamped the Mountainside mini scene on a dark blue cardstock panel with Versafine Onyx ink and then embossed it with silver sparkly embossing powder from my stash.  I then blended black ink along the edges before grabbing my Distress ink in Turquoise, Purple and Pink to create this pretty aurora in the sky.  I then spritzed water onto the panel to help let the ink bleed together.  Next, I splashed a bit of sparkly shimmer on the panel.

I stamped and embossed the sentiment from the Little Angel set because it just fit so perfectly with this scene.  I cut the sentiment into a banner and then mounted it onto the stamped panel.  To finish things off, I attached some sparkly tinsel ribbon and some tiny sheer bows before adding a little bling.  I mounted this whole panel onto a piece of white cardstock, then gray stock before popping the whole panel onto a white card base.  

Thanks for hopping over to check out my card.  I hope it inspired you and I hope you have a wonderful 2021!  

See you again soon!


Friday, October 30, 2020

Heartfelt Creations October Alumni Hop...Inspiration Galore!


Hello there inky friends!  I'm moving way past Fall and making a mad dash to WINTER!  Is anyone with me?  WOO!  Fall and Winter are my most favorite seasons and I am already over raking leaves and wet leaves from the yucky rain, so let's move on to winter, shall we?!  


Today, I'm joining my fellow Heartfelt Creations DT Alumni as we share some fun inspiration and fun this month!  Every month, the Alumni DT members get together for a fun family gathering in blogland and share our love of stamping and creating with each other.  It's so amazing to be a part of this inky/creative family!  If you've arrived here from Candy's blog, you're on the right track.  If not, you'll find the complete blogroll at the bottom of my post to help you along your way.  

Remember,  one lucky commenter will be chosen from one of the blogs to be this month's prize winner so you'll want to leave some love at every hop spot in order to have a chance at the goodies!  We appreciate your comments and know that your visit will continue to inspire us to create with Heartfelt Creations products we all love! 

I created my wintery card using the adorable stamps Merry Moments (On sale now!) Cling set and the Candy Cane Cottage (On Sale Now!) Cling set.  I paired it up with the pretty Poinsettia & Holly Clusters Cling set/Dies and Shaping Mold to make a fun and festive shaker card.  
I started out by stamping the gingerbread house onto white cardstock and then colored it with Copics and watercolor pencils.  I fussy cut the colored image and then glued it to a light blue piece of cardstock (5 1/4 x 4).  I then took some ivory acrylic paint and washed a bit over the top of the paper to dull down the image and coloring.  I added  a colored polar bear/panda image with a foam square then some foam around the image panel before filling the area with microfine glitter, styrofoam "snowballs" and some Blue Suede Shoes Prills and Minnie Pearls Prills and mounted a laminated panel to the top and tested out the shaker with a shake, shake, shake!  Perfect!

Next, I cut a piece of light blue cardstock and freeform cut the inside to create a fun frame.  I rubbed the edges of the panel with my finger to fuss it up a bit and then stamped the holly leaves with embossing ink then used some white embossing powder to make the holly leaves show up and make the blue panel blend well with the scene.  After that, I mounted it over the laminated sheet and attached the whole shaker to the front of an A2 card base (topfold).  To finish things off, I diecut some poinsettias, pressed them in the mold and assembled them.  I added some glitter to make them shine then mounted them on the card.  I added some acrylic flats to the center of each flower and my card was complete.  Can't wait to send this card to someone special!

Thanks for hopping over to my blog to check out my card.  I hope it inspires you to create something amazing and please stop by again.  Make sure to hop over to Amarilys' blog to see her inspiring creation!  See you next month and good luck!  

This month's BLOGROLL:
Kerry (ME!)

Thursday, July 23, 2020

TCP Sneak Peek Week Day 3: Dies, Dies, Dies!


Hello there cardmakers!  It's sneaky peek week day 3 and it's all about those holiday dies!  We're sneaking peeks of three new stand alone die sets that will allow you to make some GORGEOUS cards!  

My first card features the Cardinal Duo die.  Its a two part die that will help you create a fun cardinal scene as well as create pierced circle cut-outs in your cards!  

 I started out by creating the nighttime sky using some Caran d'Ache watercolor crayons in an ombre blend of oranges and yellows.  After that, I diecut the cardinal die using some white cardstock.  I removed the pierced circle so that I could create the cut "schierenschnitte" style design.  I mounted this panel onto the watercolored panel and then splattered some black acrylic ink over that.
Since I didn't have a pine needle die set (hint hint TCP), I decided to glue a faux pine sprig from my mantle arrangement.  I attached it with Beacon Adhesive 3 in 1 glue.  To help it stay in place while drying, I placed a box of colored pencils over it to add some pressure.  Once Dry, I attached the little gingham ribbon bow.  

Up next is the fun little Gnome!  I paired it up with the fun Birch Forest stencil and the Birch Snowglobe die.  

I started out by blending the yummy Wendy Vecchi Make Art inks below to create the beautiful blue birch tree sky scene on white cardstock.  
 I then flicked some diluted white acrylic paint onto the stencil to create the illusion of snow falling.

I then diecut the birch tree globe using white cardstock and then started diecutting the parts of the gnome.  After cutting the nose, hands and feet, I colored them with Copics.  I then glued everything together to create the cute gnome and mounted it onto the birch globe.  
To finish everything off, I mounted the birch stenciled panel onto red cardstock trimmed to size and machine stitched the edge before attaching this panel to a white card base.  Next, I mounted the Gnome and birch globe combo, then attached some coordinating twine with some fun brass jingle bells.  SO FUN!  

Isn't he just the cutest???

Alrighty, for the last card today, I'm featuring the fun scripty sentiment die "Hello Winter".  
 I started out by coloring a white piece of cardstock using Copic markers.  I blended the inks with Copic various refill and then added some shimmery metallic ink splatters before drying with a heat gun.  After it was dry, I diecut the sentiment and set it aside.
 Next, I scribbled a tree scene on a piece of cardstock and then added some blue watercolor.  I then added some white splatter and mounted it onto a blue scrap of cardstock.  I then attached some fun sequins (holeless sequins from TCP) and attached the sentiment.
For the ribbon treatment, I added some black twine and some fuzzy floral centers and some sequins.  I curled the edges of the twine to mimic the scribbles in the background.  :)


Hop on over and check out all the other inspiration for these fun dies!  

Me


Tuesday, October 22, 2019

Club La-La Land Crafts October Kit: Winter Piggies!


Hello there inky friends!  Today I get to share my final two cards featuring the adorable new stamps in the October 2019 Club La-La Land Crafts kit.  This kit is so fun and playful!  It's perfect for my love of winter!  I love these little piggies so much!  How about you?  Have you been inspired by all the fabulous creations posted since its release?  I sure have!  

Today I'm joining Larisa, Cathy and Bobbi as we share fun projects with this kit! We hope to inspire you to create something Ahhh-DORABLE too.  


My first card features two cute little piggies having a ball out in the freezing cold environment.  They're building snowmen, making figure eights in the snow and keeping cozy in their warm clothes.  
 I gave the cute little piggie with the hat a fun hat pattern and a cozy red sweater.
I gave the second ice skating piggie a cozy blue sweater, hat and scarf.  I also added some icicles hanging down and the icy pond for them to play on.  

Copics Used:  
Pig 1: E93, V000, RV42
Shirt:  R17, R29, RV42
Ice Skating Pig: Gelly Roll White opaque pen,  B52, B12, W3, W5
Snowman and Snow/Ice:  C0, C2, B52, B12

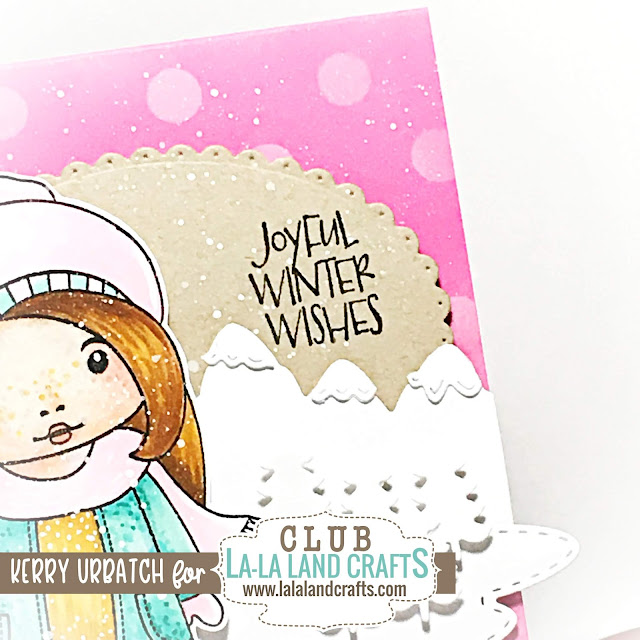
My second card is a sweet pink girly card!  I wanted to feature the pinks and the whites so I used few colors on this design.  I opted for no color on my mountains and on my trees so that Marci can take center stage on this card
To  add a bit of whimsy, I stenciled (So Many Dots Layering Stencils) some white polka-dots onto the pink card base before adding the Kraft oval (Pierced Scalloped Ovals Die) and the mountain-snow scene.  
I love Marci with freckles so I added a few light freckles on her face.  I also added some "texture" to her sweater by stippling some darker teals over the light color.
After stamping the sentiment, I flicked some white acrylic paint over the whole card to create a snowy effect.

Copics Used:  
Marci Face/Legs:  YR00, E93, YR0000
Hair:  YR24, E23, E37, E47
Scarf, hat, mittens: RV10, RV21, BG32
Sweater Jacket: BG32, BG45,BG13, BG49
Sweater:  Y15, YR31, YR24, White Gelly Roll Pen