Showing posts with label Stars. Show all posts

Tuesday, July 2, 2019

TCP Tuesday: Christmas in July!

Hello there inky friends.  Today I'm joining my fellow Cat Packers as we introduce TCP Tuesday challenge #359.  It's all about CHRISTMAS IN JULY!  And there's nothing like a great SALE to get you revved up right?  The SUMMER SAVE SALE is going on NOW!  Get 25% off ALL products in the TCP shop NOW through July 8!  Take this opportunity to cross sets off your wish list and get a discount to boot!  


The TCP Challenge runs throughout the month of July.  To play along, please upload a CHRISTMAS themed entry to our blog post HERE.  
Here are the details for the Challenge:
  • Each month a new challenge will be posted on The Cat’s Pajamas blog and our Facebook page.
  • If you want to play along you just upload your design to The Cat’s Pajamas blog page using the InLinkz button provided.
  • You are not required to use a Cat’s Pajamas stamp or die but if you have them we would love to see them.
  • On the day of the next challenge one winner will be chosen from the previous challenge and will receive a Cat Cash Voucher for $50!
Now let me share a bit about my Christmas themed card!  

I created this fun and festive card using the adorable bunny set called "Your Gift".  I started out by using an awesome new blending brush (COMING SOON TO THE SHOP) to add some light blue on a white card panel.  I also stamped some of the tiny stars onto the background so that I could color them and add a bit of sparkly bling.  I then stamped the bunny tree onto a piece of white cardstock and fussy cut the image before coloring with Copic markers.  After it was colored, I applied some white gel pen to add dimension and give a bit more texture.  I then started arranging the card design.  
I thought a whisp of golden thread would add the fine ribbon treatment I needed for this card.  To finish things off, I added a few golden pearls and mounted this panel onto a piece of polkadotty paper (Pink and Main) and mounted this panel onto a green backing.  Next, I mounted the whole panel onto the card base and added the sweet sentiment.

Thanks for hopping over to check out my card.  I hope my teamies also inspire you to start filling your Christmas card stash box with some awesome new cards!

Wednesday, November 1, 2017

November Joy Clair Challenge: Stencil It!

Hey there stampers!  Today I'm joining my fellow Joy Clair team members in kicking off the November Challenge on the blog with a fun stenciling challenge.  STENCIL IT!  We welcome you to play along and encourage you to post your creation in our inlinkz for your chance at a $25.00 gift certificate to Joy Clair!!!  Come on, Join the fun!
I totally intended on making this card a FALL card but...it just didn't want to be a fall card.  I think it wanted so much to be a snowy scene...so I just followed along for the ride.  
To create my "starlight scene", I made my own stencil using some punches and a piece of cardstock.  I originally started stenciling with the dauber but found that too annoying so I just inked up my finger and dabbed onto the stars and dots.  It worked much better!
Those itty bitty dots didn't stencil as well as I thought they would and just became some pin prick colors.  I think these dots would have worked a bit better in gold on dark cardstock but oh, well...I just had to keep applying the dots so it would look like I meant to have them all there.  HA HA.  
After doing the stenciling (notice my blue finger dabbed in yellow made an oopsie green star),  I started coloring one of the trees from the Happy Camper set.  I colored/painted it with a combination of Tombow #296, and Memento Cottage Ivy (with water) and Rich Cocoa (with water).  I colored the other two tree trunks and gave a little shadow with the Tombow N95.  I then cut out this tree and the other two trees so that I could figure out a nice arrangement on the card.  
 I figured out a nice arrangement, tied some twine, machine stitched some meandering lines, added some pop dots, laid the trees down, then searched for the perfect sentiment...I found it in the Salt and Light set.  Inked it up with Memento Black and stamped her on.
The stamped image was then splattered with some sparkle silk and pop dots were added to make her float on the card base.  FINITO BANDITO!  Love it!
I hope you enjoyed this creation and remember, if you don't have stencils, make your own!  Easy, peasy!

Thanks for stopping by!

Thursday, July 4, 2013

Happy 4th Of July USA!!!

Hello stamping friends.  I'm celebrating the Fourth of July at home with my pups this year.  Nearby family is away cruising the Caribbean so that leaves me home alone with the pups.  I've spent the day relaxing, sipping homemade cappuccino and stamping.

I wanted to share a few cards I made while tucked away in my stamping room today.  I'm determined to use my stash and play with much forgotten and unloved stamps...

Here's your traditional RED, WHITE, BLUE card...with some added bling and yellow.
Ink Used:  Memento Tuxedo Black, Ladybug, Dandilion, Danube Blue
Kraft Cardstock
Silver flatback beads
Silver cording

And for a little twist:
Stamps Used:  Unity splatters and stars all boy
Inks Used:  Hero Arts Neon Cube set
Sequins
Black satin ribbon
Silver Cording
Micron Black Pen
Stardust and Silver Stickles

Hope you have a fabulous holiday!!!

Saturday, June 9, 2012

Babies, Babies, Babies...

 Happy Saturday stamping friends!  I'm spending today cleaning my stamp room and decided to stop and take a break to make a baby card for one of the Art teachers at my school.  Her baby shower is this Monday and I told my team I would make the card.  I decided to make a not-so-traditional baby card this time.
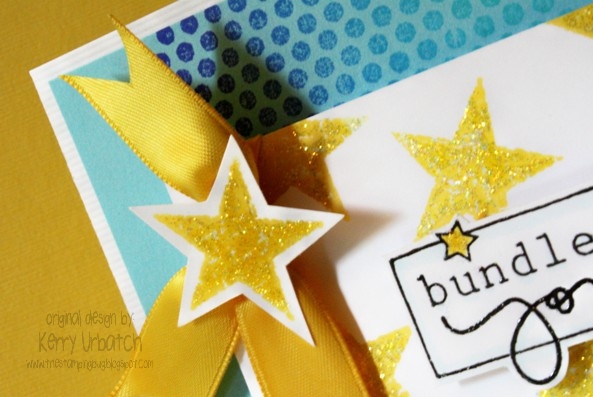
 I combined a few stamp sets to make this card.  The first set selected was a UNITY background set called Dots for Sure.  I used some Kaleidacolor Sea Breeze ink with the dots.  The next set was an itty bitty set called Splatters and Stars (must be discontinued because I can't find it in their store).  I stamped the stars with Memento Dandelion ink.  Of course you know me, added some Diamond Stickles to make those stars SPARKLY!  I didn't have a UNITY sentiment that would work for this baby card so I pulled out my big box of Studio G clear dollar stamps for the sentiment and stamped it with Versafine Onyx then heat embossed with clear EP. This "Bundle of Joy" sentiment is from Series 16/19 and it was the perfect fit for the card.  My cards are never missing a touch of ribbon and I think the yellow just pops on this card!
Copic colors added were:  Y15 Cadmium Yellow (perfect match to the Memento ink) and some highlighting around the sentiment with B0000 (you can't see the highlighting due to my need to BLOW OUT the image in editing...It needed to be BRIGHT!)

I'm excited for the next few weeks to come...SUMMER and more stamping time available!  Keep your eyes peeled!