Showing posts with label Ranger. Show all posts

Friday, November 6, 2020

Day 1: Coffee Loving Cardmakers Fall/Winter Hop

Hey there inky friends!  Today is the first day of the FALL/WINTER COFFEE LOVERS BLOG HOP!  WOO HOO!  I'm so excited to be joining all my coffee-loving peeps as we celebrate our love of coffee/tea/cocoa/cider goodness...In crafty form!  All week long we'll be sharing projects we're proud of and we hope you'll join us in the fun!  Thanks to all of our amazing Super Sponsors, we have a TON of NEW and LOVED products on display and our Super Sponsors have once again shared some amazing goodies for our give-aways.  In order to have a chance at any of our Super Sponsor prizes, just play along and share your creations with us HERE!  

I created my first card/ornament combo featuring the yummy new stamps/die/stencil combo from Wendy Vecchi and Ranger called Warm Wishes.  I blended some Wendy Vecchi ink around the edges, stenciled the leaves, vines and berries (Potting Soil, Carnation Red, Fern Green, Leaf Green) and then stamped the sentiment along the edge.  I then splattered some black acrylic paint onto the panel to give it another layer of yumminess.  

To create my "2020 COFFEE LOVERS Ornament, I machine stitched a pouch using a piece of laminated film and then tucked some coffee beans and grinds into the pouch.  After it was all sealed up, I added some ribbon, corrugated paper and some bakers twine/sparkle ribbon before attaching some buttons and a little tag.  I hung this on my cardfront using another piece of baker's twine and a foam square.  I love giving cards that have a multi purpose- and this one does the trick.  
Thanks so much for hopping over to check out my card!  I hope it inspires you to create something FUN and coffee-licious!  See you again tomorrow for another fun hop project!


Thursday, October 15, 2020

New Wendy Vecchi: Warm Wishes


Hello there inky friends!  I'm back with a few more bits of inspiration featuring the awesome new Wendy Vecchi stamp/die/stencil combos released yesterday by Ranger!  Today, I'm sharing projects featuring the new Warm Wishes set.  It's a great collection of winter themed images and a fun mix of sentiments.  

I started out by creating a grid format on some grey paper using the Perfect Stamp Positioner as a straight edge.  I used a White Gelly Roll pen to get the lines just right.  Next, I used the quad circle stamp from Wendy's Thank You set to add extra pattern.  I love this little stamp and use it often in making fun backgrounds.  

Next, I attached the gray strip to some opalescent burgundy cardstock, attached some silver sparkly ribbon and machine stitched along the edge.  I then started working on the poinsettias.  I wanted a big cluster of poinsettia so I stamped three clusers and fussy cut each one to achieve the full affect. I then used the little feathery pine bough to create some pattern on a white piece of cardstock that would hold the poinsettia.  After stamping the sentiment and the pine to the white cardstock, I attached the poinsettia (I blended each one with Red Geranium and Poppy ink then lifted some of the color using water and a tissue.)  

To finish things off, I mounted the panels onto a black panel then attached it to a white card base.  I then added an extra ribbon bow and some silver bling.  

My second card started out with a kraft card base.  I used the polka-dot stencil from the Thank You set using Red Geranium ink and then added some additonal blending around the edges before stamping the pine cluster along the top edge.  Next, I diecut the leafy spray and stamped/inked and diecut the acorn and poinsettia.  
I attached a cluster of buttons and ribbons to the green diecut to create a nice swag.  After that, I diecut a scalloped rectangle, blended some Acorn ink onto it to mute the brightness down and stamped some green sprigs from the Flower Pot set to create some layering effect.  I cut the sentiment apart so that I could stamp the three words on top of each other.  

I just love how all the elements in this set work so well together.  To finish things off, I tucked the rectangle diecut into the swag and mounted the rectangle onto the card base with foam squares.  I also added three clusters of red berries using Wendy's Carnation Red Liquid Pearls.
Thanks so much for stopping by today.  I'll be back again tomorrow to share a few more projects.  

Please remember that Wendy and Ranger are offering a 20% ONE TIME discount on your purchases at Ranger.  Just enter the code 20WENDY at check-out!  

See you tomorrow!!!


Sunday, March 1, 2020

Wendy Vecchi in the house...Masculine Coffee Card Inspiration!

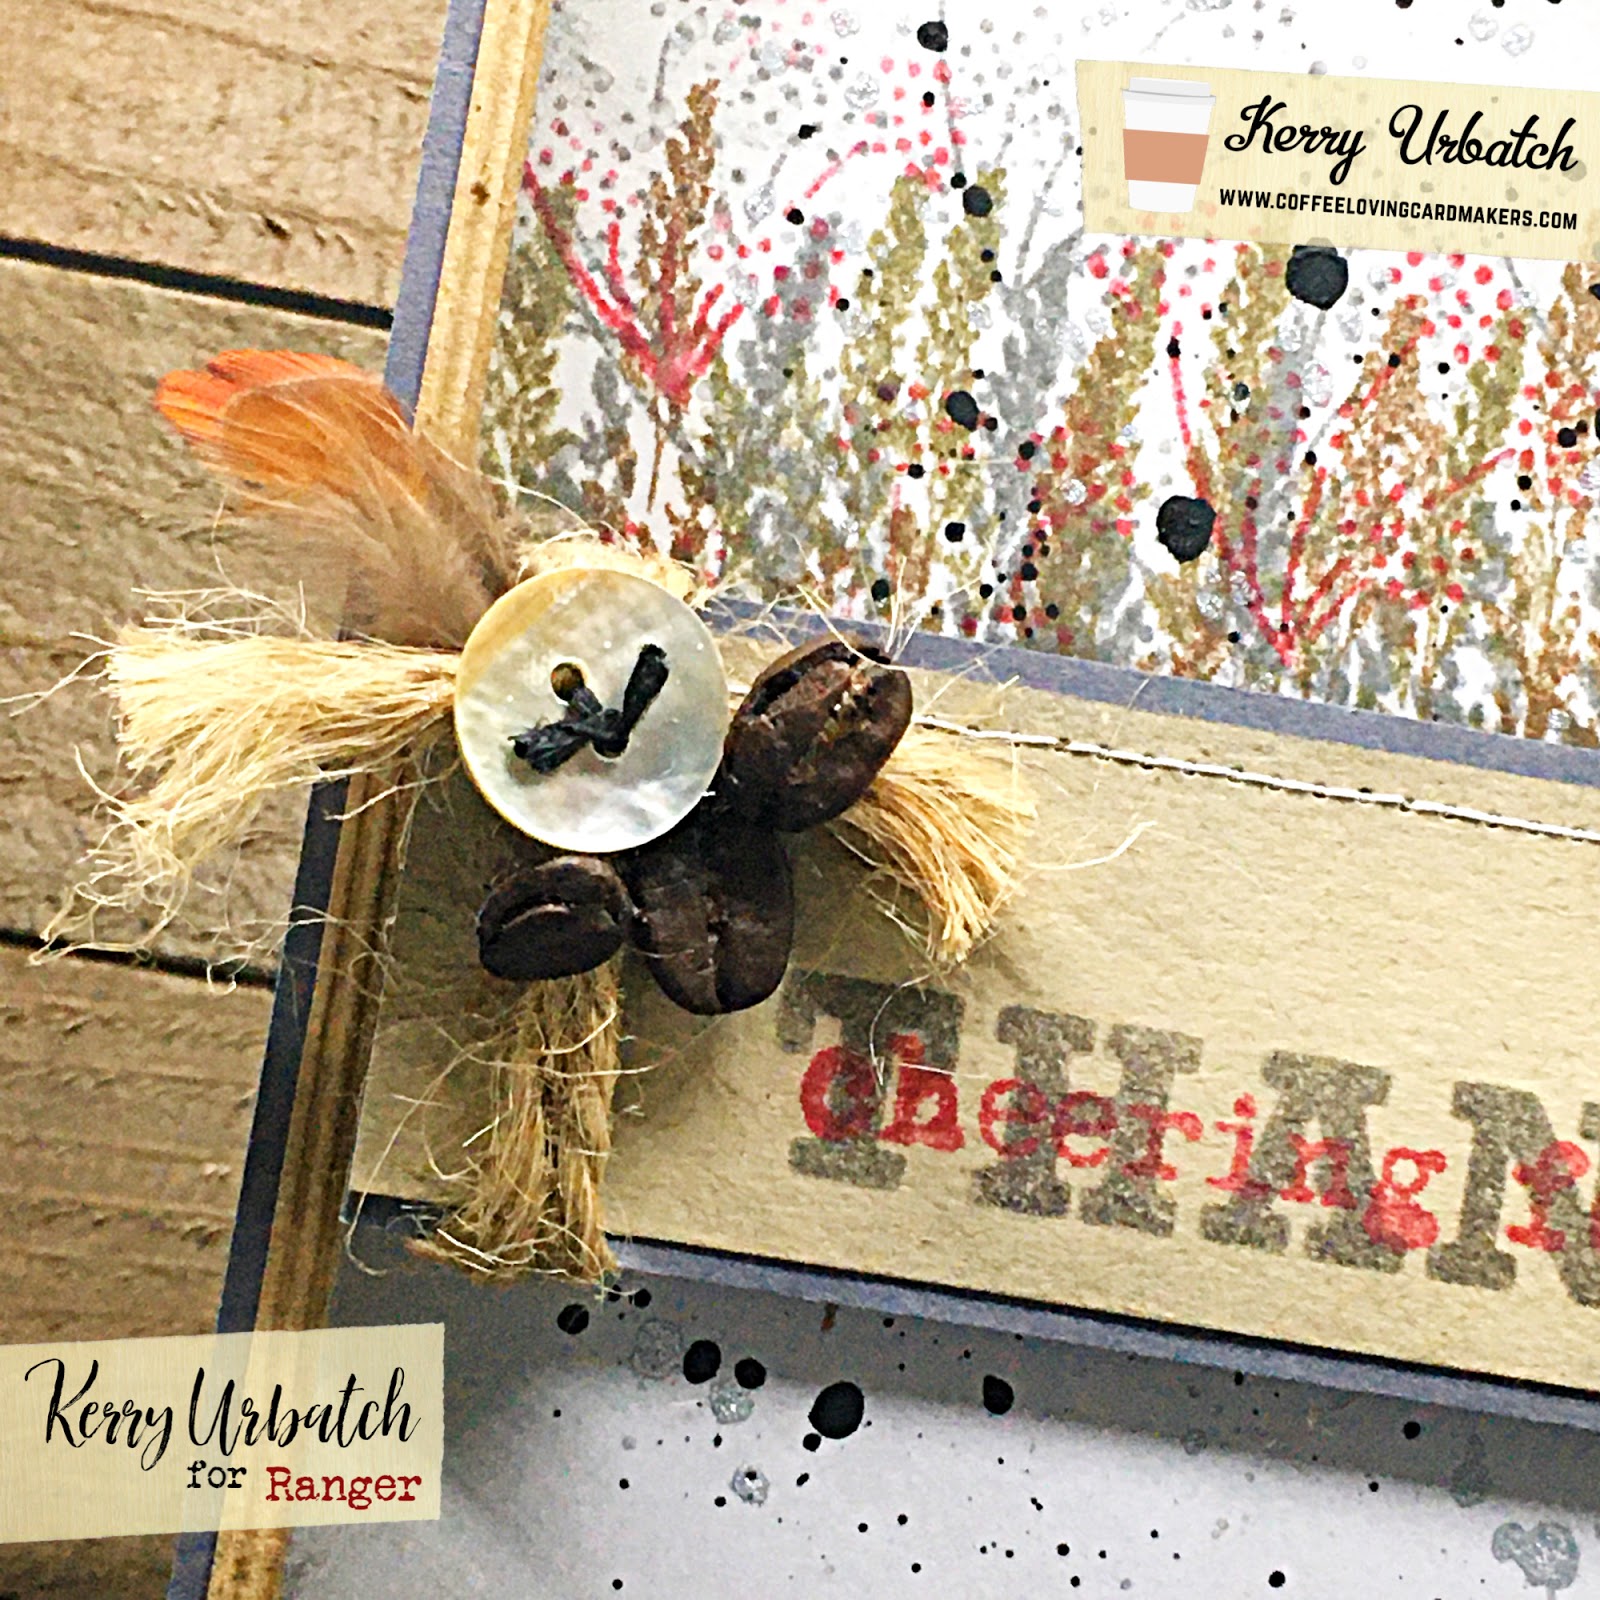
Hello there inky friends!  Today is Sunday Sip day at the Coffee Loving Cardmakers blog and it so happens that my card today is sharing a little wheat-ish vibe with my gorgeous handmade mug from Andrew Gilliatt.  When I first saw this new stamp/die/stencil set "Bravo" by Wendy Vecchi-for Ranger, I gushed.  I knew I could make the elusive MASCULINE card with these little gems and my mug would help light the way.  HA HA...

Check out all these yummy goodies available March 31!  I'm thrilled to be able to share some inspiration with the newest goodies in the Wendy Vecchi Make Art collection at Ranger and can't wait until YOU can get your hands on the goods too.  You'll definitely find these items must-haves in your card making wheelhouse!  

To create my card, I selected some Wendy Vecchi Perfect Cardstock in Grey to build my masculine card.  I stamped the "wheat-like" images onto the panel using Potting Soil, Acorn, Watering Can and Carnation Red inks.  I used her fun new mini magnetic STAY-tion and stamp positioner to arrange my images perfectly on the page.  The Perfect Stamp Block also helped so much to allow me easy grip of the block (those scalloped edges are perfect) and the straight edge butted up to the stamp positioner just so snug!
Now that I take a closer look at those "wheat-like" images, I think they look more like the tall grass weeds that have gone to seed.  LOL...Whatever they are, they work perfectly for this masculine design. 
After stamping the background, I added some flicks of black acrylic paint and silver metallic paint onto the panel to help tie everything together.  I then grabbed some kraft cardstock and created a sentiment panel.  I stenciled the "Thanks" from the stamp/die/stencil set using the Watering Can ink and then added the "cheering for you" sentiment over that using Carnation Red ink.  I mounted this panel onto a dark gray piece of cardstock and then machine stitched the top before wrapping it with some jute.  
To finish things off, I attached a shell button a feather and a trio of coffee beans.  I mounted this panel onto a corrugated kraft panel before mounting the whole thing onto a dark gray card base. 
Wahoo!  And there you have it.  The ever-elusive Masculine card is ready to mail!
Thanks so much for hopping over to check out my card...and the new goodies from Ranger.  I hope I inspired you to create something coffee-licious and MASCULINE!  See you again soon!

Saturday, February 29, 2020

New Wendy Vecchi in the house!!!

Hello there inky friends!  Today I'm excited to share the first project I created using the newest deelish products from Wendy Vecchi's recent launch at Ranger.  These products are slated to become available to the public on March 31 but I'm thrilled to be one of a few cardmakers around that have the privilege of getting a sneak peek!  I'm so honored to have been asked by Ranger to share my experiences with these products and am excited to be making cards featuring these new products.  

My first card incorporates many of the newest products and I had such a fun time playing with them.  Take a peek at all the delicious products Ranger sent me:  

New Wendy Vecchi products included in my Box of Love:  


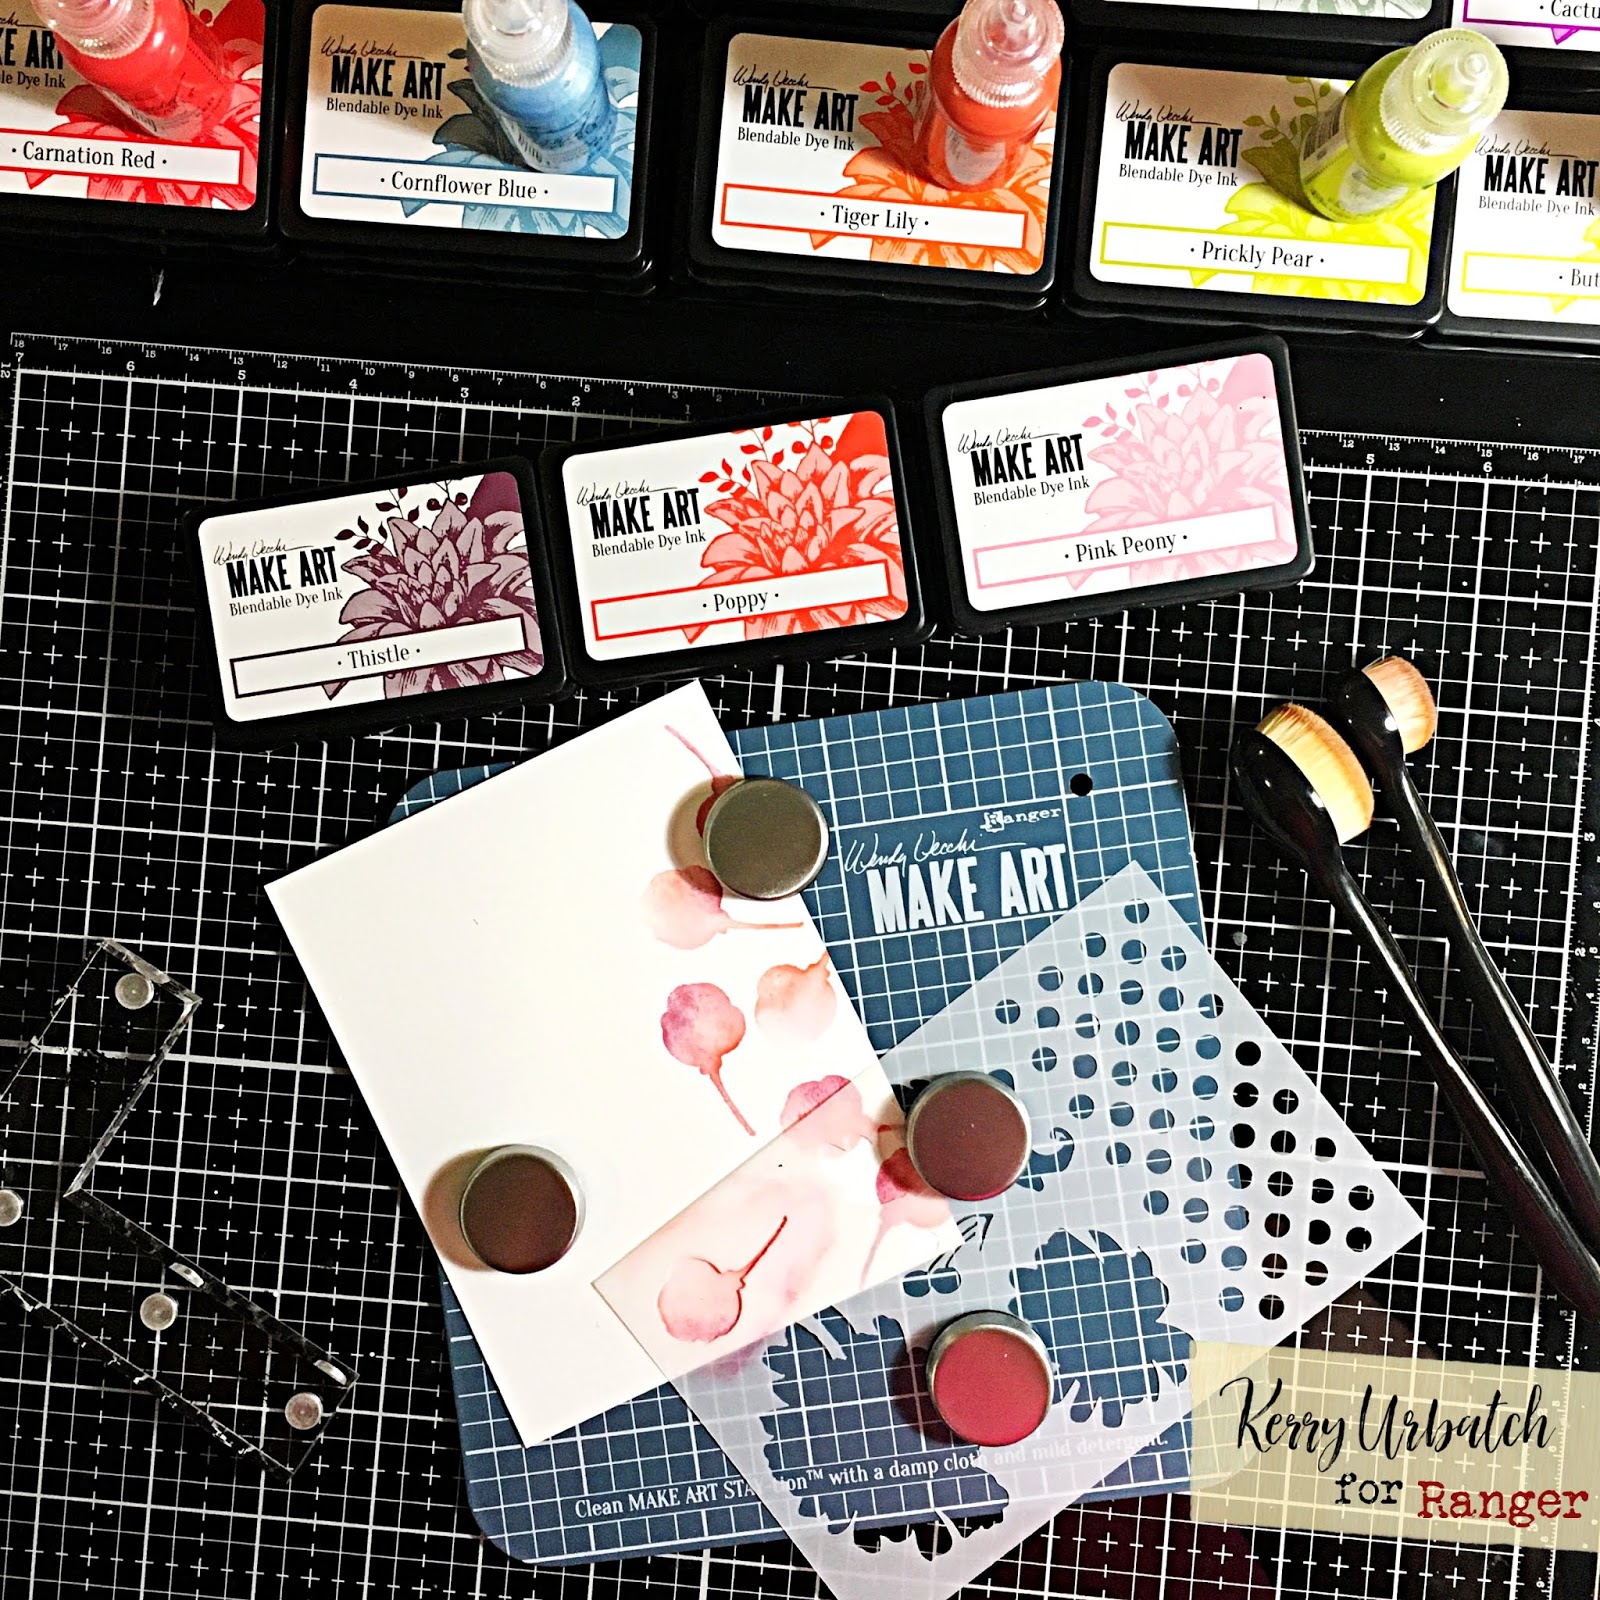
So in order to play around, I pulled out more of my Wendy Vecchi collection (I love her blendable inks so much I have almost every color....almost...ha ha).  Anyway, I selected a few colors to begin my stencily adventures:  Thistle, Poppy, Pink Peony and Prickly Pear.  I also used some little blending brushes I picked up from the Dollar Store.  
To start the blending bonanza, I used the Make Art STAY-tion to hold down a piece of white cardstock.  The magnets are quite sturdy and have a little foam pad on them so they don't scratch anything.  They held everything in place as I blending the colors and used the stencil available in the new Thank You stamp set (link above).  I found that using the magnetic right angle of the stamp positioner also helped cover some of the parts of the stencil I did not want to get inky.
After stenciling the bud image with the red tones, I chose a pop of Prickly Pear ink to add some polka-dots here and there.  It helped bring the collage together and made a beautiful composition.
I himmmm hawwwed a bit about whether to stamp this large floral directly over my stenciled background.  I was worried about covering all that yumminess up but I just went for it and used the Watering Can (dark gray) ink to stamp the florals here and there over the stenciling.  The stamp positioner (link above) helped make nice crisp images and helped hold the paper down to the metal STAY-tion.  Before calling it quits, I flicked some black acrylic paint onto the panel for another layer of deliciousness.
To finish the design, I used the magnetic ruler (and a .01 black Staedtler pen) that is included in the STAY-tion to create some lines over the design. I mounted this panel onto several color coordinated pieces of cardstock and then wrapped the layers in black seam binding.  Next, I added a shell button, some pearls, the sentiment then mounted the whole thing onto a soft yellow card base.


I also tucked a little flower/diecut under the ribbon using some foam squares just to add another pop of layering!  DONE!

Thanks so much RANGER and Wendy Vecchi for providing this fabulous collection of goodies.  I'm excited to continue to play with them and know they will be quite popular in the months to come!  Another FAB release!!!

Friday, July 26, 2019

New Release: Wendy Vecchi Make Art Inks by Ranger...


Hello there inky friends!  I am so excited to share a brand spankin' new release at Ranger today!  Check out their blog post to learn more about it HERE.  The newest Wendy Vecchi Make Art blendable Dye Inks are such an inky dream and I'm so honored to be able to play and share with you today!  

The newest colors are lush, vibrant and GORGEOUS!  The six new colors include:  Carnation Red, Pink Peony, Cactus Flower, Tiger Lily, Forget-Me-Not and Leaf Green
Wendy Vecci Make Art Blendable Dye Ink Pads
For my first project with these deelish inks, I selected the trio of reds to blend and build a gorgeous background onto some Wendy Vecchi Perfect Cardstock (White).  This 110lb cardstock blends so beautifully well and the ink just rolled onto the page like butter.  YUM!  As you can see from my process photo below, I started out by using a blender brush to go around the top/right/bottom edge of the paper.  Top:  Carnation Red, Right Side:  Cactus Flower, Bottom:  Pink Peony. 
After finishing the background blending, I used the stencil in the "A Million Thanks" Stamp, Die, Stencil set to create a little pattern on the central portion of my background panel.  Next, I stamped the leaves onto the edges of the panel using my stamp positioner and some black ink.  After I was satisfied with the design, I splattered some black acrylic paint on the background panel with my super fine paint brush.  
Once my background was complete, I moved on to stamping and coloring the floral image and the butterfly image in the stamp set.  I used my stamp positioner to get the most perfect and crisp images.  I colored the images using Copic markers.  


Copics used on this project include:  
Reds:  R81, RV55, V05
Yellows: Y18, Y23, YR65
Greens: YG25, YG61
After completing the coloring, I diecut the images and then added a personal fussy cut edge to each design before attaching them to the panel.  I then attached some black satin ribbon and mounted this panel onto some lime green cardstock.  I mounted the completed panel onto .a coordinating fuchsia card base.      

**Thank you Ranger for providing these fabulous new Wendy Vecchi products to play with. I am excited to share additional projects very soon! 

A note to my blog readers:  

The links provided in my blog posts are not affiliate links.  I never use affiliate links on any products I use and love.  It's just not me.  Please consider purchasing these products directly through Ranger with no cut back to me.  I appreciate their kind and generous product contribution so much!