Showing posts with label Ranger Ink. Show all posts

Sunday, March 1, 2020

Wendy Vecchi in the house...Masculine Coffee Card Inspiration!

Hello there inky friends!  Today is Sunday Sip day at the Coffee Loving Cardmakers blog and it so happens that my card today is sharing a little wheat-ish vibe with my gorgeous handmade mug from Andrew Gilliatt.  When I first saw this new stamp/die/stencil set "Bravo" by Wendy Vecchi-for Ranger, I gushed.  I knew I could make the elusive MASCULINE card with these little gems and my mug would help light the way.  HA HA...

Check out all these yummy goodies available March 31!  I'm thrilled to be able to share some inspiration with the newest goodies in the Wendy Vecchi Make Art collection at Ranger and can't wait until YOU can get your hands on the goods too.  You'll definitely find these items must-haves in your card making wheelhouse!  

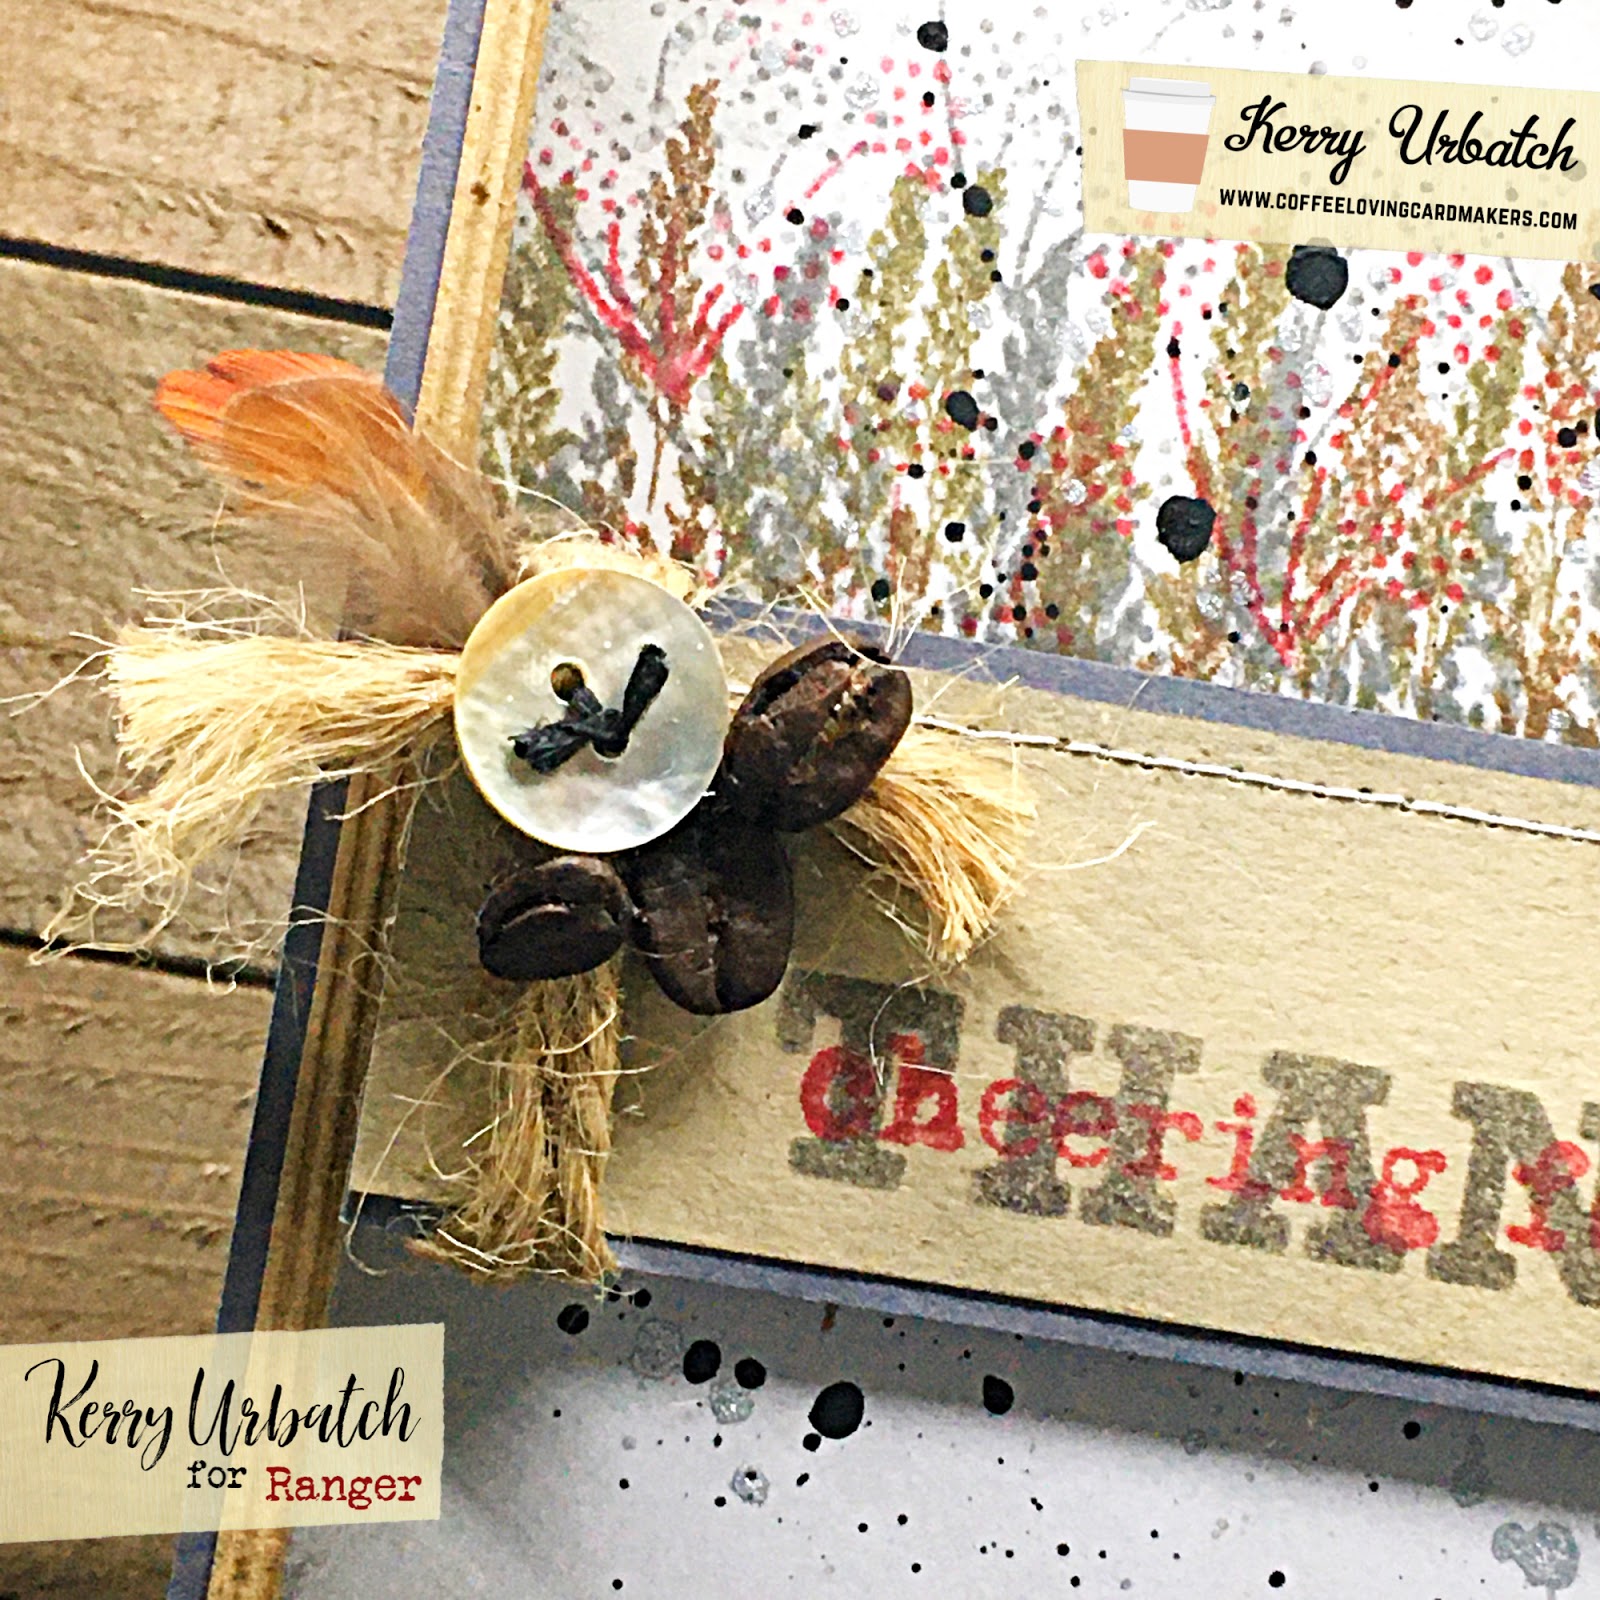
To create my card, I selected some Wendy Vecchi Perfect Cardstock in Grey to build my masculine card.  I stamped the "wheat-like" images onto the panel using Potting Soil, Acorn, Watering Can and Carnation Red inks.  I used her fun new mini magnetic STAY-tion and stamp positioner to arrange my images perfectly on the page.  The Perfect Stamp Block also helped so much to allow me easy grip of the block (those scalloped edges are perfect) and the straight edge butted up to the stamp positioner just so snug!
Now that I take a closer look at those "wheat-like" images, I think they look more like the tall grass weeds that have gone to seed.  LOL...Whatever they are, they work perfectly for this masculine design. 
After stamping the background, I added some flicks of black acrylic paint and silver metallic paint onto the panel to help tie everything together.  I then grabbed some kraft cardstock and created a sentiment panel.  I stenciled the "Thanks" from the stamp/die/stencil set using the Watering Can ink and then added the "cheering for you" sentiment over that using Carnation Red ink.  I mounted this panel onto a dark gray piece of cardstock and then machine stitched the top before wrapping it with some jute.  
To finish things off, I attached a shell button a feather and a trio of coffee beans.  I mounted this panel onto a corrugated kraft panel before mounting the whole thing onto a dark gray card base. 
Wahoo!  And there you have it.  The ever-elusive Masculine card is ready to mail!
Thanks so much for hopping over to check out my card...and the new goodies from Ranger.  I hope I inspired you to create something coffee-licious and MASCULINE!  See you again soon!

Sunday, July 28, 2019

Sunday Sip...Tea Treats!


Hello there Coffee-tea-cocoa loving crafty friends!  It's Kerry here and I'm back with another fun Sunday Sip!  Today I'm sharing a fun little tea giftie for a special someone.  The gift includes a sweet little decorated gift bag with a little note tucked inside and a few hand-packaged bags of specialty teas.  The black polka-dot ribbon indicates a super delish English breakfast tea and the orange twine indicates a yummy vanilla Thai Tea. 

To create my ensemble, I started out by frothing some Nutpod "creamer" and brewing myself a cup of bold coffee.  After taking a few sips, I got to work on distressing a piece of Wendy Vecchi Perfect White cardstock by Ranger.  I then use the brand spankin' new Wendy Vecchi Make Art Blendable inks to create a vibrant background.  I used the new colors:  Forget Me Not, Tiger Lily and Leaf Green.  I also used the fabulous new blending brush "Big Beautiful Blending Brush" by The Cat's Pajamas to achieve the seamless blending.  After I was satisfied with the background color, I stamped the sentiment "A Million Thanks" from the Wendy Vecchi "Thanks a Million" stamp/die/stencil combo set a million times (hee hee) along the right edge of the panel. Next, I attached two strips of Wendy Vecchi washi tape along the other side of the panel.  I used my sewing machine to add some stitching on top of the washi for added texture.
Next, I set out to stamp and color the floral image in the set.  I wanted to use this ink as a watercolor medium so I dabbed a bit of each color onto my Ranger mat and used a superfine paint brush (and a bit of water) to add the color.  As I was coloring the image, I incorporated the Pink Peony and Carnation Red Blendable Dye inks as well to give some added dimension to the flower.  
When I felt the image was colored just the way I wanted it, I added a few white highlights here and there with my White Gelly Roll pen.  I added some graph paper (I just can't do without it!) and attached the flower.  To finish the panel off, I added some polka-dotted ribbon and a cute orange button.  I mounted this panel onto a black Jillibean Soup gift bag (retired) and started working on packaging the tea gifts.  While I was at it, I brewed myself up a cup of Thai tea in my French Press.  It made a mighty fine photo prop while it was steeping, right?
Thanks so much for hopping over today!  I have been having such a fabulous time crerating with the new Wendy Vecchi goodies and I want to thank Ranger for giving me the opportunity to play with these fabulous products!  The blendable inks...I'm in love (I had to order 'em ALL!) and the stamp/die/stencil combo is such a treat.  Of course, you've gotta love a nice collection of washi tape too!  WOO HOO!

Sunday, September 25, 2016

Sunday Sip and Share...Hopping Along!


Hello there Coffee/Tea/Hot Chocolate loving friends!  It's me Kerry, back with another Sunday Sip and Share!  I'm sharing a little project I created last night for the Fall Hop.  I had a goal of making a card each day (for each one of my blogs) but I caught a nasty cold a week ago and it hasn't let up!  Stamping and Coffee are my liquid therapy, so I've been trying to create through my icky feels...It's working, but I missed a day yesterday.  I'm too tired and icky. Wahhh!!!  Anyway, I did create this tag card last night particularly for this post, and I'm really loving it!  Hope you do too!
I started off by selecting a fun fall image!  Waaay back in the day, I subscribed to the Unity Stamp of the Week Club and like many others, I amassed a huge collection of gorgeous itty bitty stamps.  I was bad, and just packed most of them away as I had trouble inking them up as fast as I received them...I'm happy I didn't let them go because they're becoming some yummy treasures in my stash!  This particular mini set is called "Nuts But I Love Ya" by Joslyn Nielson (WIB-399).  I see it is still available in the Unity Shop. 
I love the crosshatching in the image and decided to ink it up, color it with Ranger Distress Inks and use it on a card...Problem was, I had no "sketchy" cup to coordinate...so what to do???  I doodled one myself!  I colored it up and cut it out and it was a perfect match!
When watercoloring the acorn image, I used a mix of some older colors:  Walnut Stain, Peeled Paint, Rusty Hinge, Bundled Sage and Broken China.  I also used my FSJ Gold Silk as a paint medium and added just a hint to the edges of the acorns and the crosshatching on the coffee sleeve.  I hope the photo allows you to see some of the flecks and shimmer of gold.  After coloring, I added some Journey Glaze on the acorns and cup for gloss and shine.
When ordering from Unity Stamp Company, I often receive a freebie bag of goodies to craft with. Sometimes, as in this case, it is a few tags, a couple buttons, some yummy twine and a cute itty bitty stamp.  I used these freebies to make this tag!   I also added a bit of some My Minds Eye 6x6 All Spice printed paper.  It's an oldie but goodie from my collection.  I also added a bit of vellum to the layering.
After creating the tag, I assembled the card.  Just a little layering onto a white card base and voila!  I was happy with how it turned out!  Isn't it fun!?!
Next, I set out to build the sketch...Here it is...Simplified layering, of course. I hope you enjoy using this sketch and if you do, please share your creation with us!  We would LOVE to see what you make.  Make sure to come back and add your link to our September Sip and Share collection below!   If sharing to social media, please remember to include the hashtag #clcsipandshare for easy reference!
I hope you enjoyed today's post!  I'll see you around the blog hop! Back to creating some coffee loving cards and projects....and sipping Thera-flu...