Showing posts with label Rinea Foil. Show all posts

Wednesday, September 25, 2019

Joy Clair and Rinea Foil...Fall in LOVE!

Hello there Joy Clair friends!  It's Kerry here and I'm back to share another fun card created with some brand spankin' new products from Joy Clair and Rinea Foil!  I created this card that features the new Fall Greetings stamp set and some Autumn Foiled Paper variety pack.  I wanted to create a rich and lovely card that gives the ultimate fall vibe...oranges, yellows, rich greens...So I stamped one of the leafy borders on a piece of yellow cardstock and then cut it to create a "scalloped edge".  I then colored it with some Leisure Arts water based markers.  After coloring and cutting, I used a blender dauber to burnish the edges with a rusty pumpkin color.  It paired nicely with the red Rinea foil that I wanted to use.  
I attached some red Rinea foil to the bottom of this panel and then tied some sparkly gold ribbon to bring the two pieces together.  Next, I stamped the sentiment and some leaves (and the black dotty plants) so that I could attach them with foam squares.  When all was done, I flicked some black paint onto the panel and mounted this whole panel onto a kraft envelope.  
I wanted the foil to display both colors so I curled the edges on the bottom to reveal the golden color.  So yummy! 

Thanks for hopping over to check out my card today.  I hope it inspires you to get crafty and gets you into the fall mooood...BRING IT ON! 

Saturday, September 7, 2019

Joy Clair and Rinea Foil...Icy Hot!

Hey there inky friends!  I'm sharing a fun card I created using some fun Rinea Foil products and the brand new Joy Clair stamp set called You're A Gem. Check out this fun and "Icy" card! 

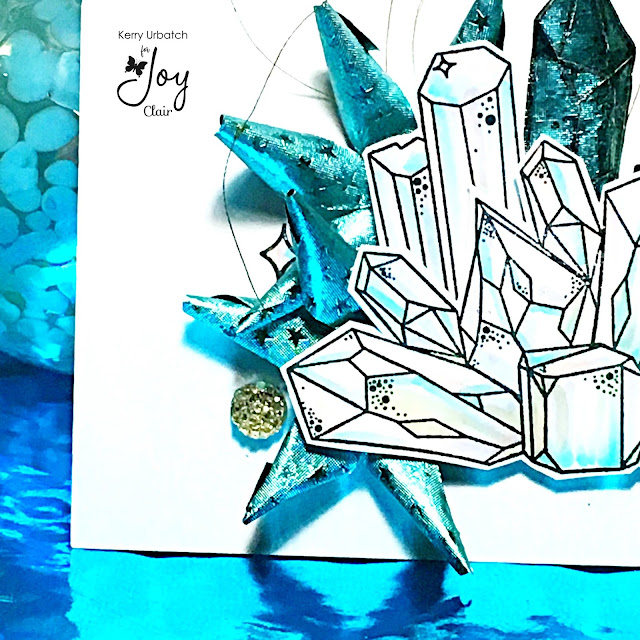
To create my card, I grabbed the yummy Rinea Foil called "Frosted Foil".  I used the Starstruck Turquoise in the pad and stamped the fun gems directly onto the foil.  After stamping and cutting out the foiled gems, I used my bone folder to crease the lines so that I could bend the foil and create some dimension.  I then stamped the gem cluster onto white cardstock and colored with Copic markers. 
To add a bit more of an "Icy" look, I used the Rinea Foil 3-D Rolled Star Die Set to create some "shards".  I used the smallest die in the set and after rolling each section, I cut the piece in half so that I could have two pieces to tuck behind my gems.  Looks pretty cool, right?!  
After attaching the "shards", I added some additional stamped elements around the base panel and colored with Copics before attaching some golden thread and some bling.  I love how this icy card turned out and I hope you do too! 

Thanks for stopping over to check out my card!  I hope it inspires you to get creative with Rinea foil and the new gem sets!  :)

Saturday, September 30, 2017

Favor in the Eyes of the Lord...

 
Hello there Joy Clair friends!  It's Kerry here and I'm back to share another fun...but simple creation using the Noah's Ark set from the Color By Faith Collection.  I think this set is so unique and extra special!  I love that it focuses on the Great Flood and the amazing beauty of animals traveling two by two.  I knew that many people would focus on the Ark and the Two by Two images in their cardmaking but I was really drawn to the Genesis scripture and the two flying birds.  They speak to me so I created a simple yet powerful card that highlighted these pieces.  
To create the background, I used some London Fog Memento Ink to stamp the three different clouds in a pleasing pattern on the paper.  I didn't fill up the page, but I applied the clouds as if the storm was coming in from the right side.  After stamping the clouds, I used a light blue watercolor pencil to add some color underneath each cloud.  This gave the clouds a bit of dimension and helped separate them from the page.  When done, I stamped the birds using some Tuxedo Black ink.  
After that, I stamped the sentiment onto some white cardstock using my Misti to get a crisp/clean image.  I popped the sentiment up with some foam squares then added a bit of black twine to "hold it up".  To incorporate a bit of shine (hinting that the sun will arrive soon), I rubbed a bit of ghost ink onto the blue Rinea foil then wiped some of the blue color off with a wet paper towel.  I attached this foil to the back of the stamped panel then mounted the whole thing onto a blue base.  

Thanks for stopping by today.  I hope you enjoyed my share!  Have a great week!

Friday, September 15, 2017

Coffee loving with Joy Clair...

Woo Hoo!!!  The hop is HERE!  I'm excited to be hopping along again and have so much to share this week.  My first share is this fun card created using a fun little sentiment from Joy Clair.  The sentiment comes from the Coffee Quotes stamp set.  It's a great collection of quotes that work perfectly as stand-alone sentiments or as embellishing elements on any crafty project.  

I created this card by first applying some watercolor splats using a sheet of acetate.  I just applied some watercolor on the acetate and then laid my paper onto that.  After that, I splattered some watercolor using my brush and my finger.  I stamped the sentiment then watercolored with some watercolor pencils.  
Did you know that Joy Clair is a Super Sponsor of the hop?  Yes, and as a Joy Clair DT member, I get to share in the excitement by hopping along and featuring some amazing stamp sets this week. Throughout the week, I'll be sharing several Joy Clair creations and I hope you enjoy.  Joy Clair will be awarding one lucky HOP participant a $25 gift certificate to their online shop!  Make sure to hop along and comment away for your chance to win!

I like to add some machine stitching to my cards so I just did a meandering stitch over and over using some white thread.  I think it gives the card a bit more to talk about...Helps it along a bit.  The little piece of Rinea Foil added a bit of whimsy and allowed me to apply some star punches for embellishments.  I added a little bronze ink splatter too.

Mounting the stamped panel onto some coordinating cardstock was the finishing touch before attaching it to a white (topfold) card base.   I had such a fun time creating this card!  I hope you like it!


Monday, September 11, 2017

Stand Firm in the Lord...

Hello there Joy Clair friends!  It's Kerry here and I'm excited to share with you a card I created using the Be A Flamingo set from the Color By Faith Collection.  This set is a fun mix of flamingos, pineapples, background images and some amazing faith-based sentiments!  I love that you can mix and match the sentiments to suit your style and needs.  For my card, I chose to use the sentiment "STAND FIRM" and the script "in the Lord".  
To start my creation, I drew some leafy fronds onto some green Rinea foil with a dull pencil.  After three were drawn, I used the tip of the pencil as a pseudo-paintbrush with the Rinea Ghost ink.  I wanted to remove a bit of the green ink on the foil so I chose to remove the veins.  On one of the fronds, I removed almost all of the green so that I could get a variety of colors for my piece.  This foil is special because it has green on one side and gold on the other, so I was able to use both sides for this card.    
After creating the fronds, I stamped the background doodly stars onto the white cardstock then attached the fronds with glue.  I only added glue to the long stem so that I could fluff the petals up a bit.  Next up, I colored the flamingo.  I used some watercolor pencils just like colored pencils and added a bit of water here and there but I wanted to make sure to leave a bit of a "feathery" texture so I didn't watercolor the image completely.  I fussy cut the image then added the sentiment with Tuxedo Black Memento ink.  
The flamingo was attached using some foam squares and the whole stamped panel was placed onto a kraft base to help it stand out and stand tall!