Thursday, November 25, 2010
It's Christmas All Year Long...Magnolia Style!
Sunday, July 25, 2010
Fond Christmas Memories...
Now that I'm an adult, I celebrate the spirit of Christmas with my family and try to share my experiences. This year, I hope to attend a Nutcracker performance with my nieces...It is so heartwarming to see the wonder in a little ones eyes.
This month, I created a card for the blog hop that brought me back to the Nutcracker, and all the while I was coloring this adorable maggie, I was thinking of the show. So, for this months card, I present to you....The dance of the....Well, maybe not so much a sugar plum fairy....but heck, why not!
Friday, June 25, 2010
Beat the heat...It's Christmas All Year Long!
Every month, I am challenging myself to participate in the Magnolia-Licious Christmas All Year Blog Hop. I guess you could say it's a bit selfish, but I need some motivation to keep me going or I will end up spending the first few weeks of December making cards for family. Fellow Magnolia Friends are also participating in the hop so please take time to view their creations (your comments are a wonderful gift).
I'm headed to the National Scrapbooking Convention and a class in Chantilly tonight so I know I'll be back with some fun new tricks and goodies.
K
Monday, May 31, 2010
Giving Thanks...
Friday, May 28, 2010
Long weekend fun...
I've never tried doing the European coloring style that I love seeing so much so after I colored this image, I felt it looked a bit too bright, crisp and clean so I needed to distress it up...I was quite nervous about doing anything more with the image as I didn't want to ruin a perfectly good colored image. Well, I just gave it a whirl. It's not exactly the European style, but I was able to gray it up a bit which helped make the card and image work better together.
Patterned Paper: October Afternoon Gingerbread (#PP047)
Ribbon: Silk from Michael's
Flowers: Prima (from Fairytale collection)
Martha Stewart Punch
MM photo turn (with stickles added on top)
Pearl Sewing pins (pearls colored with copic E35 then buffed to shine)
Nestabilities Oval/scallop
Liquid Pearls: Gold
DMC floss: Gold, Cream
Buttons: Basic Grey, Lasting Impressions
- Hair/Violin/Shoes: E25, E31, E35, E37, E55, YR14
- Dress: RV0000, RV91, RV93, RV95
- Skin: E000, E00, E01
- "European Shading": W00, W1, W3
- Copic White Opaque for highlighting
I'm sure you're shocked with the color of her dress...I was too. I don't like purple but dark plums and blue-purples are my favorites...as long as they arent bright colors and have a little black mixed in, I'm fine with it. Take a close look at the background paper too...I used gray to highlight the music notes and some faux stitching with my copic multiliner too...Just another finishing touch.
I'm so looking forward to my long weekend. I'm not planning anything. I'd love to visit a place called The Homestead and take some pictures at least as I've been hearing some amazing things about this place. I don't think I could EVER afford a long weekend there!
I will be heading to the Quantico National Cemetery to take some pictures with my new lens too. It's a beautiful little version of Arlington National Cemetery and it's right down the street from me. It's especially beautiful on Memorial Day.
I'll be back sometime this weekend with a special Memorial Day card.
Kerry
Tuesday, May 25, 2010
It's Christmas All Year Long...
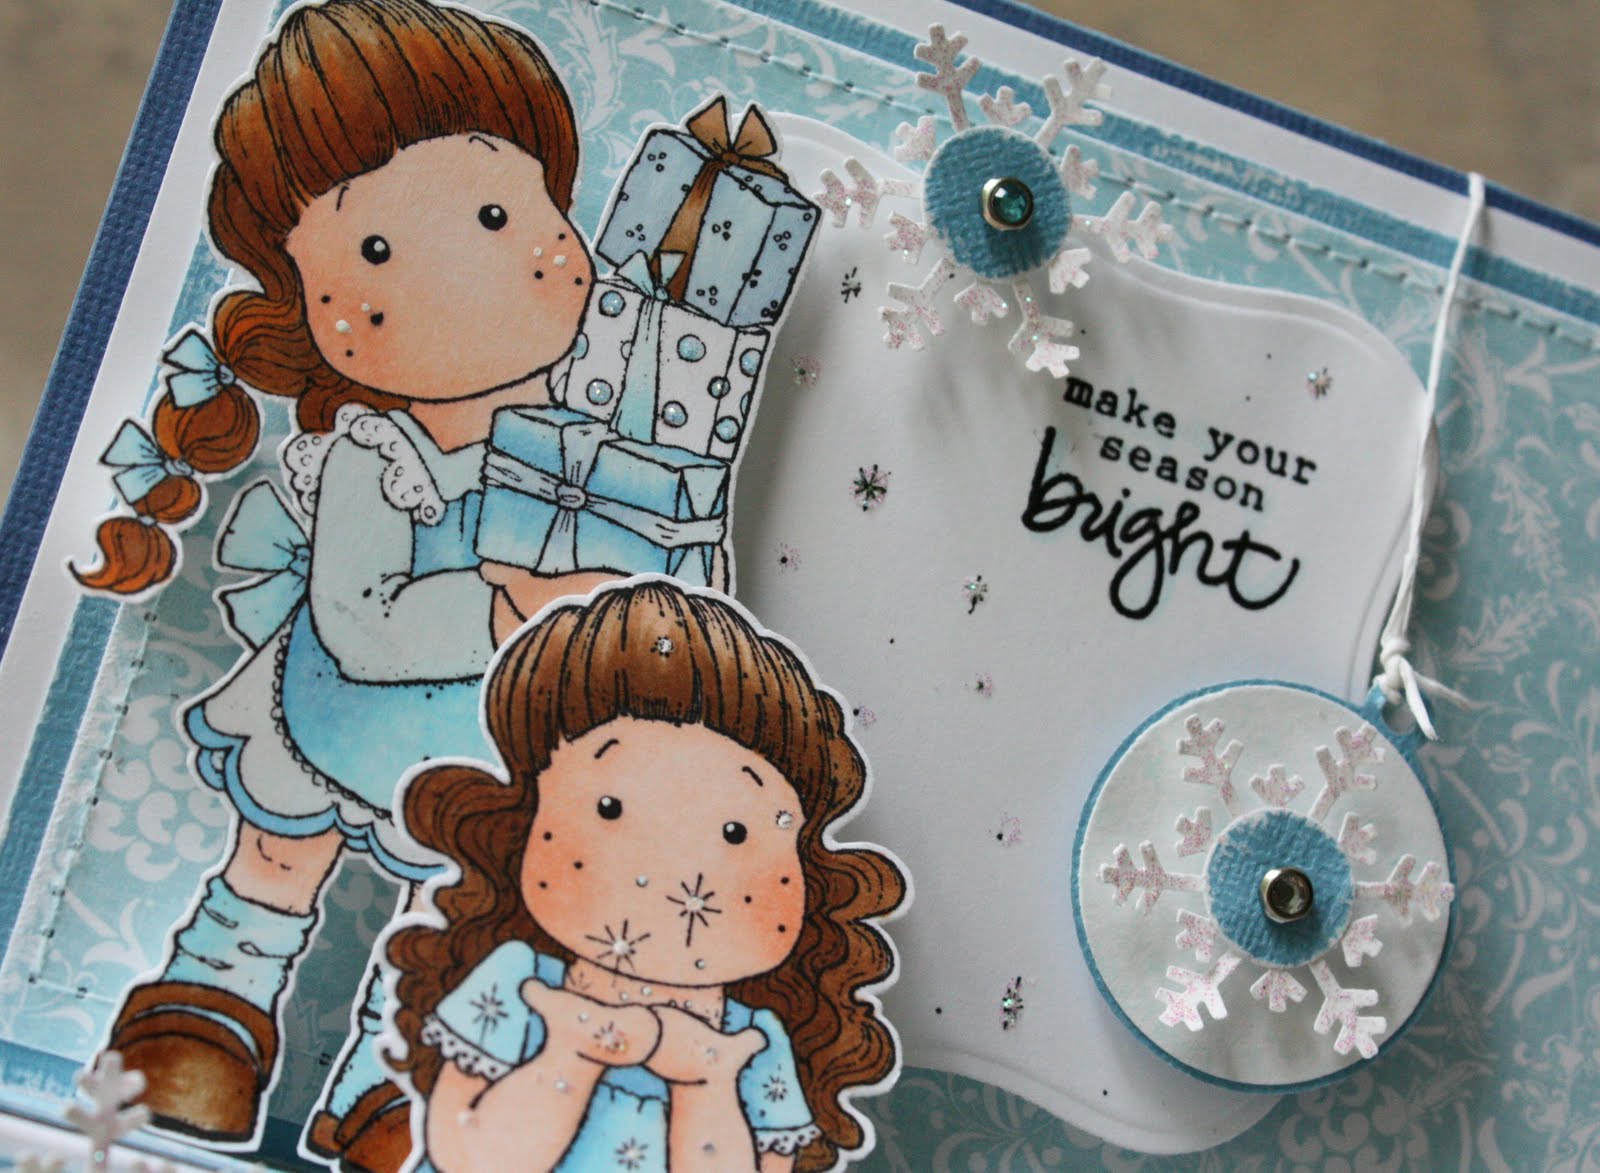
Yes, if you have fabulousy adorable images, luscious Copic markers and some beautiful patterned paper, you can turn almost any stamp into a festive holiday centerpiece!
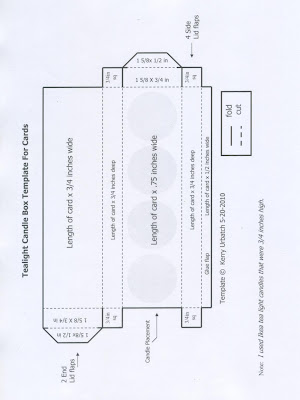
I created this gift/card after being inspired on Rach's blog. She posted a beautifully colored and designed card incorporating a card and a gift in one. She made and placed a tealight box at the base of the card and included some tea lights inside for the gift. She also posted a link to the template so I was excited to try making one myself...
Well, the template that was provided did not work very well for me (and I don't think it worked well for her either so she made one for herself too). I could not get it to work no matter how I folded it. So I decided to make a new template that would work for me. While making a new template, I realized the only measurement that would need to change for a different sized card, would be the "6 inch length" measurement. All the other measurments remain the same. NICE!
I'm posting the template I created to help you make your own. Now, remember, the template is not drawn to scale, but does have the correct measurements listed. Here's the template I created. Feel free to share it with your stamping friends.

After I made the box, I set out to find the perfect stamp(s) to use for this month's blog hop. I found it in a new stamp called FAIRYDUST TILDA...Yes, it is from the Fairytale Collection, but that dust also reminded me of snow and HECK...I love cold weather and wear short sleeves in the winter so POO...It's not fairy dust, ITS SNOW! I also pulled two more stamps that would work with my theme.
After selecting the images, I went to my stash of pre cut 6x6 patterned papers...I found the perfect background paper in Little Yellow Bicycle Sharon Ann Delightful Blue Lace (Retired). It was the perfect shade of blue. I then went on to selecting the Copic Colors. I pulled out my handy-dandy copic book and started with hair, then moved on to clothes, then to her face...
Here are the colors I used:
- Fairytale Tilda's Hair: E21, 31, 55
- Clothes and Presents: BG0000, B00, B12, B91, Woo, W1
- Tilda With Gifts Hair/Shoes: E 21, 31, 35, YR14
- Tilda with Knitted Hat Hair: E55, Y23, E31
- Tilda with Knitted Hat Shoes: E31, E35, W01
- White Opaque Copic for the highlights
- Diamond Glaze for the shoes
- Crystal Stickles for the sparkle
- Skin on all Tildas: E0000, E00, E01
After assembling the card with all the assorted embellishments, I decided it needed one or two more Maggie images. I pulled two: Tilda With Gifts (from the Wedding Collection) and an old favorite Tilda (I'll call her Tilda with Knitted Hat). I colored both images and put some pop dots on them then tried test positioning them on the card.
Sunday, May 23, 2010
Sneak Peek!
Thursday, May 20, 2010
Hey all...
I'm having a BLOG CHALLENGE!
I happened upon this AMAZING STAMPING BLOG and just started drooling over the amazing coloring and also found this cool card. That got me thinking about what I'm going to do this weekend.
I'm set to make a Christmas card for the Magnolia-licious Christmas All Year Blog hop on May 25 and THIS IS THE PERFECT TEMPLATE!!! So, I'm going to do a little challenge too.
HERE'S THE CHALLENGE:
I challenge you to make a Christmas Card using this template. Post a comment in the CHRISTMAS CARD THREAD. Be sure to post a link to your card. I will pick my most favorite card from the set to receive a BRAND NEW MAGNOLIA stamp called "VIOLIN TILDA". I got one as a freebie in my most recent Magnolia order and I already have her...so my loss, your gain! This stamp is a hot item right now as it is not yet available for purchase.
The challenge will go live on May 25 and will run until June 5. That gives you a while to figure out the pattern, play around with it, and make your Christmas Card. PS...I had to modify the pattern myself, so I'll also post the template I created.
Chat Later.
Ker
Sunday, May 2, 2010
Make a Wish!
So here's what I made this afternoon: It may look like I did a little masking with the fence, but no, I just stamped tilda, then the fence over her, then stamped another tilda and cut her out to paste over the top (a little longer than the real stamp....maybe I need to make a video of how I did it). Just a little hint on the cut edges: I run a gray marker over the edge to soften it up and make the cuts "fade away".
I also have begun the BIG job of cleaning out my "crap" room and organizing it up A LOT...so, perhaps this little magical Tilda is giving me a little support. If only that magic wand would work in my room.
Stamps: Magnolia Spellcaster Tilda, Magic Wand, Spring Fence
Patterned Paper: Imaginisce For Peeps Sake: Drapin' Daisies (front and back used)
Plain Cardstock: DCWV cardstock teal, Club Scrap Cream (unknown kit)
Punch (inside): EK success
Stickles: Ranger
Atyu Spika Clear glitter pen
Inkssentials White Gel Pen
Karen Foster White Floss
QK small tag
Copic Black Multiliner for sentiment
Versamagic Sea Breeze ink for distressing
I did happen to do a little with the inside of the card too. You know, with so much work on the outside, you just can't possibly leave the inside bare, right???
Have a great week!
Ker
Monday, April 26, 2010
Purple Passion
Here are the details for the card:
Magnolia Image: Tilda With Flowing Hair
Sentiment: TAC
Patterned Paper: I'll get back to you (It's an old pattern from Michael's)
MS Three Hydrangeas Punch
Spellbinders Nesties: Oval, oval scallops (in my cuttlebug)
Quickcutz Tag
White Floss: Karen Foster
Solid Paper: Olive, pink and lavender: The Paper Company, shredded paper bag, Bazzill (bamboo color)
Making Memories Brads
Diamond Stickles
MS punch and Silk ribbon from Michaels
Acrylic Paint (the dots)
Copics Used:
- Hair: E13, 15, 51, 77, YR 24
- Dress/Flowers N0, 2, 4, BV000, 02, V04, 12
- Shoes: B39, C5, 7
- Basket: E11, 15, 31, 33, 37, YR 24
- Skin: E000, E01
- White Pen: Inkssentials
- I also used a dry Versafine Onyx pad to distress the whole thing up a bit.
Sunday, April 25, 2010
You are my Sunshine!
patterned paper: GCD Studios: Item #214 Tinted Medallions Rose Colored Glasses Collection
Cardstock: Bazzill
Ribbon: American Crafts and some "Easter Grass"
Stamp Sentiment and sun: Studio G Series 7 Clear Dollar Stamps
Stamp border (swag) Odd Bird Planet
Flowers: Martha Stewart 3 Hydrangea punch
Liquid Pearls: Pearl (painted with Leaf Green Copic)
Magnolia Stamp: Hawaii Tilda don't know if Diana has it in her stock though.
Copics:
- Hair: E29, 33, 35, 37
- Skin: E000, E50, YR00
- Shirt/Lei: R000, RV10, 23, 29
- Grass Skirt: G0000, G40, G82, G94, YG23, 25
- Sun: Y21, 35, 38
Hope you enjoy! Have a sunshiney day!
Sunday, April 11, 2010
Mother's Day Treasures...
So here it is...a shadow box. I love making shadow boxes!
This initially started out as a 6x6 card but I liked it so much that I decided to trim it down so it could fit into a 5 1/2 x 5 1/2 shadow box. I painted the shadow box to match the patterned paper. The image was completely cut out and applied to another stamped image (that was highlighted with BG0000 to give it some added depth, highlighting, and texture.
So here are the details:
- Stamp: #232 Tulip Tilda
- Sentiment: Clear Studio G (dollar deal)
- Flower: R000, R22, RV29, YG 25
- Tag: BG0000, Blender
- Dress/Shoes: E01, E35, E37, E95, Rooo
- Hair: E57, E35, E01, E02
- Skin: R000, R00, E02
- Patterned Paper: Imaginisce, Basic Gray
- Ribbon: May Arts two sided twill
- Flowers: Kaiser (big), Prima (small)
- Buttons: SEI
- Brads: MM
- Iridescent sequins (Michael's)
K
Happy Spring!
- #3046 Hoppy Easter Collection: Tilda with Eggs in Her Apron
- Dress: Y0000, Y21, YR 20, YR 31, B0000, B00, BG0000
- Hair and Shoes: E00, E29, E33, E35, E 37, E47
- Skin: E000, E00, E01
- Patterned Paper: Imaginisce
- Cardstock: Bazzill
- Sentiment: Clear Studio G (dollar deal)
- Ribbons: Dots and Dashes (Michael's) May Arts Velvet scalloped ribbon, Teal Waxed jewelry rope (Michael's)
- Punches: EK threading water, Martha Stewart: 3 hydrangeas
- Gold Liquid Pearls
Hope you enjoy! I'll be back as I've got a secret surprise to post in a few minutes.
Kerry
Sunday, March 21, 2010
New Bunnies in the house!
I've got a bunch more to ink up too and a VERY short time to do it!
K
Sunday, March 7, 2010
What a beautiful day in the neighborhood...
Tuesday, February 23, 2010
Toss the beads!
Sunday, July 19, 2009
Just a note...
Here are the details for this card:
Stamps: Magnolia Tilda with Sunflower from the Halloween/Autumn collection, TAC sentiment from Tag Tidbits
Patterned Paper: From dollar bin card set at Target
Cardstock: Apricot Shimmer, Pink: The Paper Company (Michael's), Bazzill green: Parakeet
Embellishments Ribbon: Cut by the yard: Joanne's
Buttons: Basic Grey
Thread: DMC White
White acrylic paint (those white dots)
Glossy accents: for her eyes
Nestabilities Classic Circles and coordinating scallops
Copic Colors Used
Hair, Shoes, Flower: E15, E35, E47
Dress, Flower: YR23, Y17
Dress, Ribobn, Flower: YG23, YG63, G99
Dress: RV10, R85
Skin: E000, E00, E02
Now I'm off to get some shelves for my craft room...
Saturday, July 18, 2009
SOL Success!
I colored some of her hair and the slate she is holding with a black multiliner. HI is written with my Inksentials pen. After she was colored, I decided I needed to make her have a BIG blackboard too so I created her background using RAVEN Bazzill and stamped it with a retired TAC set in my school stamp collection. I used White Staz-On for the "chalk" sentiment.
Inks: Memento, Staz-On White, White acrylic paint (for the dots on scalloped circle), White Inksentials Opaque pen
Patterned Paper: I think it's Laura Ashley (from WAAAAY Back) there are no mfg. marks.
Cardstock: The Paper Company, Bazzill
Brads: Making Memories
Flowers: Kaiser, Prima
Ribbon: Velvet: Joanne's, Michael's, and part of a paper bag dry brushed with white paint
Other: Crystal Effects (Her shoes are "patent leather" and her eyes sparkle too!), pop dots, Nestabilities, Cuttlebug
Copics Used:
I've got three more layouts to do for three images I've colored...Just gotta go through my stash and get them together...Hopefully tomorrow.
Have a great SUNDAY!