Showing posts with label My Templates. Show all posts

Thursday, November 2, 2017

Joy Clair New Release November!


Hello there planner friends!  Today I'm joining my fellow Joy Clair design team members as we share the newest stamps to the Joy Clair collection!  I'm excited to share the new calendar set called Calendar Fun!  This is the perfect stamp set for all your planner needs and it can help you create the most awesome "from scratch" traveler inserts too!  Check out the Joy Clair Blog for a sneak at what my fellow DT members are showcasing!  

Join us for this fun hop:  I'm attaching the blogroll so you can hop along with us!  
Let's start the fun!  Remember...Joy Clair has prizes for their blog readers and visitors that comment on each and every blog in the hop...so get hoppin' for your chance to WIN!  
Here's the complete list for the Everyday Stamp Sets Blog Hop:  


Did you know that I have a love affair with making monthly Traveler's Notebook inserts?  I really do!  Each month, I make a unique and "from scratch" insert for my Traveler's Notebook.  You can make one too!  I'll share some tips and tricks here:  

Use a piece of cardstock that is cut down to 21x22 cm.  I'm attaching my insert template for you here FREE so print using the 8 1/2 x 11 setting, trim it down to insert size (make sure to trim while folded like a signature) and enjoy!  

I use a LONGARM stapler to staple my inserts.  If you're interested in getting one, mine is a soft touch stapler so it staples my inserts easily and perfectly every time!  


If you would like the PDF version of my insert page emailed to you, please post a comment for me with your contact info (I have set this blog post to moderate comments and will not post your private comment info.)

Now, let's get back to my insert... Before starting on the planning part on the inside, I just had to decorate it up for a fancy fall design.  I used Fall Leaves and a mix of Memento inks and gold ink to decorate the front.  
After finishing the outside, I started working on the pages inside.  I stamped all the days and dates and also added some fun decor stamps as I was planning the first week.  Since I prepare these inserts myself, I can customize them so that they do not bleed through and can also have "pockets" to hold receipts and other important papers.  Each week spread is backed by a blank spread so that they can be glued together along the edge to become pockets OR I can use the next pages for sketching, journaling and note writing.  It's a perfect set-up for me.  
This set is so fun!  I love the mix of faux washi, doodly images, little icons and fun elements to incorporate on my pages and I also love that there are social media icons that can be used too.  SO FUN!  
The little arrows are perfect for adding some action and whimsy to a page!  
So fun, right?!  Now I'm set for the month and all I have to do is FILL IT UP!  
Get yours today!  Hope you enjoy!  

Tuesday, May 25, 2010

It's Christmas All Year Long...

It's that time of the month again, Magnolia-licious Christmas All Year Long Blog Hop! This month I have a card AND a challenge for you!!!

Yes, if you have fabulousy adorable images, luscious Copic markers and some beautiful patterned paper, you can turn almost any stamp into a festive holiday centerpiece!

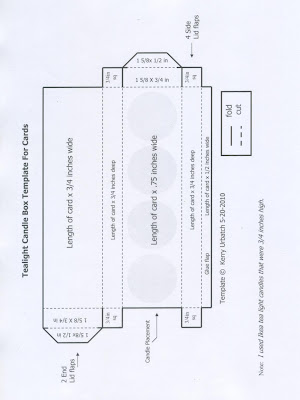
I created this gift/card after being inspired on Rach's blog. She posted a beautifully colored and designed card incorporating a card and a gift in one. She made and placed a tealight box at the base of the card and included some tea lights inside for the gift. She also posted a link to the template so I was excited to try making one myself...

Well, the template that was provided did not work very well for me (and I don't think it worked well for her either so she made one for herself too). I could not get it to work no matter how I folded it. So I decided to make a new template that would work for me. While making a new template, I realized the only measurement that would need to change for a different sized card, would be the "6 inch length" measurement. All the other measurments remain the same. NICE!

I'm posting the template I created to help you make your own. Now, remember, the template is not drawn to scale, but does have the correct measurements listed. Here's the template I created. Feel free to share it with your stamping friends.


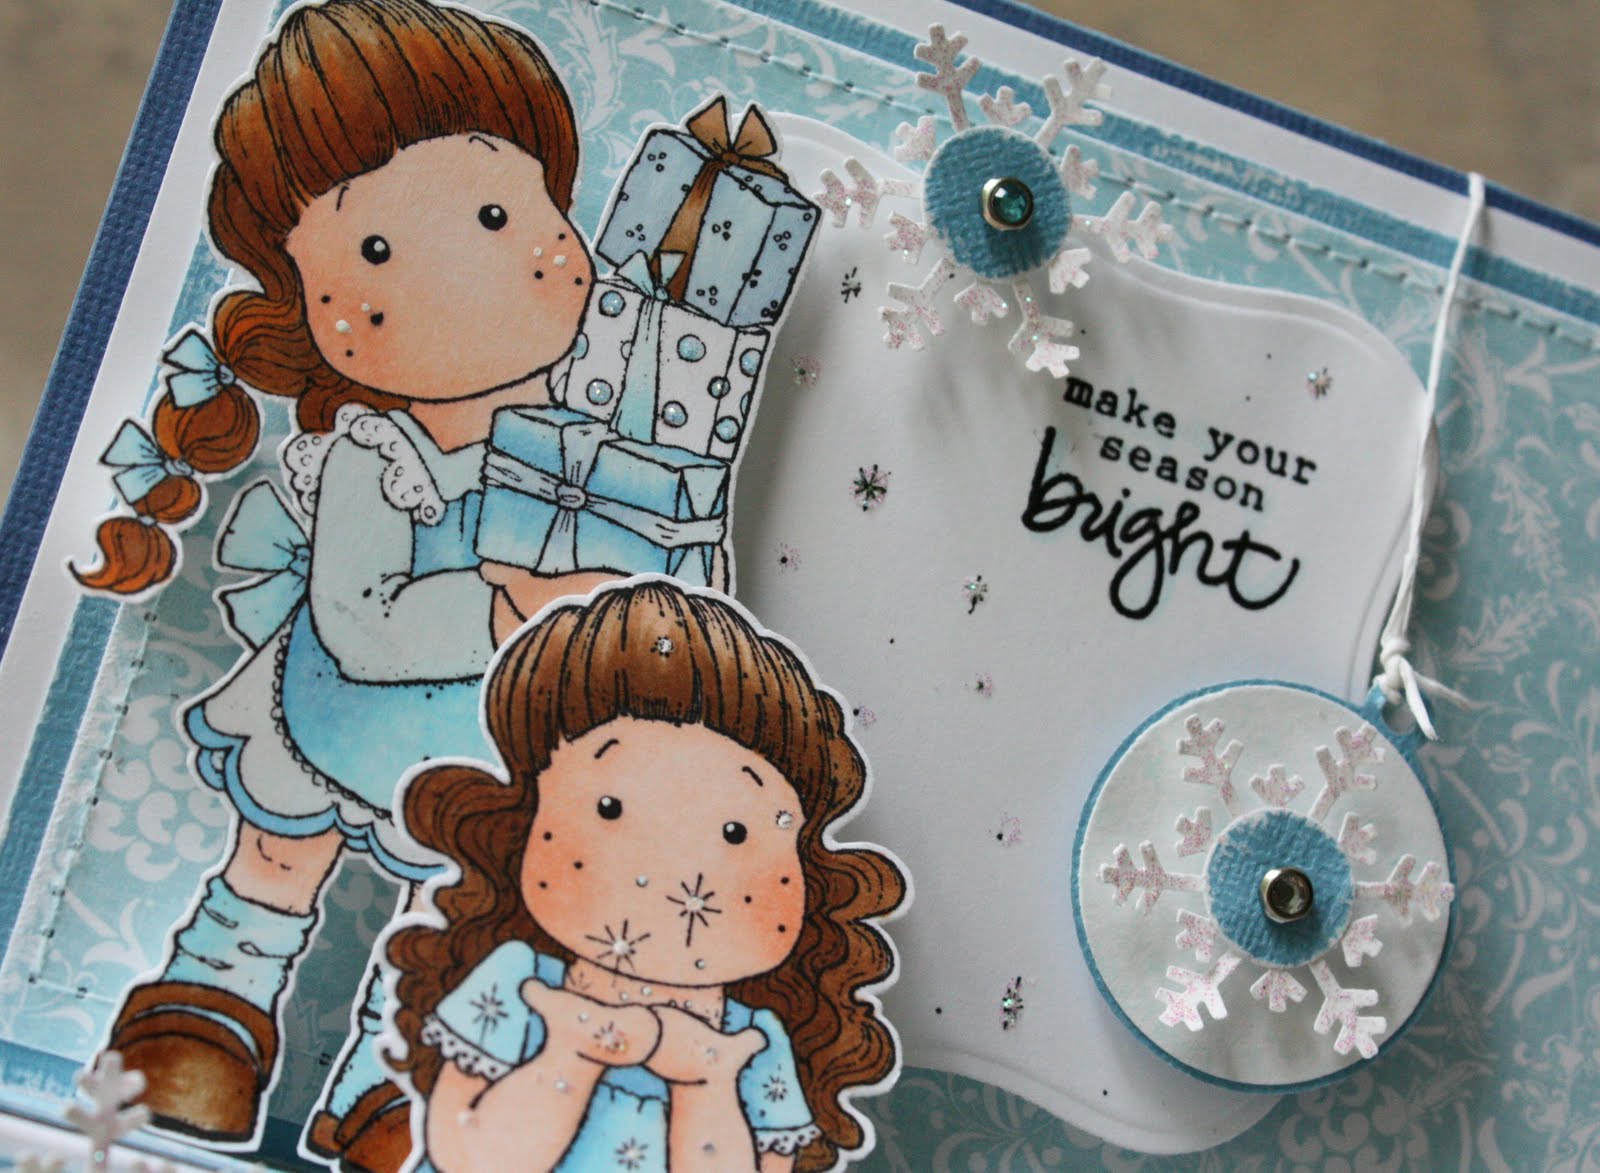
After I made the box, I set out to find the perfect stamp(s) to use for this month's blog hop. I found it in a new stamp called FAIRYDUST TILDA...Yes, it is from the Fairytale Collection, but that dust also reminded me of snow and HECK...I love cold weather and wear short sleeves in the winter so POO...It's not fairy dust, ITS SNOW! I also pulled two more stamps that would work with my theme.

After selecting the images, I went to my stash of pre cut 6x6 patterned papers...I found the perfect background paper in Little Yellow Bicycle Sharon Ann Delightful Blue Lace (Retired). It was the perfect shade of blue. I then went on to selecting the Copic Colors. I pulled out my handy-dandy copic book and started with hair, then moved on to clothes, then to her face...

Here are the colors I used:

  • Fairytale Tilda's Hair: E21, 31, 55
  • Clothes and Presents: BG0000, B00, B12, B91, Woo, W1
  • Tilda With Gifts Hair/Shoes: E 21, 31, 35, YR14
  • Tilda with Knitted Hat Hair: E55, Y23, E31
  • Tilda with Knitted Hat Shoes: E31, E35, W01
  • White Opaque Copic for the highlights
  • Diamond Glaze for the shoes
  • Crystal Stickles for the sparkle
  • Skin on all Tildas: E0000, E00, E01
I always color their skin last for some strange reason. After that, it was time to cut them out.

After assembling the card with all the assorted embellishments, I decided it needed one or two more Maggie images. I pulled two: Tilda With Gifts (from the Wedding Collection) and an old favorite Tilda (I'll call her Tilda with Knitted Hat). I colored both images and put some pop dots on them then tried test positioning them on the card.
This was option 1:

And this was option 2:
I decided I liked option 2 better.

No snowy card is complete without a bit of Stickles, so I had to add that too. Martha Stewart snowflakes were punched and blinged up with brads and stickles. The stamped sentiment comes from a clear dollar Holiday set (Series 22) by Studio G. The ribbon was added to the box before gluing down to the front of the card base. It can be tied and untied to remove/insert the "gift".

SO here's the CHALLENGE:

Make one CHRISTMAS card using my tea light box card template. YOU HAVE UNTIL JUNE 5 to post your entry in the comments section here. I will select a winner based on all entries submitted.
The WINNER will receive:

New Tilda with Violin as well as a new Magnolia Ink Fairytale Magazine.

Good luck and Have fun!

Now you should head on to Lauren's and check out her holiday creation!