Showing posts with label Scrap-Mart. Show all posts

Wednesday, December 7, 2011

Heartfelt Wednesdays...

Brrr...It's getting cold but NO SNOW YET!  I'm itchin' for some that's for sure!  I love WINTER and this time of the season but I'm getting a bit nervous that mother nature will not provide me with enough of the WHITE STUFF!  I hope and pray this will not be the case! 

Today, I'm sharing a card created particularly for the Christmas season and for the collaboration hop with Scrap-Mart.  If you haven't visited there, you'll want to.  It's a great place to pick up scrapbooking and stamping supplies and it is one of my favorite embellishment spots to stop at while at scrapbooking expos. Today we're (Heartfelt Creations and Scrap-Mart) are having a combined Blog-Hop. FUN FUN FUN!  Head over to their blog to learn more and join the fun. 

I'm sharing an artsy technique I've played around with for YEARS since first learning to use it during my college days.  I love using masking medium and find it so MAGICAL!  If you're not familiar with it, it's liquid latex and can be brushed (or dotted with a toothpick) onto paper to mask something you do not want to be colored.  It's great for watercolor painting AND for distress inks and glimmer sprays.  Perfect for this time of year right? 

OK.  So for this card, I did some masking, then inked, then masked again, then masked again...Kinda got a latex high LOL... I shared the directions on the Heartfelt Creations Blog today, but I thought I'd post them here too for those who might want to try it. 

Heartfelt Creations Products:
HCPC 3346 Joyous Noel Precut Set
Zip Dry Glue
Other Supplies Used:
Kraft Card Base (A2)
Bazzill Brown cardstock (5x3 3/4 in)
White Cardstock (for background)
Copic Xpress it Card (for sentiment only)
Clear Embossing Powder
Windsor and Newton Colorless Art Masking Fluid and a fine tip paintbrush
Versaifne Onyx Ink
Memento Tuxedo Black
Ranger Distress Ink: Tea Dye, Worn Lipstick, Fired Brick
Gold Stickles
Red Dew Drops
Yellow-Maize Stitched Ribbon
Corner Rounder
Pop Dots
Spika Glitter Pens: Gold, Turquoise
Copics: G21, BG93, G0000, RV000

Directions:
For background: Stamp poinsettia image repeatedly onto white cardstock. Paint Masking fluid over flowers and inner parts of greens. Apply Tea Dye ink (rub) with sponge over entire image. Rub the masking off the poinsettias and the other flowers. Reapply Masking over the centers of the poinsettias so it doesn't get inked. Rub Fired Brick ink over the poinsettias (and masking) from the inside outwards until color intensity and blending desired. Remove Masking from remaining part of poinsettias and other flowers and rub Worn Lipstick overr this until blending and intensity desired. Rub off masking from the greens and apply Gold Spika to these. Use Turquoise Spika to trace over veins on poinsettias and the Gold Stickles on the centers of the flowers. Cut this panel to size 5 x 3 3/4 inches and attach to brown bazzill. Attach yellow ribbon and Dew Drops with E6000 Glue. Touch-up any "missed inking" by inking a dull pencil tip then rub over this ink with the eraser tip.
Stamp sentiment onto Copic Xpress it card using Versafine Ink. Emboss with clear p and color NOEL with the Copics. Corner round three corners and apply pop dots to back (secure permanently with E6000 glue. Apply stamped panel to card base.

Here's a closer look at the background.  Kinda reminds me of wrapping paper.  I love the rich look and the two-tone look of the red on the poinsettias. 

Friday, March 11, 2011

...Hop Here!

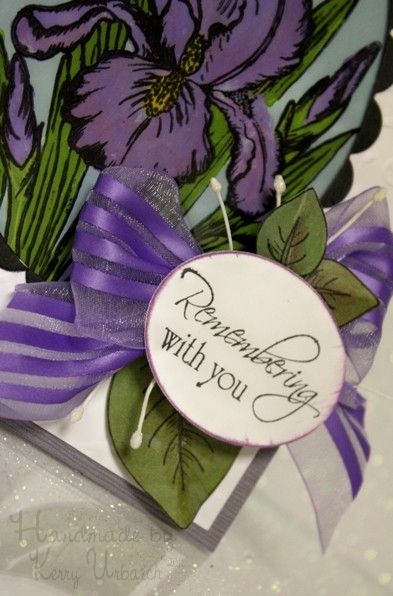
...So I'm hoping you're having fun on this weekly hop that Scrap-Mart is hosting.  It's been so fun hopping all week and seeing such fabulous creations.  I'm definitely getting more ideas about how to use the newest Heartfelt Creations image collection called the Dutch Iris-Blossom 3 Collection!!!  I hope you are too!  Today it's MY turn to share what I've made for the hop.

I thought long and hard about the type of project I would do and I decided to create a card using one of my most favorite techniques...REVERSE PAINTING.  It's an ancient technique that dates back farther than you can imagine, and if you've never tried this technique, it is quite simple-yet brings fabulous results.  I've taught the technique in a few classes here and there and everyone who tries it can't believe how simple it really is.

All you need to achieve beautiful images every time are:  a fine hair paint brush, acrylic paint, Staz-On ink, Acetate, and of course, your favorite stamp(s)!  In this case, I used a few sets from the new collection:  Distressed Leaves Precut Set, Sympathy Sentiments Precut Set and Dutch Iris Oval Precut Set. 

My lavender cardstock paper is a treasure as it's paper I HOARD and hardly ever use.  It's by HANKO Designs and it is the most lucious Tsumugi Silk embossed paper in the world!  I also used Spellbinders Nestabilities Classic Ovals and Scalloped Ovals.  The white panel was embossed using the Cuttlebug embossing folder called "Birds and Swirls".

The technique is simple: 
1.  Stamp the image onto acetate using Staz-On ink.
2.  Flip the stamped image over and paint directly on the acetate just as you would a paint-by-numbers.  Paint several layers and allow brief time to dry between layers. 
3.  Paint a final layer of paint over the entire image and hold up to the light to reveal any "light" spots.  Dab those with paint.  Let dry.
4.  Turn painted image back over and apply double stick tape to the edges. 
5.  Adhere painted image to standard white cardstock or color of your choice.  Apply to underside of top flap of precut and assembled card base.   
6.  Apply embellishments using Zip Dry Glue and VOILA!

Note::  I used a variety of lavender paints to color the iris, two shades of green for the stems and leaves, and a little orange-yellow for the flower centers.  After painting the flower portions, I painted over everything with a robins egg blue color. 

Today the hop includes three locations:

ME!
The fabulous HC designer OLENA LEVCHENKO
and Scrap-Mart's very own Katie Piotrowski

You can also check out the WHOLE LINEUP BELOW:


Enjoy the rest of the HOP and
HAVE A FABULOUS FRIDAY!

Sunday, March 6, 2011

Hop, Hop, Hop...

This week, I'm joining other Heartfelt Creations Designers AND Scrap-Mart designers for a fun blog hop.  This hop will feature Heartfelt Creations Stamps and Dies that can be purchased through Heartfelt Creations and through Scrap-Mart. 

Here's the Scrap-Mart Blog Hop schedule:

Sunday, March 6th
Monday, March 7th
Tuesday, March 8th
Wednesday, March 9th
Thursday, March 10th
Friday, March 11th
Saturday, March 12th

So check out the hop each and every day...Come back to my blog on Friday to see what I've got to share!!!